On This Page
Configuring Manual Static Access
If the broadcast SSID is not enabled for your Wi-Fi network, the terminal cannot detect your network. You must manually configure static access to your network. Adding a static network manually is very similar to adding a normal static network. The difference is that you cannot choose the network from a list on the terminal so you must manually enter the network name.
- On the IDLE screen, tapSettings.
- Touch the password field to display a keyboard. Enter 9876 as the Settings password, tap the green check mark at the bottom of the keyboard, and chooseOK.
ADDITIONAL INFORMATION

- In the Settings list that appears, slide theWi-Fitoggle switch to the right to enable Wi-Fi. The switch is green when enabled.
ADDITIONAL INFORMATION

- Tap theWi-Fifield. The Wi-Fi screen appears, listing the detected Wi-Fi networks.
- On the upper-right corner of the Wi-Fi screen, tap the three vertical dots and chooseAdd network. The Add network screen appears.
ADDITIONAL INFORMATION

- On the Add network screen, in theNetwork namefield, enter the SSID for the Wi-Fi network. This field is case-sensitive.
ADDITIONAL INFORMATION

- Touch theSecurityfield and choose a security type from the drop-down menu.
- If the selected type of security prompts for a password, enter the password to access the network. Passwords are case-sensitive.
- TapAdvanced Optionsand scroll upward to view additional fields.
ADDITIONAL INFORMATION
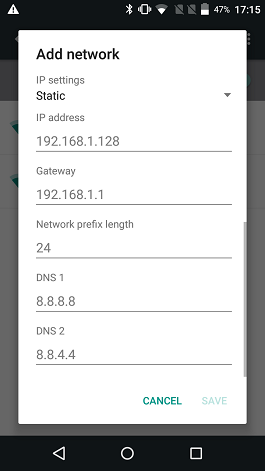
- From theIP settingsdrop-down menu, chooseStatic.
- In theIP addressfield, enter the static IP address.
- In theGatewayfield, enter the IP address for your gateway and scroll upward.
- In theNetwork prefix lengthfield, enter the prefix length for the subnetwork.
- In theDNS 1field, enter the IP address for the first domain name system server.
- In theDNS 2field, enter the IP address for the back-up domain name system server.
- To save the settings and return to the Wi-Fi screen, tapSave.
- In the Wi-Fi screen, tap the network that you just defined.
- Enter the password and tapConnect.