Acceptance Devices | Tap to Pay on Android Acceptance Devices App
Use the information in this section to use this guide and where to find further
information.
Audience and Purpose
This guide is written for partner developers, system architects, and independent software
vendors (ISVs) who wish to integrate their point-of-sale system with compatible Android
devices in a semi-integrated manner.
Implementing the Tap to Pay on Android Acceptance Devices App requires software development
skills. You must write code that uses the API request and response fields to integrate the
solution into your point-of-sale system.
Conventions
These statements appear in this document:
IMPORTANT
An
Important
statement contains information essential to
successfully completing a task or learning a concept.
WARNING
A
Warning
contains information or instructions, which, if not
heeded, can result in a security risk, irreversible loss of data, or significant cost in
time or revenue or both.
Support
For support information about any service, visit the Support Center:
Introduction to Acceptance Devices | Tap to Pay on Android Acceptance Devices App
The Tap to Pay on Android Acceptance Devices App enables partners to easily integrate
their point-of-sale (POS) systems with supported Android devices in a semi-integrated
manner using Local and Cloud modes. Leveraging the Acceptance Devices Android app and
using API requests, your POS system can accept payments by communicating with the
Android device over a local Wi-Fi network or the cloud.
The solution can also be operated in Standalone mode. This mode does not require
integration with a POS system and enables you to start transactions directly from the
Android device.
For more information about the modes available in the Acceptance Devices app, see:
Supports Google Mobile Services (GMS) and Google Play Store.
Android 12 or later operating system (OS), with a security update version of May
2022 or later. Android OS versions that do not receive security updates are not
supported.
Has hardware-backed keystore.
Contains near-field communication (NFC) enabled chip.
Automatic time and date detection are enabled.
Developer options are disabled.
Device is not rooted. This setting prevents you from changing system-level files
or settings.
Supported Payment Devices
The Tap to Pay on Android Acceptance Devices App supports validated payment devices that
meet compatibility requirements. For more information, see Compatibility Requirements for Android Devices.
The table lists supported payment devices. However, all models of supported devices are
not shown. If your device is not listed, contact your implementation manager for help
with determining whether the device is supported.
Compatible, Validated Payment Devices
Portable Devices
Kiosk Devices
Tablet Devices
Android compatible phones
Elo Touch 22-inch
iMin Falcon 2
Elo Touch M51
oona 22
MobiWire WM26 MobiTab
iMin Swift 2
Sunmi FLEX 3
oona 10
MobiWire MobiGo2+ Pro
Orderman HT10
MobiWire MP5 MobiPrint 5
Sunmi CPad
MobiWire WM19 MobiTap
Sunmi D3 MINI
Newland S90, S90 Pro
Sunmi V3 MIX
Orderman 10
Sunmi L3
Sunmi M3
Sunmi V3
Zebra EM45
Transaction Workflow for the Tap to Pay on Android Acceptance Devices App
This diagram shows the transaction workflow for the Tap to Pay on Android Acceptance
Devices App.
Figure:
Tap to Pay on Android Acceptance Devices App Transaction Workflow
The Tap to Pay on Android Acceptance Devices App workflow typically includes this
sequence of events:
The point-of-sale (POS) system, running on Windows, Android, or iOS, integrates to
the Tap to Pay on Android Acceptance Devices App APIs.
The merchant's POS system sends an API request, using the local Wi-Fi network or the
cloud, to the Acceptance Devices app that is running on the Android device.
The Acceptance Devices app user interface opens on the Android device and displays
prompts that guide the customer through the payment flow.
The Acceptance Devices app sends an API response to the POS system with the
transaction result and details, which completes the transaction.
PCI MPoC Standard Compliance
The Tap to Pay on Android Acceptance Devices app complies with the PCI Security Standards
Council (PCI SSC) Mobile Payments on COTS (MPoC) standard. This standard is typically
referred to as
PCI MPoC
. Compliance with this standard helps ensure secure and
reliable payment processing across supported Android devices.
The PCI-Certified MPoC Solution uses the Tap to Pay Ready app by Visa to meet PCI MPoC
software, attestation, and monitoring requirements. The app uses a transparent overlay
during payment processing to preserve the seamless UI experience. For app installation
instructions, see Install the Tap to Pay Ready App.
Using an app-to-app approach, payment processing is handled independently from your
point-of-sale (POS) application. Transactions are started in your POS app, securely
passed to the Tap to Pay Ready app for processing, and then returned to the original
app. This approach meets compliance requirements and helps you achieve these
benefits:
Reduces PCI compliance complexity
Lowers development and maintenance costs
Accelerates time-to-market
Enables seamless MPoC-related updates without affecting your app
For information about the PCI compliance status of the Tap to Pay on Android Solution,
see the PCI MPoC Solution Listing.
Transaction Workflow for the PCI-Certified MPoC Solution
This diagram shows the transaction workflow for the PCI-Certified MPoC Solution in the
Tap to Pay on Android Acceptance Devices app.
Figure:
PCI-Certified MPoC Solution Transaction Workflow
The PCI-Certified MPoC Solution workflow typically includes this sequence of events:
The Acceptance Devices app sends a request to the Tap to Pay Ready app to initiate a
secure switch to the other app. This activity is invisible to the customer, which
ensures that the UI experience is seamless.
The PCI-Certified MPoC Solution uses the Tap to Pay Ready app to provide a
transparent overlay to securely capture payment details.
The Tap to Pay Ready backend receives payment details from the Tap to Pay Ready app
to complete transaction processing.
Getting Started with the Acceptance Devices App
Use the information in this section to get started with using the Acceptance Devices app.
After you finish setting up the device and configuring the app, you can process
payments. For information about the types of payments services available in this
solution, see these topics:
To support PCI-compliant payment processing, the Tap to Pay Ready app must be
installed on your Android device. This app is a core component of the PCI-Certified
MPoC Solution that is used by the Tap to Pay on Android Acceptance Devices app to
process secure payment transactions.
IMPORTANT
This app must be installed before you can set up your Android
device.
Use one of these options to install the Tap to Pay Ready App:
Download the app from the Google Play store on your Android
device. No additional set up is required.
Follow these steps to set up the Android device in the Acceptance Devices
app:
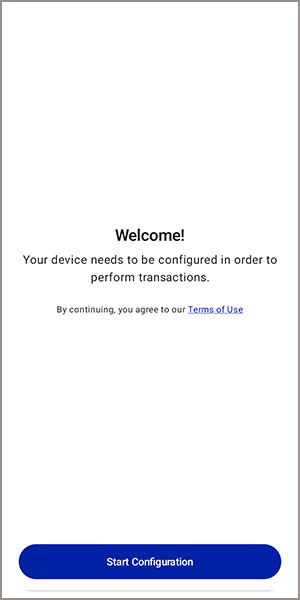
Open the Acceptance Devices App on the Android device.
On the Welcome screen, tap
Start Configuration
. The app
is configured to use the production environment. To switch to the test
environment or demo mode, press and hold the Welcome screen for 5 seconds. The
Select Environment screen appears. Choose an environment for configuration.
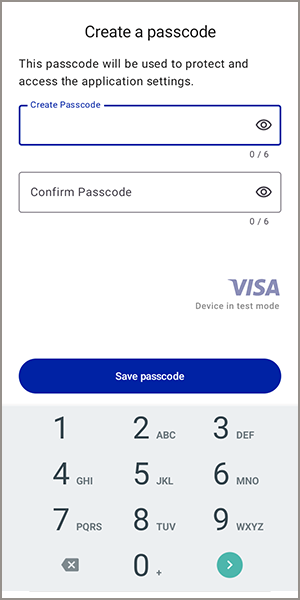
On the Create a Passcode screen, enter a unique passcode. The passcode must
consist of six digits. Confirm the passcode by entering it a second time, then
tap
Save Passcode
. You will use this passcode to access
the app, so choose a code that you will remember.
The app does not include an
option to reset the passcode. If you forget the code, you must reinstall the
Acceptance Devices app and complete the set-up process again.
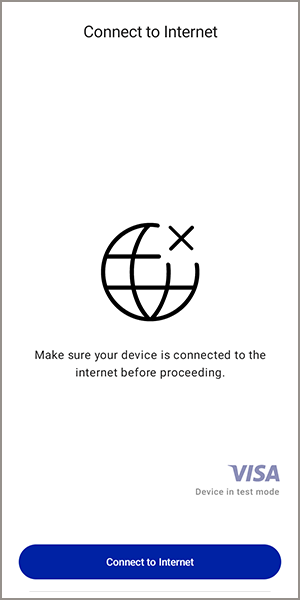
Check the internet connection status of your Android device:
When your device is not connected to the internet, the Connect to
Internet screen appears. Tap
Connect to Internet
, and
choose an internet connection option.
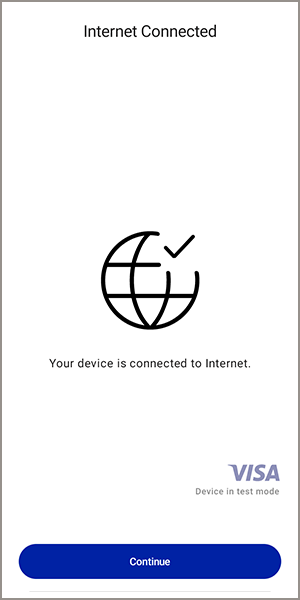
When your device is connected to the internet, the Internet Connected
screen appears. Tap
Activating an Android Device in the Acceptance Devices App
To process payments on your Android device using the Acceptance Devices app and your
point-of-sale (POS) system, you must use an activation code to activate the Android
device in the Acceptance Devices app. You can generate the code in the
Business Center
or by using an API request. After generating the activation code, you
must enter it in the Acceptance Devices app.
Generate an Android Device Activation Code in the
Business Center
Before activating the Android device in the Acceptance Devices app, you must generate a device
activation code.
You can generate an activation code in the
Business Center
. The code is valid
for 24 hours.
Follow these steps to generate an Android device activation code:
In the
Business Center
, go to the left navigation panel and choose
Acceptance Devices
>
Activation Codes
. The Activation Codes page
appears.
Click the
Select Transacting MID
drop-down menu.
Choose a transacting MID from the list.
Click the
Select number of Activation Codes
drop-down
menu.
Choose the number of activation codes that you want to generate. The maximum
number of codes is 15.
Click
Generate
. The activation codes display on the
page. To copy the codes to your clipboard, click the icon next to the
code.
To download a text file containing the activation codes, click the
Download codes as a .txt file
button.
Navigate to the Download folder on your computer to access the text file.
Generate an Android Device Activation Code Using a REST API Request
Before activating an Android device in the Acceptance Devices app, you must generate a
device activation code.
You can use a REST API request to generate a device activation code, which is valid for
24 hours.
You must authenticate each request that you send to a
Cybersource
API. In order to authenticate an API request, you can use a REST shared secret key or a
REST certificate. For more information about authentication requirements, see the
The POST request must include the transacting merchant ID (MID) that is sending the
request and the quantity of activation codes to be generated. You can request up to
15 activation codes in a single request.
Test:
POST
https://apitest.cybersource.com
/dms/v2/merchants/{transacting
mid}/activation-codes?size={number of activation codes}
Production:
POST
https://api.cybersource.com
/dms/v2/merchants/{transacting
mid}/activation-codes?size={number of activation codes}
Required Fields for Generating an Android Device Activation Code
The body of the API request is empty. The POST request must include the information
required to return the response.
REST Example: Generating an Android Device Activation Code
Request
The body of the request is empty. The POST request includes the information
required to return the response.
{
}
Response to a Successful Request
The response includes the activation code (
token
field)
and the amount of time (
ttl
field) that the activation
code is valid. The
ttl
field value is shown in
milliseconds. The activation code is valid for 24 hours.
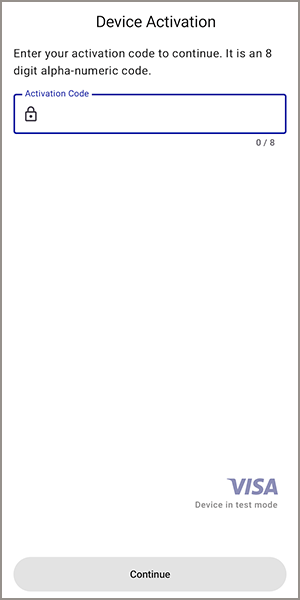
Enter an Activation Code in the Acceptance Devices App
Before activating an Android device, you must generate an activation code for the
device in the
Business Center
or by using a REST API request. The activation
code is valid for 24 hours.
Follow these steps to enter an activation code for an Android device in the Acceptance Devices
app:
On the Device Activation screen, enter the activation code that you generated.
Tap
Continue
.
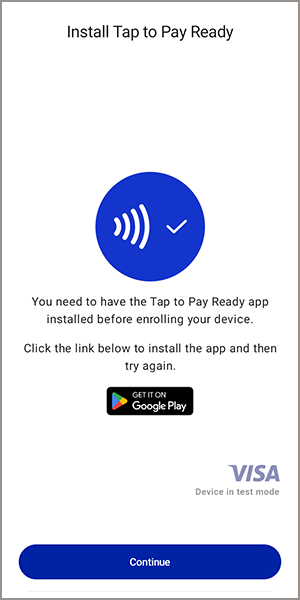
When the Tap to Pay Ready app is not installed on your Android device, you are
prompted to install the app. Tap the Google Play icon to install the app. When
installation is complete, return to the Acceptance Devices app and tap
Continue
.
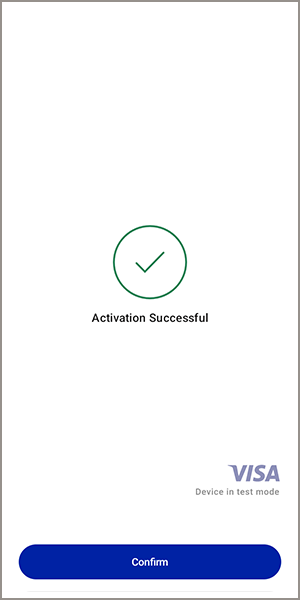
When the Tap to Pay Ready app is installed and the activation code is accepted,
the Activation Successful screen appears. Tap
Confirm
.
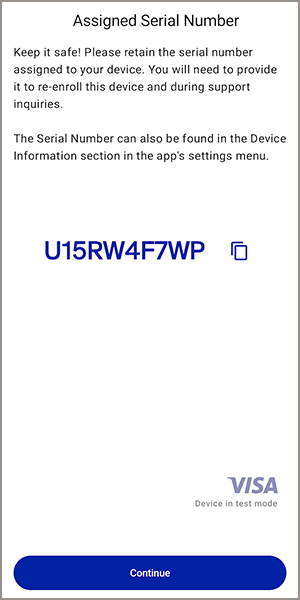
The Assigned Serial Number screen appears. Record the serial number assigned to
your device for future reference. You must provide the serial number when
re-enrolling a device or when communicating with customer support. Tap
Continue
.
AFTER COMPLETING THE TASK
If you are using the app in Local mode with Mutual Transport Layer Security (mTLS) enabled, you
must activate a secure mTLS connection between your point-of-sale (POS) system and
the Android device in the Acceptance Devices app. For more information, see Activating a Secure mTLS Connection.
If you are using the app in Local mode with Transport Layer Security (TLS) enabled or
in Cloud mode, you must start the Acceptance Devices app server. For more
information, see Starting the Acceptance Devices App Server.
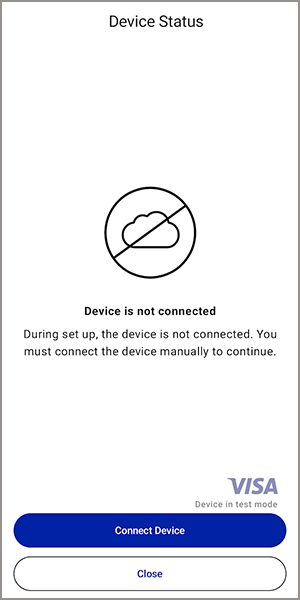
Starting the Acceptance Devices App Server
To process payments on your Android device using the Acceptance Devices app and your
point-of-sale (POS) system, you must start the Acceptance Devices app server on the
Android device.
Follow these steps to start the Acceptance Devices app server:
Before you start the server, the Device Status screen shows the
Device is
not connected
message. Tap
Connect Device
.
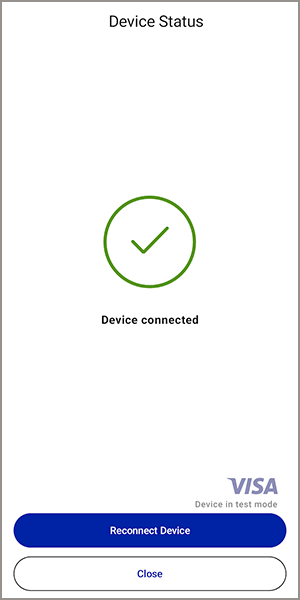
After you start the server, the Device Status screen shows the
Device
connected
message. The Android device is activated and ready to accept
transactions.
Tap the back navigation arrow to finish setting up.
Customizing the Acceptance Devices App
Use the information in this section to customize the Acceptance Devices app in the
Business Center
or by using a REST API request.
The Acceptance Devices Customizations feature in the
Business Center
enables you
to customize these parameters for a portfolio, merchant, or transacting merchant ID (MID):
User interface
Common
Local mode
Standalone mode
You can use a REST API request to perform these customization tasks:
Retrieve and review your current parameter customization settings.
Update customization settings for user interface, common, Local mode, and
Standalone mode parameters.
Customizable User Interface Parameters
You can customize these user interface parameters for the Acceptance Devices app when it
is in Local, Standalone, or Cloud mode.
Home screen logo
This parameter defines the logo that is shown on the home screen of the
app.
Toolbar logo
This parameter defines the logo that is shown during transaction processing.
Primary color
This parameter defines the color of the primary buttons.
Color on primary
This parameter defines the color of the text on the primary buttons.
Background color
This parameter defines the color of the screen background.
Color on background
This parameter defines the color of the text on the screen background.
Button shape
This parameter defines the shape of the buttons.
Customizable Common Parameters
You can customize these common parameters for the Acceptance Devices app when it is
operating in Local, Standalone, or Cloud mode.
Operating mode
This parameter enables you to choose one of these operating modes:
Semi-Integrated with Standalone:
The Acceptance Devices
app operates in Local and Standalone modes. This is the default
setting.
Semi-Integrated:
Acceptance Devices app operates in
Local mode only.
Standalone:
Acceptance Devices app operates in
Standalone mode only.
Cloud with Standalone:
Acceptance Devices app operates
in Cloud and Standalone modes.
Cloud:
Acceptance Devices app operates in Cloud mode
only.
Automatic receipt printing
This parameter enables the automatic printing of the merchant or customer
receipt after each transaction. This feature is available only on terminals with
integrated printers. The default setting is
Disabled
.
Accessibility options
This parameter enables accessibility features during transaction processing. For
example, voice-over capabilities that provide information to visually impaired
customers. The default setting is
True
.
Enable Offline mode
This parameter enables Offline mode, which you can use to process transactions
when an internet connection is not available. The default setting is
False
.
MOTO options
This parameter enables you to activate these MOTO options:
MOTO address required:
This parameter enables the
customer's address as a required data input for mail order or telephone
order (MOTO) transactions. The default setting is
True
.
MOTO show confirmation screen:
This parameter enables a
Confirmation screen to appear during MOTO transactions. The merchant
reviews and confirms the MOTO address data shown on the screen before
the payment is processed. The default setting is
False
.
MOTO CVV required:
This parameter enables the Card
Verification Value (CVV) as a required data input for MOTO transactions.
The default setting is
True
.
Offline transaction maximum amount
This parameter defines the maximum amount allowed for an offline
transaction.
Offline transaction batch maximum amount
This parameter defines the maximum amount allowed for an offline transaction
batch submitted for authorization.
Tipping options
This parameter enables you to choose one of these tipping types:
Percentage:
The customer chooses from three pre-defined
tip percentages or enters a custom tip amount. Define the tip values in
the Tipping percentage values parameter. This setting is the default
tipping type.
Tip amount:
The customer enters a custom tip
amount.
Total amount:
The customer enters the total amount to
be charged, including the tip amount.
Tipping percentage values
This parameter defines the three tipping percentage choices that appear on the
screen for the customer to choose. This parameter applies only if the Tipping
Type parameter is set to
Percentage
. The default settings are
10, 15, 20
.
Tipping confirmation screen
This parameter enables the Tipping Confirmation screen to appear on the device
when performing a sale with on-reader tipping. The customer reviews and confirms
the tip amount before the payment is processed. The default setting is
False
.
Transaction history view
This parameter defines whether the transaction history view is shown at the
merchant or device level. The default setting is
Merchant
.
Enable kiosk mode
This parameter enables Kiosk Mode on the PAX device. This mode locks the Acceptance Devices
app to the device screen. Users cannot exit the app or access other terminal
functions, which helps prevent unauthorized use. The default setting is
False
.
Customizable Local Mode Parameters
You can customize these Local mode parameters for the Acceptance Devices app.
Port
This parameter defines the port number used by the server on the terminal or
device. The default setting is
8443
.
Security
This parameter defines whether the server on the terminal or device uses two-way
verification (mTLS) or one-way verification (TLS). The default setting is
mTLS
.
Protocol
This parameter defines the protocol that is used to process transactions. The
default setting is
ADP
.
Signature capture type
This parameter defines whether the signature is captured on the terminal screen
or paper receipt, or is skipped. The default setting is
On
screen
.
Skip summary screen
This parameter disables the Summary screen from displaying after each
transaction. The default setting is
True
.
Customizable Standalone Mode Parameters
You can customize these Standalone mode parameters for the Acceptance Devices app.
Enable LAC installments
This parameter enables the processing of Latin America and the Caribbean (LAC)
installment payments. The default setting is
Disabled
.
Enable tax details
This parameter enables tax details to be shown in the app. The default setting
is
Disabled
.
Enable payment facilitator details
This parameters enables the payment facilitator details to be shown in the app.
The default setting is
Disabled
.
Additional transaction types
This parameter enables you to choose additional transaction types that the app
supports. Sale and refund transactions are supported by default. The default
setting for additional transaction types is
None
.
Customize Parameters in the
Business Center
Follow these steps to customize common, Local mode, and Standalone mode parameters
for the Acceptance Devices app.
In the
Business Center
, go to the left navigation panel and choose
Acceptance Devices
>
Customizations
. The Customizations screen appears.
Click the
Load customization parameter for
drop-down
menu.
Choose a user level from the list. Click
Load
.
Scroll down to see the various parameter sections and which elements are
available to customize for the chosen user level.
Choose parameters to customize. To see a description of a parameter, hover your
mouse over the Information icon.
Click
Apply Changes
.
Retrieve Parameters Using a REST API Request
You can use a REST API request to retrieve and view customizable parameters and their
current values. Your account settings determine the values you can view for a portfolio,
merchant, or transacting merchant ID (MID).
You must authenticate each request that you send to a
Cybersource
API. In
order to authenticate an API request, you can use a REST shared secret key or a REST
certificate. For more information about authentication requirements, see the
Required Fields to Retrieve Parameters Using a REST API Request
The body of the API request is empty. The GET request must include the information
required to return the response.
REST Example: Retrieve Parameters Using a REST API
Request
Request
The body of the request is empty. The GET request includes the information required
to return the response.
{
}
Response to a Successful Request
{
    "id": "{{organization id}}",
    "customizations": {
        Your configured parameters response data appears here.
    },
    "customizationMetadata": {
        Your possible values for parameters response data appears here.
    }
}
Customize Parameters Using a REST API Request
You can use a REST API request to update customizable parameters for a portfolio,
merchant, or transacting merchant ID (MID).
You must authenticate each request that you send to a
Cybersource
API. In
order to authenticate an API request, you can use a REST shared secret key or a REST
certificate. For more information about authentication requirements, see the
When using the solution in Local mode, the communication protocol used between the
Acceptance Devices app and the point-of-sale (POS) system is a single WebSocket channel.
Through this channel, simultaneous, two-way communication occurs between the Acceptance
Devices app and the POS system.
Retrieving the Root CA Certificate
When the app is operating in Local mode, you can validate the Acceptance Devices app
server’s certificate by adding the Root CA certificate to your trust store. This action
is required if you want to use an mTLS connection. For more information, see Activating a Secure mTLS Connection.
Use the information in this section to retrieve the Root CA certificate in the
Business Center
or by using an API request.
Retrieve the Root CA Certificate in the
Business Center
Follow these steps to retrieve the Root CA certificate in the Business Center:
In the
Business Center
, go to the left navigation panel and choose
Acceptance Devices > Activation Codes
. The Activation
Codes page appears.
Click
Download Root CA Certificate
. When the download is
complete, the browser window shows a download completion message.
In the local folder directory of your computer, navigate to the Download folder
to access the Root CA certificate file.
Retrieve the Root CA Certificate Using a REST API Request
You can use a REST API request to retrieve the Acceptance Devices app server’s Root CA
certificate when the app is operating in Local mode. You would then add the certificate
to your trust store.
You must authenticate each API request you send to a
Cybersource
API by using a REST shared secret key or a REST certificate. For more information about authentication
requirements, see the
Use the information in this section to activate a secure Mutual Transport Layer Security
(mTLS) connection. When the app is operating in Local mode, using a mTLS connection
creates an additional layer of security for communication between the Acceptance Devices
app running on your Android device and point-of-sale (POS) system.
Using the mTLS protocol is recommended because it employs two-way verification. The
minimum requirement for providing end-to-end data security is using the Transport Layer
Security (TLS) protocol.
Before activating an mTLS connection, you must retrieve the Root CA certificate. For more
information, see Retrieving the Root CA Certificate.
Endpoints
The endpoint is the same for the test and production environments.
Test:
POST https://{device IP address:port number}/ or wss://{device IP
address:port number}/
Production:
POST https://{device IP address:port number}/ or wss://{device IP
address:port number}/
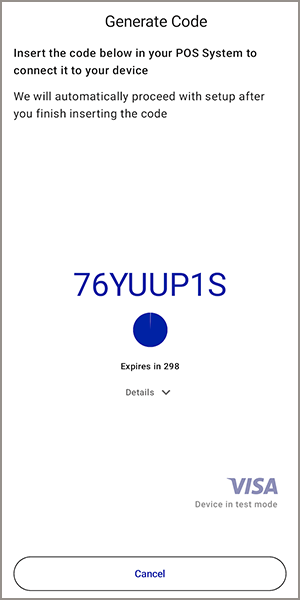
Generate a POS Connection Code for the Point-of-Sale System
To ensure the security of the data sent over the internet between your POS system and
Android device, you must establish a secure connection (sync) between your system
and the device. You must complete this task one time for each POS system you are
using.
If Mutual Transport Layer Security (mTLS) is enabled and the device activation is
complete, the Generate Code screen appears in the Acceptance Devices app.
Follow these steps to generate a POS connection code for a POS system in the
Acceptance Devices app:
On the Generate Code screen, tap
Generate Code
.
Record the eight-character code that appears on the screen. You will use this
code to request a certificate from the POS system. The screen shows an
expiration timer for the code, which refreshes every 300 seconds.
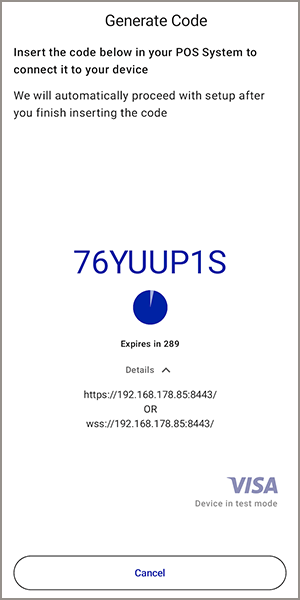
Request Certificates for the Point-of-Sale System
Before you can request certificates, you must generate a set-up code for the
point-of-sale (POS) system.
To finish activating the secure mTLS connection, request certificates for the POS
system by sending a request to the Android device through the POS system.
On the Generate Code screen, tap the
Details
arrow. The
Details section expands to show the HTTP and WSS (WebSocket) addresses and the
port number.
Record the HTTP and WSS addresses and port number shown in the Details section.
You will use this information to request a certificate through the POS system,
using the HTTPS or WSS address.
To request the certificates, send an API request through the POS system to the
HTTP or WSS address and port number, along with the POS connection code shown on
the Android device and a unique POS ID.
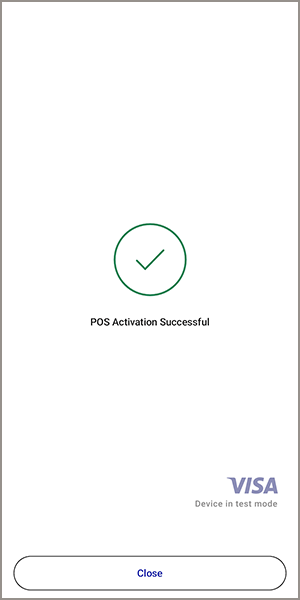
After the certificates are retrieved by the POS system and the sync between
your POS system and Android device is complete, the
POS Activation
Successful
message appears. Tap
Close
. The next
set-up screen appears.
Required Fields to Request Certificates for the Point-of-Sale System
posId
Set the value to a unique, user-defined ID for the POS system.
setupCode
Set the value to the POS connection code shown on the Generate POS
Connection Code screen in the Acceptance Devices app.
REST Example: Request Certificates for the Point-of-Sale System
Request
{
  "posId" : "123",
  "setupCode" : "8QW1YS1D"
}
Response to a Successful Request
The response includes the private key and certificates required to establish the
secure Mutual Transport Layer Security (mTLS) connection between the Android device
and POS system. For security reasons, this example does not show actual private key
and certificate response data.
-----BEGIN RSA PRIVATE KEY-----
Your RSA private key response data appears here.
-----END RSA PRIVATE KEY-----
-----BEGIN CERTIFICATE-----
Your certificate response data appears here.
-----END CERTIFICATE-----
-----BEGIN CERTIFICATE-----
Your certificate response data appears here.
-----END CERTIFICATE-----
-----BEGIN CERTIFICATE-----
Your certificate response data appears here.
-----END CERTIFICATE-----
Implement Hostname Validation in Local Mode
When operating in Local mode, your app can optionally perform hostname
validation for enhanced security. When the Android device is activated, a
certificate is generated on the device. The certificate includes a Subject
Alternative Name (SAN). This SAN appears as a Domain Name System (DNS) entry for the
Acceptance Devices app server.
This is the SAN format:
{terminal-serial-number}.cybs.seclib.io
.
To enable hostname validation or connect to the Android device using the SAN instead
of its IP address, update your system’s
hosts
file to include both
the terminal’s IP address and its corresponding SAN.
Sale
Use the information in this section to process a sale transaction when the app is in
Local mode. This type of transaction combines an authorization and a capture into a
single transaction.
Endpoints
The endpoint is the same for the test and production environments.
Test:
wss://{device IP address:port number}/
Production:
wss://{device IP address:port number}/
Required Fields for a Sale
type
Set the value to
PaymentRequest
.
merchantReferenceCode
Set the value to a unique, user-defined reference code. The code can
consist of up to 50 alphanumeric characters, underscores (_), and dashes
(-). Avoid using formatting that resembles a telephone number (XXX-XXX-XXXX)
or a Social Security number (XXX-XX-XXXX).
During the transaction, you might receive one or more update responses indicating the
current status of the transaction. You can choose to display these updates on your
point-of-sale (POS) system.
When the request is unsuccessful, you will receive an error response with details.
{
      "type": "ErrorResponse",
      "message": "Error message to display.",
      "developerDescription": "Detailed description of error."
}
Refund
Use the information in this section to process a refund when the app is in Local mode.
This type of refund includes a reference to the original transaction for a full or
partial transaction amount. Stand-alone credits are also supported in this Acceptance
Devices solution. For more information, see Stand-Alone Credit.
Endpoints
The endpoint is the same for the test and production environments.
Test:
wss://{device IP address:port number}/
Production:
wss://{device IP address:port number}/
Required Fields for a Refund
type
Set the value to
LinkedRefundRequest
.
transactionId
Set the value to the
id
field value from the original
transaction.
Optional Fields for a Refund
Use the optional amount and currency fields to process a partial refund. Otherwise,
the full amount will be refunded.
During the transaction, you might receive one or more update responses indicating the
current status of the transaction. You can choose to display these updates on your
point-of-sale (POS) system.
When the request is unsuccessful, you will receive an error response with details.
{
      "type": "ErrorResponse",
      "message": "Error message to display.",
      "developerDescription": "Detailed description of error."
}
Stand-Alone Credit
Use the information in this section to process a stand-alone credit when the app is in
Local mode. This type of transaction is used to process a credit without reference to
the original transaction. The customer is required to present their card for this type
of transaction.
WARNING
When processing a stand-alone credit, there is no limit on the credit
amount because there is no reference to the original transaction amount. The
recommendation is to use a refund transaction whenever possible. For more information,
see Refund.
Endpoints
The endpoint is the same for the test and production environments.
Test:
wss://{device IP address:port number}/
Production:
wss://{device IP address:port number}/
Required Fields for a Stand-Alone Credit
type
Set the value to
StandaloneRefundRequest
.
merchantReferenceCode
Set the value to a unique, user-defined reference code. The code can
consist of up to 50 alphanumeric characters, underscores (_), and dashes
(-). Avoid using formatting that resembles a telephone number (XXX-XXX-XXXX)
or a Social Security number (XXX-XX-XXXX).
During the transaction, you might receive one or more update responses indicating the current status of the transaction. You can choose to display these updates on your point-of-sale (POS) system.
When the request is unsuccessful, you will receive an error response with details.
{
      "type": "ErrorResponse",
      "message": "Error message to display.",
      "developerDescription": "Detailed description of error."
}
Check Transaction Status
Use the information in this section to request a check transaction status when the app is
in Local mode. This transaction is used to obtain response data for a transaction that
was lost or timed out.
Endpoints
The endpoint is the same for the test and production environments.
Test:
wss://{device IP address:port number}/
Production:
wss://{device IP address:port number}/
Required Fields to Request a Check Transaction Status
During the transaction, you might receive one or more update responses indicating the
current status of the transaction. You can choose to display these updates on your
point-of-sale (POS) system.
When the request is unsuccessful, you will receive an error response with details.
{
      "type": "ErrorResponse",
      "message": "Error message to display.",
      "developerDescription": "Detailed description of error."
}
Cancel Transaction
Use the information in this section to process a cancel transaction request in Local
mode. This request is sent to interrupt an in-process transaction.
Endpoints
The endpoint is the same for the test and production environments.
Test:
wss://{device IP address:port number}/
Production:
wss://{device IP address:port number}/
Required Fields to Cancel Transaction
type
Set the value to
CancelRequest
.
REST Example: Cancel Transaction
Request
{
      "type": "CancelRequest"
}
Mid-Transaction Status Updates
During the transaction, you might receive one or more update responses indicating the
current status of the transaction. You can choose to display these updates on your
point-of-sale (POS) system.
When the request is unsuccessful, you will receive an error response with details.
{
      "type": "ErrorResponse",
      "message": "Error message to display.",
      "developerDescription": "Detailed description of error."
    }
Sale with On-Reader Tipping
Use the information in this section to process a sale with on-reader tipping in Local
mode. At the start of each transaction, the Android device prompts the customer to add a
tip by showing suggested tip amounts. The customer selects or enters a tip amount on the
device before presenting their payment card.
Endpoints
The endpoint is the same for the test and production environments.
Test:
wss://{device IP address:port number}/
Production:
wss://{device IP address:port number}/
Required Fields for a Sale with On-Reader Tipping
type
Set the value to
PaymentRequest
.
merchantReferenceCode
Set the value to a unique, user-defined reference code. The code can
consist of up to 50 alphanumeric characters, underscores (_), and dashes
(-). Avoid using formatting that resembles a telephone number (XXX-XXX-XXXX)
or a Social Security number (XXX-XX-XXXX).
During the transaction, you might receive one or more update responses indicating the
current status of the transaction. You can choose to display these updates on your
point-of-sale (POS) system.
When the request is unsuccessful, you will receive an error response with details.
{
      "type": "ErrorResponse",
      "message": "Error message to display.",
      "developerDescription": "Detailed description of error."
}
Pre-Authorization
Use the information in this section to process a pre-authorization for an initial amount
in Local mode. A pre-authorization transaction places a temporary hold on the customer's
payment card, which can be captured at a later time.
Most authorizations expire in 5 to 7 days. The issuing bank sets the length of time
before expiration. When an authorization expires with the issuing bank, your bank or
processor might require you to re-submit an authorization request and include a request
for capture in the same message. For more information, see Capture.
Endpoints
The endpoint is the same for the test and production environments.
Test:
wss://{device IP address:port number}/
Production:
wss://{device IP address:port number}/
Required Fields for a Pre-Authorization
type
Set the value to
PaymentRequest
.
merchantReferenceCode
Set the value to a unique, user-defined reference code. The code can
consist of up to 50 alphanumeric characters, underscores (_), and dashes
(-). Avoid using formatting that resembles a telephone number (XXX-XXX-XXXX)
or a Social Security number (XXX-XX-XXXX).
During the transaction, you might receive one or more update responses indicating the
current status of the transaction. You can choose to display these updates on your
point-of-sale (POS) system.
When the request is unsuccessful, you will receive an error response with details.
{
      "type": "ErrorResponse",
      "message": "Error message to display.",
      "developerDescription": "Detailed description of error."
}
Incremental Authorization
Use the information in this section to process an incremental authorization in Local
mode. This type of request can be made on a pre-authorization transaction to increase
the authorized amount before it is captured.
Endpoints
The endpoint is the same for the test and production environments.
During the transaction, you might receive one or more update responses indicating the
current status of the transaction. You can choose to display these updates on your
point-of-sale (POS) system.
When the request is unsuccessful, you will receive an error response with details.
{
      "type": "ErrorResponse",
      "message": "Error message to display.",
      "developerDescription": "Detailed description of error."
}
Capture
Use the information in this section to capture a pre-authorized transaction in Local
mode. The capture request references the approved pre-authorization request.
Endpoints
The endpoint is the same for the test and production environments.
Test:
wss://{device IP address:port number}/
Production:
wss://{device IP address:port number}/
Required Fields for a Capture
type
Set the value to
CaptureRequest
.
transactionId
Set the value to the
id
field value from the original
transaction.
Optional Fields for a Capture
Use the optional amount and currency fields to process a partial capture. Otherwise,
the full amount will be captured.
During the transaction, you might receive one or more update responses indicating the
current status of the transaction. You can choose to display these updates on your
point-of-sale (POS) system.
When the request is unsuccessful, you will receive an error response with details.
{
      "type": "ErrorResponse",
      "message": "Error message to display.",
      "developerDescription": "Detailed description of error."
}
Sale with Installment Details
Use the information in this section to process a sale transaction with installment
details when the app is in Local mode. This type of transaction can be used to include
the required installment details as part of the sale transaction.
This transaction is available only in the Latin American & Caribbean (LAC)
region.
Endpoints
The endpoint is the same for the test and production environments.
Test:
wss://{device IP address:port number}/
Production:
wss://{device IP address:port number}/
Required Fields for a Sale with Installment Details
type
Set the value to
PaymentRequest
.
merchantReferenceCode
Set the value to a unique, user-defined reference code. The code can
consist of up to 50 alphanumeric characters, underscores (_), and dashes
(-). Avoid using formatting that resembles a telephone number (XXX-XXX-XXXX)
or a Social Security number (XXX-XX-XXXX).
amountDetails.amount
Set the value to the transaction amount.
amountDetails.currency
Set the value to the currency code.
Optional Fields for a Sale with Installment Details
During the transaction, you might receive one or more update responses indicating the
current status of the transaction. You can choose to display these updates on your
point-of-sale (POS) system.
When the request is unsuccessful, you will receive an error response with details.
{
      "type": "ErrorResponse",
      "message": "Error message to display.",
      "developerDescription": "Detailed description of error."
}
Sale with Payment Facilitator Details
Use the information in this section to process a sale transaction with payment
facilitator details when the app is in Local mode. This type of transaction can be used
to include the required payment facilitator details as part of the sale transaction.
Endpoints
The endpoint is the same for the test and production environments.
Test:
wss://{device IP address:port number}/
Production:
wss://{device IP address:port number}/
Required Fields for a Sale with Payment Facilitator Details
type
Set the value to
PaymentRequest
.
merchantReferenceCode
Set the value to a unique, user-defined reference code. The code can
consist of up to 50 alphanumeric characters, underscores (_), and dashes
(-). Avoid using formatting that resembles a telephone number (XXX-XXX-XXXX)
or a Social Security number (XXX-XX-XXXX).
amountDetails.amount
Set the value to the transaction amount.
amountDetails.currency
Set the value to the currency code.
Optional Fields for a Sale with Payment Facilitator Details
Use one or more of the optional
merchantDetails
fields to provide
the required payment facilitator details.
merchantDetails.salesOrganizationId
Set the value to the sales organization identifier.
merchantDetails.subMerchantId
Set the value to the sub-merchant identifier.
merchantDetails.descriptorName
Set the value to the descriptor name.
REST Example: Sale with Payment Facilitator Details
During the transaction, you might receive one or more update responses indicating the
current status of the transaction. You can choose to display these updates on your
point-of-sale (POS) system.
When the request is unsuccessful, you will receive an error response with details.
{
      "type": "ErrorResponse",
      "message": "Error message to display.",
      "developerDescription": "Detailed description of error."
}
Sale with Tax Details
Use the information in this section to process a sale transaction with tax details when
the app is in Local mode. This type of transaction can be used to include the required
tax details as part of the sale transaction.
Endpoints
The endpoint is the same for the test and production environments.
Test:
wss://{device IP address:port number}/
Production:
wss://{device IP address:port number}/
Required Fields for a Sale with Tax Details
type
Set the value to
PaymentRequest
.
merchantReferenceCode
Set the value to a unique, user-defined reference code. The code can
consist of up to 50 alphanumeric characters, underscores (_), and dashes
(-). Avoid using formatting that resembles a telephone number (XXX-XXX-XXXX)
or a Social Security number (XXX-XX-XXXX).
During the transaction, you might receive one or more update responses indicating the
current status of the transaction. You can choose to display these updates on your
point-of-sale (POS) system.
When the request is unsuccessful, you will receive an error response with details.
{
      "type": "ErrorResponse",
      "message": "Error message to display.",
      "developerDescription": "Detailed description of error."
}
Sale with Lodging Details
Use this information to process a sale transaction with lodging details in Local mode.
This transaction includes required lodging details as part of the sale transaction.
Endpoints
The endpoint is the same for the test and production environments.
Test:
wss://{terminal IP address:port number}/
Production:
wss://{terminal IP address:port number}/
Required Fields for a Sale with Lodging Details
type
Set this field to
PaymentRequest
.
merchantReferenceCode
Set this field to a unique, user-defined reference code. The code can
consist of up to 50 alphanumeric characters, underscores (_), and dashes
(-). Avoid using formatting that resembles a telephone number (XXX-XXX-XXXX)
or a Social Security number (XXX-XX-XXXX).
amountDetails.amount
Set this field to the transaction amount.
amountDetails.currency
Set this field to the currency code.
Optional Fields for a Sale with Lodging Details
Use one or more of the optional fields to include additional details in the
transaction.
lodgingDetails.duration
Set this field to the number of nights of the lodging stay.
lodgingDetails.checkInDate
Set this field to the check-in date in MMDDYY format.
lodgingDetails.checkOutDate
Set this field to the check-out date in MMDDYY format.
lodgingDetails.guestSmokingPreference
Set this field to
Y
or
N
to indicate the
guest's smoking preference.
lodgingDetails.numberOfGuests
Set this field to the number of guests.
lodgingDetails.numberOfRoomsBooked
Set this field to the number of rooms booked.
lodgingDetails.guestName
Set this field to the name of the guest.
lodgingDetails.roomLocation
Set this field to the room location description.
lodgingDetails.roomTaxElements
Set this field to the applicable room tax elements.
lodgingDetails.roomBedType
Set this field to the type of bed in the room.
lodgingDetails.roomRateType
Set this field to the room rate type.
lodgingDetails.specialProgramCode
Set this field to the special program code.
lodgingDetails.dailyRoomRate1
Set this field to the daily room rate for the first rate tier.
lodgingDetails.dailyRoomRate2
Set this field to the daily room rate for the second rate tier.
lodgingDetails.dailyRoomRate3
Set this field to the daily room rate for the third rate tier.
lodgingDetails.roomNights1
Set this field to the number of nights at the first rate tier.
lodgingDetails.roomNights2
Set this field to the number of nights at the second rate tier.
lodgingDetails.roomNights3
Set this field to the number of nights at the third rate tier.
lodgingDetails.corporateClientCode
Set this field to the corporate client code.
lodgingDetails.promotionalCode
Set this field to the promotional code.
lodgingDetails.additionalCoupon
Set this field to an additional coupon code.
lodgingDetails.travelAgencyCode
Set this field to the travel agency code.
lodgingDetails.travelAgencyName
Set this field to the name of the travel agency.
lodgingDetails.customerServicePhoneNumber
Set this field to the customer service phone number.
lodgingDetails.tax
Set this field to the total tax amount.
lodgingDetails.prepaidCost
Set this field to the prepaid cost amount.
lodgingDetails.foodAndBeverageCost
Set this field to the food and beverage cost.
lodgingDetails.roomTax
Set this field to the room tax amount.
lodgingDetails.adjustmentAmount
Set this field to the adjustment amount.
lodgingDetails.phoneCost
Set this field to the phone cost.
lodgingDetails.restaurantCost
Set this field to the restaurant cost.
lodgingDetails.roomServiceCost
Set this field to the room service cost.
lodgingDetails.miniBarCost
Set this field to the mini bar cost.
lodgingDetails.laundryCost
Set this field to the laundry cost.
lodgingDetails.miscellaneousCost
Set this field to the miscellaneous cost.
lodgingDetails.giftShopCost
Set this field to the gift shop cost.
lodgingDetails.movieCost
Set this field to the movie cost.
lodgingDetails.healthClubCost
Set this field to the health club cost.
lodgingDetails.valetParkingCost
Set this field to the valet parking cost.
lodgingDetails.cashDisbursementCost
Set this field to the cash disbursement cost.
lodgingDetails.nonRoomCost
Set this field to the non-room cost.
lodgingDetails.businessCenterCost
Set this field to the business center cost.
lodgingDetails.loungeBarCost
Set this field to the lounge or bar cost.
lodgingDetails.transportationCost
Set this field to the transportation cost.
lodgingDetails.gratuityCost
Set this field to the gratuity cost.
lodgingDetails.conferenceRoomCost
Set this field to the conference room cost.
lodgingDetails.audioVisualCost
Set this field to the audio/visual equipment cost.
During the transaction, you might receive one or more update responses indicating the
current status of the transaction. You can choose to display these updates on your
point-of-sale (POS) system.
When the request is unsuccessful, you receive an error response with details.
{
      "type": "ErrorResponse",
      "message": "Error message to display.",
      "developerDescription": "Detailed description of error."
}
Custom Screens
Use this information to send a custom screen request in Local mode. This feature enables
you to show one or more customized screens on the payment terminal. Custom screen can
show informational text, collect text input, or capture a digital signature.
Endpoints
The endpoint is the same for the test and production environments.
Test:
wss://{terminal IP address:port number}/
Production:
wss://{terminal IP address:port number}/
Required Fields for Custom Screens
type
Set this field to
CustomScreenRequest
.
screens
Set this field to a list of one or more screen objects. Each screen must
include a
screenType
field to identify the type of custom
screens to show on the payment terminal.
Required Fields for Custom Screens by Screen Type
Use these fields to define the required content for each custom screen in the
screens
field. Each screen in this field must include a
screenType
field that identifies the type of custom screen to
show on the payment terminal. The
screens
field supports these
screenType
values:
textDisplay
,
textInput
, and
signatureCapture
.
textDisplay
Screen
screens[n].screenType
Set this field to
textDisplay
.
screens[n].title
Set this field to the screen title. The title cannot exceed 20
characters.
textInput
Screen
screens[n].screenType
Set this field to
textInput
.
screens[n].title
Set this field to the screen title. The title cannot exceed 20
characters.
screens[n].textInputs
Set this field to a list of one or more text input fields.
screens[n].textInputs[n].textInputLabel
Set this field to the label for the input field. The label cannot exceed 25
characters.
Set this field to the error message displayed when the input does not match
the pattern.
screens[n].toggles
Set this field to a list of toggle items for the cardholder to accept or
decline.
screens[n].toggles[n].label
Set this field to the label displayed next to the toggle. The label cannot
exceed 40 characters.
screens[n].toggles[n].required
Set this field to
true
to require the cardholder to enable
the toggle before proceeding. The default value is
false
.
REST Example: Custom Screens
Request
{
    "type": "CustomScreenRequest",
    "screens": [
        {
            "screenType": "signatureCapture",
            "title": "Confirm Receipt",
            "description": "I certify that I am the authorized representative to receive these goods...",
            "isSkippable": false
        },
        {
            "screenType": "textDisplay",
            "title": "Liability Waiver",
            "description": "By proceeding, you acknowledge inspection of goods...",
            "isSkippable": false,
            "toggles": [
                {
                    "label": "I accept the terms",
                    "required": true
                }
            ]
        },
        {
            "screenType": "textInput",
            "title": "Purchase Order (PO)",
            "description": "Please enter the authorized Purchase Order (PO) number...",
            "isSkippable": false,
            "textInputs": [
                {
                    "textInputLabel": "Authorized PO Number",
                    "textInputHint": "PO518736",
                    "textInputConfig": {
                        "textInputType": "ALPHANUMERIC",
                        "masked": true,
                        "length": {
                            "min": 5,
                            "max": 10
                        },
                        "patternConfig": {
                            "pattern": "^[a-zA-Z0-9]*$",
                            "patternError": "Only letters and numbers allowed"
                        }
                    }
                }
            ],
            "toggles": [
                {
                    "label": "I accept the terms",
                    "required": true
                }
            ]
        }
    ]
}
Mid-Transaction Status Updates
During the operation, you might receive one or more update responses indicating the
current status of the operation. You can choose to display these updates on your
point-of-sale (POS) system.
{
      "type": "OperationStatusResponse",
      "message": "Status update to display."
}
When the request is unsuccessful, you receive an error response with details.
{
          "type": "ErrorResponse",
          "message": "Error message to display.",
          "developerDescription": "Detailed description of error."
}
Cloud Mode Payment Services
Use the information in this section to process payment services featured in the
Acceptance Devices app when operated in Cloud mode. In this mode, the point-of-sale
(POS) system communicates over the cloud with the Acceptance Devices app on the Android
device.
For information about other modes available in the Acceptance Devices app, see:
When operating the solution in Cloud mode, the communication protocol used between the
Acceptance Devices app and the point-of-sale (POS) system is a single HTTPS request to
the backend.
The transaction response can be sent either synchronously or asynchronously:
Synchronously
The POS system keeps the connection open until the transaction is completed
and the response is provided with the full transaction details. The backend
timeout setting is 180 seconds.
Asynchronously
The POS system receives a response with an interaction identifier after the
transaction is started. The interaction identifier can then be used to check
the transaction events. After the transaction is completed, the interaction
identifier can be used to get the transaction identifier. The transaction
identifier can then be used to get the full transaction and receipt details.
For more information, see Receiving Transaction Responses Asynchronously.
Generating a Bearer Token for Authentication
Use the information in this section to generate a bearer token for authentication. A unique bearer
token is required to authenticate each payment transaction request when the app is in
Cloud mode.
Generate a Bearer Token for Authentication
You must generate a new bearer token before sending each transaction request.
IMPORTANT
Meta keys are not supported for bearer token generation.
Follow these steps to generate a bearer token:
Create a P12 certificate for the transacting merchant ID (MID).
Construct a message using a JSON web Token (JWT) by following the steps shown
in the
Use the JWT as the bearer token to authenticate the payment transaction request.
Sale
Use the information in this section to process a sale transaction when the app is in Cloud mode.
This transaction combines an authorization and a capture into a single transaction.
When the request is unsuccessful, you will receive an error response with details.
{
      "type": "ErrorResponse",
      "message": "Error message to display.",
      "developerDescription": "Detailed description of error."
}
Refund
Use the information in this section to process a refund when the app is in Cloud mode. This type of
refund includes a reference to the original transaction for a full or partial
transaction amount. Stand-alone credits are also supported in this Acceptance Devices
solution. For more information, see Stand-Alone Credit.
When the request is unsuccessful, you will receive an error response with details.
{
      "type": "ErrorResponse",
      "message": "Error message to display.",
      "developerDescription": "Detailed description of error."
}
Stand-Alone Credit
Use the information in this section to process a stand-alone credit in Cloud mode. This type of
transaction is used to process a credit without reference to the original transaction.
The customer is required to present their card for this type of transaction.
WARNING
When processing a stand-alone credit, there is no limit on the credit
amount because there is no reference to the original transaction amount. The
recommendation is to use a refund whenever possible. For more information, see Refund.
When the request is unsuccessful, you will receive an error response with details.
{
      "type": "ErrorResponse",
      "message": "Error message to display.",
      "developerDescription": "Detailed description of error."
}
Check Transaction Status
Use the information in this section to request a check transaction status in Cloud mode. This
transaction is used to obtain response data for a transaction that was lost or timed
out.
When the request is unsuccessful, you will receive an error response with details.
{
      "type": "ErrorResponse",
      "message": "Error message to display.",
      "developerDescription": "Detailed description of error."
}
Cancel Transaction
Use the information in this section to process a cancel transaction request in Cloud mode. This
request is sent to interrupt an in-process transaction.
When the request is unsuccessful, you will receive an error response with details.
{
      "type": "ErrorResponse",
      "message": "Error message to display.",
      "developerDescription": "Detailed description of error."
    }
Sale with On-Reader Tipping
Use the information in this section to process a sale with on-reader tipping in Cloud mode. At the
start of each transaction, the Android device prompts the customer to add a tip by
showing suggested tip amounts. The customer selects or enters a tip amount on the
Android device before presenting their payment card.
When the request is unsuccessful, you will receive an error response with details.
{
      "type": "ErrorResponse",
      "message": "Error message to display.",
      "developerDescription": "Detailed description of error."
}
Pre-Authorization
Use the information in this section to process a pre-authorization for an initial amount in Cloud
mode. A pre-authorization transaction places a temporary hold on the customer's payment
card, which can be captured at a later time.
Most authorizations expire in 5 to 7 days. The issuing bank sets the length of time
before expiration. When an authorization expires with the issuing bank, your bank or
processor might require you to re-submit an authorization request and include a request
for capture in the same message.
When the request is unsuccessful, you will receive an error response with details.
{
      "type": "ErrorResponse",
      "message": "Error message to display.",
      "developerDescription": "Detailed description of error."
}
Incremental Authorization
Use the information in this section to process an incremental authorization in Cloud mode. This
type of request can be made on a pre-authorization transaction to increase the
authorized amount before it is captured.
When the request is unsuccessful, you will receive an error response with details.
{
      "type": "ErrorResponse",
      "message": "Error message to display.",
      "developerDescription": "Detailed description of error."
}
Capture
Use the information in this section to capture a pre-authorized transaction in Cloud mode. The
capture request references the approved pre-authorization request.
When the request is unsuccessful, you will receive an error response with details.
{
      "type": "ErrorResponse",
      "message": "Error message to display.",
      "developerDescription": "Detailed description of error."
}
Sale with Installment Details
Use the information in this section to process a sale transaction with installment details when
the app is in Cloud mode. This type of transaction can be used to include the required
installment details as part of the sale transaction.
When the request is unsuccessful, you will receive an error response with details.
{
      "type": "ErrorResponse",
      "message": "Error message to display.",
      "developerDescription": "Detailed description of error."
}
Sale with Payment Facilitator Details
Use the information in this section to process a sale transaction with payment facilitator details
when the app is in Cloud mode. This type of transaction can be used to include the
required payment facilitator details as part of the sale transaction.
When the request is unsuccessful, you will receive an error response with details.
{
      "type": "ErrorResponse",
      "message": "Error message to display.",
      "developerDescription": "Detailed description of error."
}
Sale with Tax Details
Use the information in this section to process a sale transaction with tax details when
the app is in Cloud mode. This type of transaction can be used to include the required
tax details as part of the sale transaction.
When the request is unsuccessful, you will receive an error response with details.
{
      "type": "ErrorResponse",
      "message": "Error message to display.",
      "developerDescription": "Detailed description of error."
}
Sale with Lodging Details
Use this information to process a sale transaction with lodging details in Cloud mode.
This transaction includes required lodging details as part of the sale transaction.
Endpoints
Test:
POST
https://terminalstest.cybersource.com/v1/cloud/transactions
Production:
POST
https://terminals.cybersource.com/v1/cloud/transactions
Required Fields for a Sale with Lodging Details
serialNumber
Set this field to the serial number of the terminal.
request.type
Set this field to
PaymentRequest
.
request.merchantReferenceCode
Set this field to a unique, user-defined reference code. The code can
consist of up to 50 alphanumeric characters, underscores (_), and dashes
(-). Avoid using formatting that resembles a telephone number
(XXX-XXX-XXXX) or a Social Security number (XXX-XX-XXXX).
request.amountDetails.amount
Set this field to the transaction amount.
request.amountDetails.currency
Set this field to the currency code.
Optional Fields for a Sale with Lodging Details
Use one or more of the optional fields to include additional details in the
transaction.
request.lodgingDetails.duration
Set this field to the number of nights of the lodging stay.
request.lodgingDetails.checkInDate
Set this field to the check-in date in MMDDYY format.
request.lodgingDetails.checkOutDate
Set this field to the check-out date in MMDDYY format.
request.lodgingDetails.guestSmokingPreference
Set this field to
Y
or
N
to indicate the
guest's smoking preference.
request.lodgingDetails.numberOfGuests
Set this field to the number of guests.
request.lodgingDetails.numberOfRoomsBooked
Set this field to the number of rooms booked.
request.lodgingDetails.guestName
Set this field to the name of the guest.
request.lodgingDetails.roomLocation
Set this field to the room location description.
request.lodgingDetails.roomTaxElements
Set this field to the applicable room tax elements.
request.lodgingDetails.roomBedType
Set this field to the type of bed in the room.
request.lodgingDetails.roomRateType
Set this field to the room rate type.
request.lodgingDetails.specialProgramCode
Set this field to the special program code.
request.lodgingDetails.dailyRoomRate1
Set this field to the daily room rate for the first rate tier.
request.lodgingDetails.dailyRoomRate2
Set this field to the daily room rate for the second rate tier.
request.lodgingDetails.dailyRoomRate3
Set this field to the daily room rate for the third rate tier.
request.lodgingDetails.roomNights1
Set this field to the number of nights at the first rate tier.
request.lodgingDetails.roomNights2
Set this field to the number of nights at the second rate tier.
request.lodgingDetails.roomNights3
Set this field to the number of nights at the third rate tier.
request.lodgingDetails.corporateClientCode
Set this field to the corporate client code.
request.lodgingDetails.promotionalCode
Set this field to the promotional code.
request.lodgingDetails.additionalCoupon
Set this field to an additional coupon code.
request.lodgingDetails.travelAgencyCode
Set this field to the travel agency code.
request.lodgingDetails.travelAgencyName
Set this field to the name of the travel agency.
request.lodgingDetails.customerServicePhoneNumber
Set this field to the customer service phone number.
request.lodgingDetails.tax
Set this field to the total tax amount.
request.lodgingDetails.prepaidCost
Set this field to the prepaid cost amount.
request.lodgingDetails.foodAndBeverageCost
Set this field to the food and beverage cost.
request.lodgingDetails.roomTax
Set this field to the room tax amount.
request.lodgingDetails.adjustmentAmount
Set this field to the adjustment amount.
request.lodgingDetails.phoneCost
Set this field to the phone cost.
request.lodgingDetails.restaurantCost
Set this field to the restaurant cost.
request.lodgingDetails.roomServiceCost
Set this field to the room service cost.
request.lodgingDetails.miniBarCost
Set this field to the mini bar cost.
request.lodgingDetails.laundryCost
Set this field to the laundry cost.
request.lodgingDetails.miscellaneousCost
Set this field to the miscellaneous cost.
request.lodgingDetails.giftShopCost
Set this field to the gift shop cost.
request.lodgingDetails.movieCost
Set this field to the movie cost.
request.lodgingDetails.healthClubCost
Set this field to the health club cost.
request.lodgingDetails.valetParkingCost
Set this field to the valet parking cost.
request.lodgingDetails.cashDisbursementCost
Set this field to the cash disbursement cost.
request.lodgingDetails.nonRoomCost
Set this field to the non-room cost.
request.lodgingDetails.businessCenterCost
Set this field to the business center cost.
request.lodgingDetails.loungeBarCost
Set this field to the lounge or bar cost.
request.lodgingDetails.transportationCost
Set this field to the transportation cost.
request.lodgingDetails.gratuityCost
Set this field to the gratuity cost.
request.lodgingDetails.conferenceRoomCost
Set this field to the conference room cost.
request.lodgingDetails.audioVisualCost
Set this field to the audio/visual equipment cost.
When the request is unsuccessful, you receive an error response with details.
{
      "type": "ErrorResponse",
      "message": "Error message to display.",
      "developerDescription": "Detailed description of error."
}
Custom Screens
Use this information to send a custom screen request in Cloud mode. This feature enables you to
show one or more customized screens on the payment terminal. Custom screen can show
informational text, collect text input, or capture a digital signature.
Endpoints
Test:
POST
https://terminalstest.cybersource.com/v1/cloud/transactions
Production:
POST
https://terminals.cybersource.com/v1/cloud/transactions
Required Fields for Custom Screens
serialNumber
Set this field to the serial number of the terminal.
request.type
Set this field to
CustomScreenRequest
.
request.screens
Set this field to a list of one or more screen objects. Each screen must
include a
screenType
field to identify the type of custom
screens to show on the payment terminal.
Required Fields for Custom Screens by Screen Type
Use these fields to define the required content for each custom screen in the
request.screens
field. Each screen in this field must include
a
screenType
field that identifies the type of custom screen to
show on the payment terminal. The
request.screens
field supports
these
screenType
values:
textDisplay
,
textInput
, and
signatureCapture
.
textDisplay
Screen
request.screens[n].screenType
Set this field to
textDisplay
.
request.screens[n].title
Set this field to the screen title. The title cannot exceed 20
characters.
textInput
Screen
request.screens[n].screenType
Set this field to
textInput
.
request.screens[n].title
Set this field to the screen title. The title cannot exceed 20
characters.
request.screens[n].textInputs
Set this field to a list of one or more text input fields.
request.screens[n].textInputs[n].textInputLabel
Set this field to the label for the input field. The label cannot exceed 25
characters.
When the request is unsuccessful, you receive an error response with details.
{
          "type": "ErrorResponse",
          "message": "Error message to display.",
          "developerDescription": "Detailed description of error."
}
Receiving Transaction Responses Asynchronously
Use the information in this section to receive transaction responses asynchronously when the app
is in Cloud mode. For information about a follow-on service for this type of request,
see Check Transaction Events.
POST
https://terminalstest.cybersource.com/v1/cloud/transactions/async
Production:
POST
https://terminals.cybersource.com/v1/cloud/transactions/async
Receive Transaction Responses Asynchronously
Asynchronous endpoints can be used to receive transaction responses for most types of
transaction requests when the app is in Cloud mode.
Follow these steps to receive transaction responses asynchronously:
Use the asynchronous endpoints shown in the example to process a transaction
and receive an interaction identifier. The example shows how to process a sale
asynchronously.
After the transaction is completed, use the interaction identifier returned in
the response to check the transaction events and to get a transaction
identifier.
Use the transaction identifier to process a Check Transaction Status request.
The response will contain full transaction and receipt details. For more
information, see Check Transaction Status.
When the request is unsuccessful, you will receive an error response with details.
{
      "type": "ErrorResponse",
      "message": "Error message to display.",
      "developerDescription": "Detailed description of error."
}
Check Transaction Events
Use the information in this section to process a Check Transaction Events request when the app is
in Cloud mode. This type of request is a follow-on service for receiving transaction
responses asynchronously. For more information, see Receiving Transaction Responses Asynchronously.
The GET request must include the interaction identifier
(
interactionId
).
Test:
GET
https://terminalstest.cybersource.com/v1/cloud/interactions/{interactionId}/events
Production:
GET
https://terminals.cybersource.com/v1/cloud/interactions/{interactionId}/events
Required Fields to Check Transaction Events
The body of the API request is empty. The GET request must include the information
required to return the response. If you want to receive only the latest transaction
event, set a query parameter of
limit=1
.
REST Example: Check Transaction Events
Request
The body of the request is empty. The GET request includes the information required
to return the response.
When the request is unsuccessful, you will receive an error response with details.
{
      "type": "ErrorResponse",
      "message": "Error message to display.",
      "developerDescription": "Detailed description of error."
}
Standalone Mode Payment Services
Use the information in this section to process payment services in the Acceptance Devices
app when operated in Standalone mode.
These are some benefits of using Standalone mode:
Start transactions directly from the Android device.
Fastest way to begin accepting payments.
No integration required with a point-of-sale (POS) system.
Serves as a backup option when your POS system is unavailable for Local or Cloud
semi-integrated modes.
IMPORTANT
When the Acceptance Devices app is in Standalone mode, the Android device does not communicate with your POS system to exchange transaction details. You are responsible for reconciling transactions with your internal systems and records.
For information about other modes available in the Acceptance Devices app, see:
Enable Standalone Mode in the Acceptance Devices App
Follow these steps to enable Standalone mode in the Acceptance Devices
app:
In the Acceptance Devices app, tap
Settings
.
Enter your Acceptance Devices app passcode.
Tap
Standalone Mode
.
Toggle Enable Standalone Mode to
ON
.
Choose the currency in which you want to process transactions. Tap
Save
.
If you want to enable custom merchant reference codes, toggle Custom
Transaction Reference to
ON
.
Tap the back navigation arrow to return to the home screen. You can now process
transactions in Standalone mode.
Sale
Use the information in this section to process a sale transaction when the app is in
Standalone mode. This type of transaction combines an authorization and a capture
into a single transaction.
Follow these steps to process a sale transaction:
In the Acceptance Devices app, tap
Sale
.
Enter the transaction amount.
Tap
Submit
to start the transaction.
Refund
Use the information in this section to process a refund when the app is in Standalone mode.
This type of refund includes a reference to the original transaction for a full or
partial transaction amount.
Stand-alone credits are also supported in this Acceptance Devices solution. For more
information, see Stand-Alone Credit.
Follow these steps to process a refund:
In the Acceptance Devices app, tap
Settings
.
Enter your Acceptance Devices app passcode.
Tap
Transaction History
.
Tap the transaction you want to refund.
Tap
Refund
.
Enter the transaction amount.
Tap
Refund
to start the transaction.
Stand-Alone Credit
Use the information in this section to process a stand-alone credit when the app is in
Standalone mode. This type of transaction is used to process a credit without
reference to the original transaction. The customer must present their payment card
for this type of transaction.
WARNING
When processing a stand-alone credit, there is no limit on the credit amount
because there is no reference to the original transaction amount. The
recommendation is to use a refund transaction whenever possible. For more
information, see Refund.
Follow these steps to process a stand-alone credit:
In the Acceptance Devices app, tap
Other
Transactions
.
Tap
Refund
.
Enter your Acceptance Devices app passcode.
Enter the transaction amount.
Tap
Submit
to start the transaction.
Sale with On-Reader Tipping
Use the information in this section to process a sale with on-reader tipping in Standalone
mode. At the start of each transaction, the terminal prompts the customer to add a
tip by showing suggested tip amounts. The customer selects or enters a tip amount on
the terminal before presenting their payment card.
Follow these steps to process a sale with on-reader tipping:
In the Acceptance Devices app, tap
Settings
.
Enter your Acceptance Devices app passcode.
Tap
Standalone Mode
.
Toggle Ask for Tip to
ON
.
Tap the back navigation arrow to return to the home screen.
Tap
Sale
.
Enter the transaction amount.
Tap
Submit
to start the transaction.
Pre-Authorization
Use the information in this section to process a pre-authorization for an initial amount in
Standalone mode. A pre-authorization transaction places a temporary hold on the
customer's payment card, which can be captured at a later time.
Most authorizations expire in 5 to 7 days. The issuing bank sets the length of time
before expiration. When an authorization expires with the issuing bank, your bank or
processor might require that you re-submit an authorization request and include a
request for capture in the same message. For more information, see Capture.
Follow these steps to process a pre-authorization:
In the Acceptance Devices app, tap
Other
Transactions
.
Tap
Pre-Authorization
.
Enter the transaction amount.
Tap
Submit
to start the transaction.
Capture
Use the information in this section to capture a pre-authorized transaction in Standalone
mode. The capture request references the approved pre-authorization request.
Follow these steps to process a capture:
In the Acceptance Devices app, tap
Settings
.
Enter your Acceptance Devices app passcode.
Tap
Transaction History
.
Tap the transaction that you want to capture.
Tap
Capture
.
Enter the transaction amount.
Tap
Capture
to start the transaction.
Sale with Installment Details
Use the information in this section to process a sale transaction with installment details
when the app is in Standalone mode. This type of transaction can be used to include
the required installment details as part of the sale transaction.
This transaction is available only in the Latin American and Caribbean (LAC)
region.
Follow these steps to process a sale transaction with installment details:
In the Acceptance Devices app, tap
Settings
.
Enter your Acceptance Devices app passcode.
Tap
Standalone Mode
.
Tap
Installment Details
.
Toggle Enable Installment Details to
ON
.
Configure the installment details.
Tap the back navigation arrow to return to the home screen.
Tap
Sale
.
Enter the transaction amount.
Tap
Submit
to start the transaction.
Sale with Payment Facilitator Details
Use the information to process a sale transaction with payment facilitator details
when the app is in Standalone mode. This payment service enables you to include
required payment facilitator details as part of the sale transaction.
Follow these steps to process a sale transaction with payment facilitator
details:
In the Acceptance Devices app, tap
Settings
.
Enter your Acceptance Devices app passcode.
Tap
Standalone Mode
.
Tap
Payment Facilitator Details
.
Toggle Enable Payment Facilitator Details to
ON
.
Configure the payment facilitator details.
Tap the back navigation arrow to return to the home screen.
Tap
Sale
.
Enter the transaction amount.
Tap
Submit
to start the transaction.
Sale with Tax Details
Use the information in this section to process a sale transaction with tax details when the
app is in Standalone mode. This type of transaction can be used to include the
required tax details as part of the sale transaction.
Follow these steps to process a sale transaction with tax details:
In the Acceptance Devices app, tap
Settings
.
Enter your Acceptance Devices app passcode.
Tap
Standalone Mode
.
Tap
Tax Details
.
Toggle Enable Tax Details to
ON
.
Configure the tax details.
Tap the back navigation arrow to return to the home screen.
Tap
Sale
Enter the transaction amount.
Tap
Submit
to start the transaction.
Email a Customer Receipt
Use the information in this section to email a customer receipt from a previous transaction
when the app is in Standalone mode.
Follow these steps to email a customer receipt:
In the Acceptance Devices app, tap
Settings
.
Enter your Acceptance Devices app passcode.
Tap
Transaction History
.
Tap the transaction for which you want to email the receipt.
Tap
Send Receipt
.
Release Notes for Tap to Pay on Android Acceptance Devices App
These release notes are organized by release name and version, from newest to oldest.
Each release note includes these details:
Name of release
Type of release: app or SDK
Version number
Operating system: Android or iOS
Release date: DD-MM-YYYY format
These are the types of release notes published:
General information
Improvements
New features
Fixed issues
Updated requirements
Security updates
Hot fixes
Acceptance Devices App Version 1.23.0 Release Notes
These release notes are for the Acceptance Devices app, version 1.23.0 for Android. The app is
used in the PAX Acceptance Devices App and Tap to Pay on Android Acceptance Devices App.
The release date is 06-24-2026.
Improvements
Added support for Kiosk Mode in Customization parameters.
Updated the SDK version to 2.113.0.
Fixed Issues
Fixed an intermittent issue where Transaction History did not show recently completed
transactions.
Acceptance Devices App Version 1.22.0 Release Notes
These release notes are for the Acceptance Devices app, version 1.22.0 for Android. The
app is used in the PAX Acceptance Devices App and Tap to Pay on Android Acceptance
Devices App. The release date is 05-07-2026.
Improvements
Updated the SDK version to 2.112.0.
Fixed Issues
Fixed an issue in Standalone mode where the
Sales Slip Number
and
Merchant Tax ID
fields were missing from the payment request
for transactions without taxes.
Fixed an issue that intermittently prevented Transaction History from displaying
recently completed transactions.
Applied general UI fixes.
Acceptance Devices App Version 1.21.0 Release Notes
These release notes are for the Acceptance Devices app, version 1.21.0 for Android. The
app is used in the PAX Acceptance Devices App and Tap to Pay on Android Acceptance
Devices App. The release date is 04-14-2026.
New Features
Added support for these devices and features:
PAX A6650, A6630, A99, and A50 payment terminals.
Meeza card type, Egypt's national payment scheme.
Enabling Kiosk mode on PAX terminals.
Spanish (Argentina) and Spanish (Mexico) language variants.
Printing custom content when using PAX terminals with integrated printers.
Displaying custom screens to show informational text, collect text input, or capture
a digital signature.
Providing lodging details during a transaction.
Improvements
The toolbar logo now appears on the Enter Amount screen when the app is in
Standalone mode.
On the PAX A35 payment terminal, pressing the Cancel button on the integrated PIN
keypad no longer closes the AD app on the home screen.
Applied general improvements to UI.
Updated the SDK version to 2.111.0.
Acceptance Devices App Version 1.20.0 Release Notes
These release notes are for the Acceptance Devices app, version 1.20.0 for Android. The
app is used in the PAX Acceptance Devices App and Tap to Pay on Android Acceptance
Devices App. The release date is 03-12-2026.
New Features
Tap to Pay: Added support for processing transactions in multiple currencies with a
single device enrollment.
Added support for configuring the maximum amount allowed for an offline
transaction and the maximum amount allowed for an offline transaction batch
submitted for authorization.
Improvements
Improved the user experience when performing a sale with tax details in Standalone
mode.
Updated the SDK version to 2.110.0.
Fixed Issues
Fixed the issue that caused the app to close when the Back button was tapped on the
Check Device screen.
Applied general fixes to the UI.
Archive of Release Notes
This archive of release notes for the PAX Acceptance Devices App and Tap to Pay on Android Acceptance Devices App is organized by release name and version, from newest to
oldest. For more information, see the current release notes.
Each release note includes these details:
Name of release
Type of release: app or SDK
Version number
Operating system: Android or iOS
Release date: MM-DD-YYYY format
These are the types of release notes published:
General information
Improvements
New features
Fixed issues
Updated requirements
Security updates
Hot fixes
Acceptance Devices App Version 1.18.0 Release Notes
These release notes are for the Acceptance Devices app, version 1.18.0 for Android, which
is used in the PAX Acceptance Devices App and Tap to Pay on Android Acceptance Devices
App. The release date is 12-11-2025.
New Features
Added support for the PAX A3700 terminal.
Added support for landscape mode on large-screen devices.
Added the ability to enable and disable Offline mode from the POS system.
Improvements
Updated the SDK version to 2.108.0.
Fixed Issues
Fixed an issue where EBT transactions failed when optional REST API fields were
omitted.
Acceptance Devices App Version 1.17.0 Release Notes
These release notes are for the Acceptance Devices app, version 1.17.0 for Android, which
is used in the PAX Acceptance Devices App and Tap to Pay on Android Acceptance Devices
App. The release date is 10-28-2025.
New Features
PAX: Added the ability to process Electronic Benefits Transfer (EBT) payment
card transactions.
PAX: Added the ability to read non-PCI custom magstripe cards such as gift
cards and loyalty program cards.
Improvements
Improved the tax calculation logic when the app is operating in Standalone
mode.
Updated the SDK version to 2.106.0.
Fixed Issues
Fixed the issue caused by using 10-digit transaction amounts with certain currencies in
Standalone mode.
Acceptance Devices App Version 1.16.0 Release Notes
These release notes are for the Acceptance Devices app, version 1.16.0 for Android, which
is used in the PAX Acceptance Devices App and Tap to Pay on Android Acceptance Devices
App. The release date is 09-30-2025.
Improvements
Updated the SDK version to 2.105.0.
Fixed Issues
Fixed the issue that caused users to be limited to entering only 7 digits for the
transaction amount when using certain currencies in Standalone mode.
Acceptance Devices App Version 1.15.0 Release Notes
These release notes are for the Acceptance Devices app, version 1.15.0 for Android, which
is used in the PAX Acceptance Devices App and Tap to Pay on Android Acceptance Devices
App. The release date is 08-21-2025.
New Features
Added the ability to configure the transaction history to show all transactions
from the merchant or show only transactions from the device.
Added the ability to customize user interface parameters.
Improvements
Updated the SDK version to 2.103.1.
Fixed Issues
Tap to Pay: Fixed the issue that caused the app to occasionally crash after installing
the Tap to Pay Ready app during the activation process.
Acceptance Devices App Version 1.14.0 Release Notes
These release notes are for the Acceptance Devices app, version 1.14.0 for Android, which
is used in the PAX Acceptance Devices App and Tap to Pay on Android Acceptance Devices
App. The release date is 07-07-2025.
New Features
Tap to Pay: The solution is now PCI-MPoC compliant, which requires the Tap to Pay Ready
app to be installed on the Android devices used to process transactions. After upgrading
to this version of the Acceptance Devices app, re-enroll your devices.
Improvements
Tap to Pay: The process used to select the currency in Standalone mode is now
automated and based on the merchant configuration.
Updated the SDK version to 2.102.0.
Acceptance Devices App Version 1.13.0 Release Notes
These release notes are for the Acceptance Devices app, version 1.13.0 for Android, which
is used in the PAX Acceptance Devices App and Tap to Pay on Android Acceptance Devices
App. The release date is 06-18-2025.
Improvements
Improved the reconnect mechanism when using the app in Cloud mode.
Updated the SDK version to 2.101.1.
Acceptance Devices App Version 1.12.0 Release Notes
These release notes are for the Acceptance Devices app, version 1.12.0 for Android, which
is used in the PAX Acceptance Devices App and Tap to Pay on Android Acceptance Devices App. The release date is 05-13-2025.
Improvements
Updated the UI to use Google Material Design 3.
Updated the SDK version to 2.100.0.
Acceptance Devices App Version 1.11.0 Release Notes
These release notes are for the Acceptance Devices app, version 1.11.0 for Android, which
is used in the PAX Acceptance Devices App and Tap to Pay on Android Acceptance Devices App. The release date is 04-14-2025.
Improvements
Improved the experience when using the app with the Arabic language.
Tap to Pay: Improved the error messages that can appear during enrollment.
Updated the SDK version to 2.99.0.
Fixed Issues
Fixed the issue that caused the language not to change correctly when switching to Arabic.
Acceptance Devices App Version 1.10.0 Release Notes
These release notes are for the Acceptance Devices app, version 1.10.0 for Android, which
is used in the PAX Acceptance Devices App and Tap to Pay on Android Acceptance Devices App. The release date is 03-05-2025.
New Features
Added Arabic as a supported language.
Improvements
Tap to Pay: Improved the device enrollment experience by removing the need to
provide an International Mobile Equipment Identity (IMEI) number. After upgrading to
Acceptance Devices app version 1.10.0, devices must be re-enrolled.
Updated the SDK version to 2.98.0.
Acceptance Devices App Version 1.9.0 Release Notes
These release notes are for the Acceptance Devices app, version 1.9.0 for Android, which
is used in the PAX Acceptance Devices App and Tap to Pay on Android Acceptance Devices App. The release date is 02-03-2025.
New Features
Added the ability to print a customer or merchant receipt when using a terminal with an
integrated printer.
Improvements
Tap to Pay: Added a device requirements screen during the set-up process.
Improved the validation process when entering an activation code so that it accepts only 8 characters.
Improved the app behavior when attempting to access transaction history when the internet connection is not available.
Improved the reconnect mechanism when using the app in Cloud mode.
The mid-transaction status updates now indicate if the current transaction can be
cancelled.
Updated the SDK version to 2.97.0.
Acceptance Devices App Version 1.8.0 Release Notes
These release notes are for the Acceptance Devices app, version 1.8.0 for Android, which
is used in the PAX Acceptance Devices App and Tap to Pay on Android Acceptance Devices App. The release date is 10-31-2024.
Improvements
Updated the SDK version to 2.95.0.
Fixed Issues
Fixed the issue that caused today's transactions to not appear in the transaction history if the end date was manually set to
Today
.
Acceptance Devices App Version 1.7.0 Release Notes
These release notes are for the Acceptance Devices app, version 1.7.0 for Android, which
is used in the PAX Acceptance Devices App and Tap to Pay on Android Acceptance Devices App. The release date is 09-30-2024.
New Features
Added the ability to provide these details when performing a transaction:
Payment facilitator details.
Tax details.
Installment details for the Latin America and Caribbean (LAC) region.
Added support for additional languages in the Acceptance Devices app.
Acceptance Devices app can now be used with Tap to Pay.
Improvements
Updated the SDK version to 2.94.0.
Fixed Issues
Fixed the issue that caused the Acceptance Devices app to crash when an unsupported
character was entered during activation code entry.
Fixed the issue that caused the Print Receipt button to appear on the Summary screen
of devices without a printer.
Acceptance Devices App Version 1.6.0 Release Notes
These release notes are for the Acceptance Devices app, version 1.6.0 for Android, which
is used in the PAX Acceptance Devices App and Tap to Pay on Android Acceptance Devices App. The release date is
07-22-2024.
Improvements
Acceptance Devices app server now provides the full certificate chain for TLS.
Transaction summary reports can now show multiple currencies.
Improved the UI on several screens.
Improved the WebSocket connection handling.
Updated the SDK version to 2.92.0.
Acceptance Devices App Version 1.5.0 Release Notes
These release notes are for the Acceptance Devices app, version 1.5.0 for Android, which
is used in the PAX Acceptance Devices App and Tap to Pay on Android Acceptance Devices App. The release date is 06-25-2024.
New Features
Added the option to set a custom merchant reference code for transactions when the
Acceptance Devices app is in Standalone mode.
Signature capture type can now be set to
NONE
to skip signature
capture.
Added support for the Oracle Payment Interface.
Improvements
PAX IM30: Settings button is now hidden.
Settings menu now has an idle timeout of 2 minutes for the PAX IM30 and 5 minutes
for all other supported PAX devices.
Status notification now indicates when a device is operating in Standalone
mode.
Updated the SDK version to 2.91.0.
Fixed Issues
Fixed the issue that caused POS Setup to fail when you attempt set up again after
canceling.
Fixed the issue that caused Offline mode not to be shown when the Acceptance Devices
app is in Cloud with Standalone mode.
PAX A35: Fixed the issue that caused some text in the transaction summary report to
not display correctly.
Acceptance Devices App Version 1.4.0 Release Notes
These release notes are for the Acceptance Devices app, version 1.4.0 for Android, which
is used in the PAX Acceptance Devices App and Tap to Pay on Android Acceptance Devices App. The release date is 05-29-2024.
New Features
Added support for PAX IM30 and PAX A920 MAX devices.
Added support for asynchronous responses for transactions when the Acceptance
Devices app is in Cloud mode.
Improvements
Updated the SDK version to 2.90.0.
Fixed Issues
Fixed the issue that rarely caused the app to crash when an invalid request was
attempted.
Fixed the issue that caused null receipt fields to be shown in the response when
processing an offline transaction.
Acceptance Devices App Version 1.3.0 Release Notes
These release notes are for the Acceptance Devices app, version 1.3.0 for Android, which
is used in the PAX Acceptance Devices App and Tap to Pay on Android Acceptance Devices App. The release date is 04-23-2024.
New Features
Acceptance Devices App now supports:
Offline transactions (also known as
deferred authorization
or
store
and forward
) in Local and Standalone modes
On-receipt tipping in Local mode
Cloud mode
Transaction summary reports
Improvements
Added support for TLS v1.3.
Removed support for TLS v1.0 and TLS v1.1.
Updated the SDK version to 2.88.0.
Fixed Issues
Fixed the issue that caused the transaction history not to display transactions when
the PAX terminal was set to certain time zones.
PAX A35 terminal: Fixed the issue that caused the Acceptance Devices app not to
auto-start.
Acceptance Devices App Version 1.2.0 Release Notes
These release notes are for the Acceptance Devices app, version 1.2.0 for Android, which
is used in the PAX Acceptance Devices App and Tap to Pay on Android Acceptance Devices App. The release date is 01-31-2024.
Improvements
Capture API requests now return
CaptureResponse
in the
Type
field.
If there is no internet access, the Start Server button is not
available in the Acceptance Devices app.
Improved the responsiveness of the Settings menu.
Updated the SDK version to 2.86.
Fixed Issues
Fixed the issue that caused the Acceptance Devices app to crash occasionally
when starting a transaction from the background.
On the Enter Amount screen, fixed the issue that caused the Backspace key to not
work properly for some keyboard settings.
On the PAX A35 terminal, fixed the issue that caused the green and red physical
buttons to be ignored on the Passcode screen.
Fixed the issue that caused authentication to fail after
reactivation when operating in Standalone mode.
Acceptance Devices App Version 1.1.0 Release Notes
These release notes are for the Acceptance Devices app, version 1.1.0 for Android, which
is used in the PAX Acceptance Devices App and Tap to Pay on Android Acceptance Devices App. The release date is 12-22-2023.
New Features
Acceptance Devices protocol:
The Acceptance Devices app features the new,
streamlined Acceptance Devices protocol. This protocol replaces the ATICA
(ISO20022) protocol and is the default integration method for the PAX Acceptance Devices App.
WebSockets support:
The Acceptance Devices app now supports WebSockets,
enabling a two-way connection between the point-of-sale (POS) system and the
terminal.
Standalone mode:
A new standalone operating mode was added to the
Acceptance Devices app. This mode enables merchants to enter transaction amounts
directly on the terminal.
Transaction history:
Merchant transaction history is now accessible from
the Settings menu in the Acceptance Devices app. This feature includes quick
filtering options and linked operations.