On This Page
Getting Started with the Acceptance Devices App
Use the information in this section to get started with using the Acceptance Devices app.
After you finish setting up the device and configuring the app, you can process
payments. For information about the types of payments services available in this
solution, see these topics:
Install the Tap to Pay Ready App
To support PCI-compliant payment processing, the Tap to Pay Ready app must be
installed on your Android device. This app is a core component of the PCI-Certified
MPoC Solution that is used by the Tap to Pay on Android Acceptance Devices app to
process secure payment transactions.
IMPORTANT
This app must be installed before you can set up your Android
device.
Use one of these options to install the Tap to Pay Ready App:
- Download the app from the Google Play store on your Android device. No additional set up is required.
- Download the app through the Acceptance Devices app when prompted during device activation. For more information, see Enter an Activation Code in the Acceptance Devices App.
Set Up an Android Device
Before setting up an Android device, download and install these apps from the Google
Play Store:
For more information about the Tap to Pay Ready app, see PCI MPoC Standard Compliance.
For current version information about the Acceptance Devices app, see the Release Notes for Tap to Pay on Android Acceptance Devices App.
Follow these steps to set up the Android device in the Acceptance Devices
app:
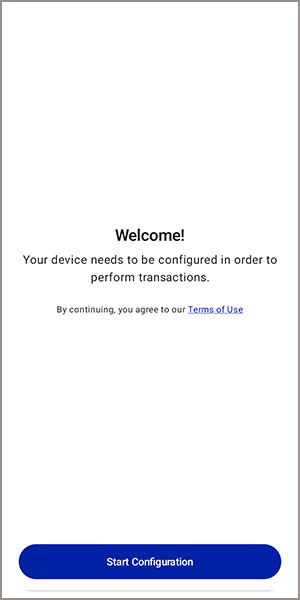
- Open the Acceptance Devices App on the Android device.
- On the Welcome screen, tapStart Configuration. The app is configured to use the production environment. To switch to the test environment or demo mode, press and hold the Welcome screen for 5 seconds. The Select Environment screen appears. Choose an environment for configuration.
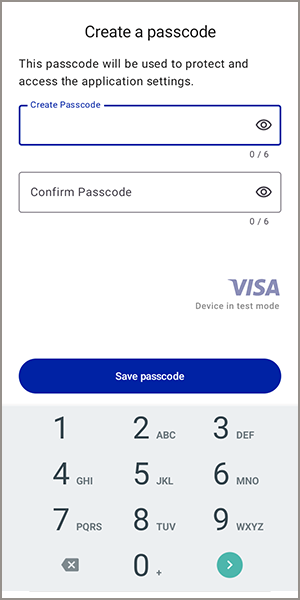
- On the Create a Passcode screen, enter a unique passcode. The passcode must consist of six digits. Confirm the passcode by entering it a second time, then tapSave Passcode. You will use this passcode to access the app, so choose a code that you will remember.The app does not include an option to reset the passcode. If you forget the code, you must reinstall the Acceptance Devices app and complete the set-up process again.
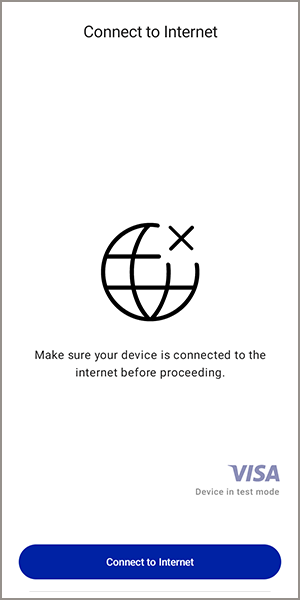
- Check the internet connection status of your Android device:
- When your device is not connected to the internet, the Connect to Internet screen appears. TapConnect to Internet, and choose an internet connection option.
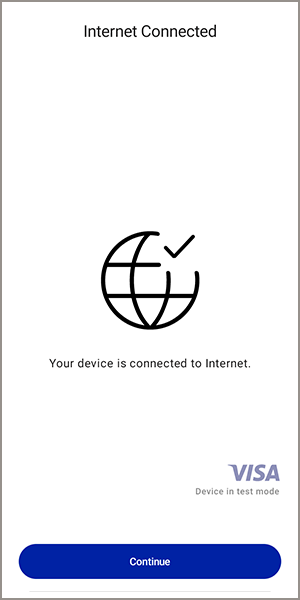
- When your device is connected to the internet, the Internet Connected screen appears. TapContinue. You are prompted to activate your device in the Acceptance Devices app. See Activating an Android Device in the Acceptance Devices App.
Activating an Android Device in the Acceptance Devices App
To process payments on your Android device using the Acceptance Devices app and your
point-of-sale (POS) system, you must use an activation code to activate the Android
device in the Acceptance Devices app. You can generate the code in the
Business Center
or by using an API request. After generating the activation code, you
must enter it in the Acceptance Devices app. Generate an Android Device Activation Code in the Business Center
Business Center
Before activating the Android device in the Acceptance Devices app, you must generate a device
activation code.
You can generate an activation code in the
Business Center
. The code is valid
for 24 hours. Follow these steps to generate an Android device activation code:
- In theBusiness Center, go to the left navigation panel and chooseAcceptance Devices>Activation Codes. The Activation Codes page appears.
- Click theSelect Transacting MIDdrop-down menu.
- Choose a transacting MID from the list.
- Click theSelect number of Activation Codesdrop-down menu.
- Choose the number of activation codes that you want to generate. The maximum number of codes is 15.
- ClickGenerate. The activation codes display on the page. To copy the codes to your clipboard, click the icon next to the code.
- To download a text file containing the activation codes, click theDownload codes as a .txt filebutton.
- Navigate to the Download folder on your computer to access the text file.
Generate an Android Device Activation Code Using a REST API Request
Before activating an Android device in the Acceptance Devices app, you must generate a
device activation code.
You can use a REST API request to generate a device activation code, which is valid for
24 hours.
You must authenticate each request that you send to a
Cybersource
API. In order to authenticate an API request, you can use a REST shared secret key or a
REST certificate. For more information about authentication requirements, see the .Endpoints
The POST request must include the transacting merchant ID (MID) that is sending the
request and the quantity of activation codes to be generated. You can request up to
15 activation codes in a single request.
Test:
POST
https://apitest.cybersource.com
/dms/v2/merchants/{transacting
mid}/activation-codes?size={number of activation codes}Production:
POST
https://api.cybersource.com
/dms/v2/merchants/{transacting
mid}/activation-codes?size={number of activation codes}Required Fields for Generating an Android Device Activation Code
The body of the API request is empty. The POST request must include the information
required to return the response.
REST Example: Generating an Android Device Activation Code
Request
The body of the request is empty. The POST request includes the information
required to return the response.
{
}
Response to a Successful Request
The response includes the activation code (
token
field)
and the amount of time (ttl
field) that the activation
code is valid. The ttl
field value is shown in
milliseconds. The activation code is valid for 24 hours. { "tokens": [ { "token": "%N5wU2jH", "ttl": 86399805 } ] }
Enter an Activation Code in the Acceptance Devices App
Before activating an Android device, you must generate an activation code for the
device in the
Business Center
or by using a REST API request. The activation
code is valid for 24 hours. Follow these steps to enter an activation code for an Android device in the Acceptance Devices
app:
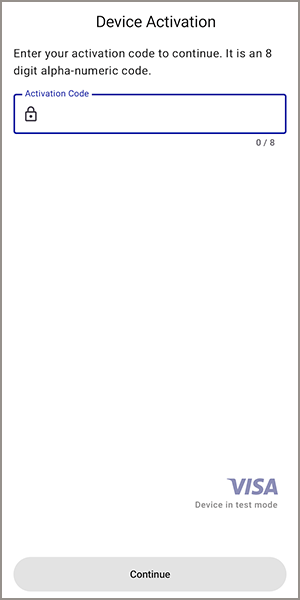
- On the Device Activation screen, enter the activation code that you generated. TapContinue.
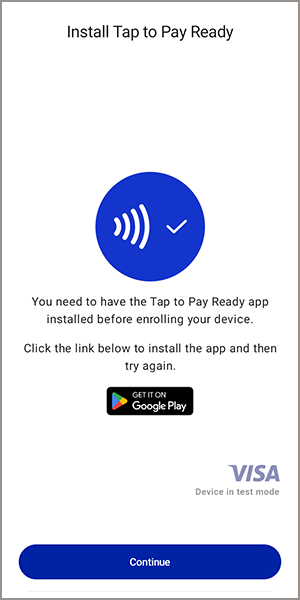
- When the Tap to Pay Ready app is not installed on your Android device, you are prompted to install the app. Tap the Google Play icon to install the app. When installation is complete, return to the Acceptance Devices app and tapContinue.
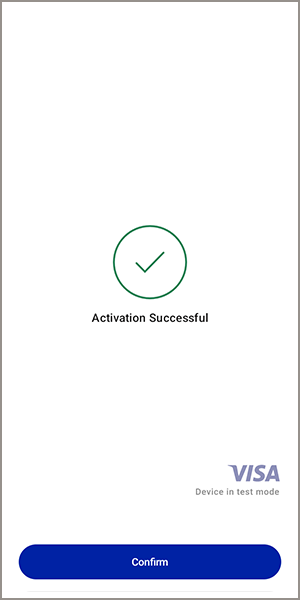
- When the Tap to Pay Ready app is installed and the activation code is accepted, the Activation Successful screen appears. TapConfirm.
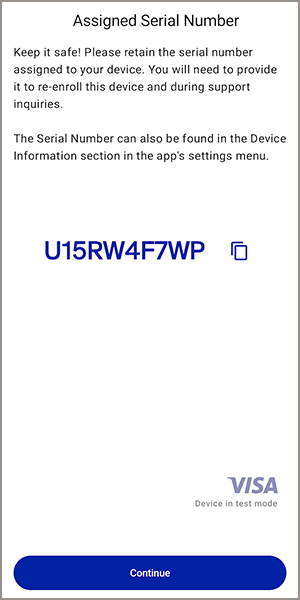
- The Assigned Serial Number screen appears. Record the serial number assigned to your device for future reference. You must provide the serial number when re-enrolling a device or when communicating with customer support. TapContinue.
AFTER COMPLETING THE TASK
If you are using the app in Local mode with Mutual Transport Layer Security (mTLS) enabled, you
must activate a secure mTLS connection between your point-of-sale (POS) system and
the Android device in the Acceptance Devices app. For more information, see Activating a Secure mTLS Connection.
If you are using the app in Local mode with Transport Layer Security (TLS) enabled or
in Cloud mode, you must start the Acceptance Devices app server. For more
information, see Starting the Acceptance Devices App Server.
Starting the Acceptance Devices App Server
To process payments on your Android device using the Acceptance Devices app and your
point-of-sale (POS) system, you must start the Acceptance Devices app server on the
Android device.
Start the Acceptance Devices App Server
Before you can start the Acceptance Devices app server, you must activate an Android
device in the Acceptance Devices app. For more information, see Activating an Android Device in the Acceptance Devices App.
Follow these steps to start the Acceptance Devices app server:
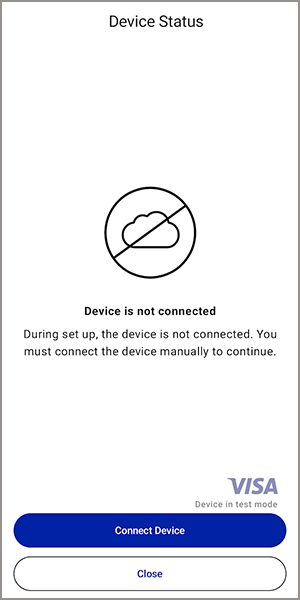
- Before you start the server, the Device Status screen shows theDevice is not connectedmessage. TapConnect Device.
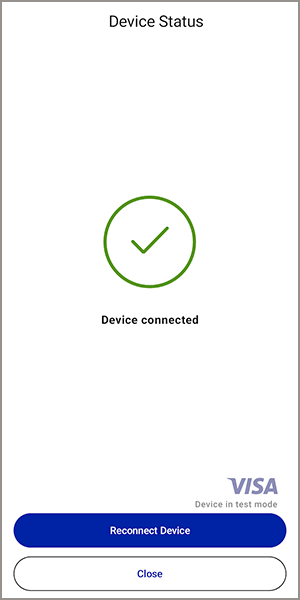
- After you start the server, the Device Status screen shows theDevice connectedmessage. The Android device is activated and ready to accept transactions.
- Tap the back navigation arrow to finish setting up.
Customizing the Acceptance Devices App
Use the information in this section to customize the Acceptance Devices app in the
Business Center
or by using a REST API request. The Acceptance Devices Customizations feature in the
Business Center
enables you
to customize these parameters for a portfolio, merchant, or transacting merchant ID (MID):- User interface
- Common
- Local mode
- Standalone mode
You can use a REST API request to perform these customization tasks:
- Retrieve and review your current parameter customization settings.
- Update customization settings for user interface, common, Local mode, and Standalone mode parameters.
Customizable User Interface Parameters
You can customize these user interface parameters for the Acceptance Devices app when it
is in Local, Standalone, or Cloud mode.
- Home screen logo
- This parameter defines the logo that is shown on the home screen of the app.
- Toolbar logo
- This parameter defines the logo that is shown during transaction processing.
- Primary color
- This parameter defines the color of the primary buttons.
- Color on primary
- This parameter defines the color of the text on the primary buttons.
- Background color
- This parameter defines the color of the screen background.
- Color on background
- This parameter defines the color of the text on the screen background.
- Button shape
- This parameter defines the shape of the buttons.
Customizable Common Parameters
You can customize these common parameters for the Acceptance Devices app when it is
operating in Local, Standalone, or Cloud mode.
- Operating mode
- This parameter enables you to choose one of these operating modes:
- Semi-Integrated with Standalone:The Acceptance Devices app operates in Local and Standalone modes. This is the default setting.
- Semi-Integrated:Acceptance Devices app operates in Local mode only.
- Standalone:Acceptance Devices app operates in Standalone mode only.
- Cloud with Standalone:Acceptance Devices app operates in Cloud and Standalone modes.
- Cloud:Acceptance Devices app operates in Cloud mode only.
- Automatic receipt printing
- This parameter enables the automatic printing of the merchant or customer receipt after each transaction. This feature is available only on terminals with integrated printers. The default setting isDisabled.
- Accessibility options
- This parameter enables accessibility features during transaction processing. For example, voice-over capabilities that provide information to visually impaired customers. The default setting isTrue.
- Enable Offline mode
- This parameter enables Offline mode, which you can use to process transactions when an internet connection is not available. The default setting isFalse.
- MOTO options
- This parameter enables you to activate these MOTO options:
- MOTO address required:This parameter enables the customer's address as a required data input for mail order or telephone order (MOTO) transactions. The default setting isTrue.
- MOTO show confirmation screen:This parameter enables a Confirmation screen to appear during MOTO transactions. The merchant reviews and confirms the MOTO address data shown on the screen before the payment is processed. The default setting isFalse.
- MOTO CVV required:This parameter enables the Card Verification Value (CVV) as a required data input for MOTO transactions. The default setting isTrue.
- Offline transaction maximum amount
- This parameter defines the maximum amount allowed for an offline transaction.
- Offline transaction batch maximum amount
- This parameter defines the maximum amount allowed for an offline transaction batch submitted for authorization.
- Tipping options
- This parameter enables you to choose one of these tipping types:
- Percentage:The customer chooses from three pre-defined tip percentages or enters a custom tip amount. Define the tip values in the Tipping percentage values parameter. This setting is the default tipping type.
- Tip amount:The customer enters a custom tip amount.
- Total amount:The customer enters the total amount to be charged, including the tip amount.
- Tipping percentage values
- This parameter defines the three tipping percentage choices that appear on the screen for the customer to choose. This parameter applies only if the Tipping Type parameter is set toPercentage. The default settings are10, 15, 20.
- Tipping confirmation screen
- This parameter enables the Tipping Confirmation screen to appear on the device when performing a sale with on-reader tipping. The customer reviews and confirms the tip amount before the payment is processed. The default setting isFalse.
- Transaction history view
- This parameter defines whether the transaction history view is shown at the merchant or device level. The default setting isMerchant.
- Enable kiosk mode
- This parameter enables Kiosk Mode on the PAX device. This mode locks the Acceptance Devices app to the device screen. Users cannot exit the app or access other terminal functions, which helps prevent unauthorized use. The default setting isFalse.
Customizable Local Mode Parameters
You can customize these Local mode parameters for the Acceptance Devices app.
- Port
- This parameter defines the port number used by the server on the terminal or device. The default setting is8443.
- Security
- This parameter defines whether the server on the terminal or device uses two-way verification (mTLS) or one-way verification (TLS). The default setting ismTLS.
- Protocol
- This parameter defines the protocol that is used to process transactions. The default setting isADP.
- Signature capture type
- This parameter defines whether the signature is captured on the terminal screen or paper receipt, or is skipped. The default setting isOn screen.
- Skip summary screen
- This parameter disables the Summary screen from displaying after each transaction. The default setting isTrue.
Customizable Standalone Mode Parameters
You can customize these Standalone mode parameters for the Acceptance Devices app.
- Enable LAC installments
- This parameter enables the processing of Latin America and the Caribbean (LAC) installment payments. The default setting isDisabled.
- Enable tax details
- This parameter enables tax details to be shown in the app. The default setting isDisabled.
- Enable payment facilitator details
- This parameters enables the payment facilitator details to be shown in the app. The default setting isDisabled.
- Additional transaction types
- This parameter enables you to choose additional transaction types that the app supports. Sale and refund transactions are supported by default. The default setting for additional transaction types isNone.
Customize Parameters in the Business Center
Business Center
Follow these steps to customize common, Local mode, and Standalone mode parameters
for the Acceptance Devices app.
- In theBusiness Center, go to the left navigation panel and chooseAcceptance Devices>Customizations. The Customizations screen appears.
- Click theLoad customization parameter fordrop-down menu.
- Choose a user level from the list. ClickLoad.
- Scroll down to see the various parameter sections and which elements are available to customize for the chosen user level.
- Choose parameters to customize. To see a description of a parameter, hover your mouse over the Information icon.
- ClickApply Changes.
Retrieve Parameters Using a REST API Request
You can use a REST API request to retrieve and view customizable parameters and their
current values. Your account settings determine the values you can view for a portfolio,
merchant, or transacting merchant ID (MID).
You must authenticate each request that you send to a
Cybersource
API. In
order to authenticate an API request, you can use a REST shared secret key or a REST
certificate. For more information about authentication requirements, see the .Endpoints
The GET request must include the organization ID for the portfolio, merchant, or
transacting merchant ID that is sending the request.
Test:
GET
https://apitest.cybersource.com
/dms/v2/customization?type=organization&id={{organization
id}}Production:
GET
https://api.cybersource.com
/dms/v2/customization?type=organization&id={{organization
id}}Required Fields to Retrieve Parameters Using a REST API Request
The body of the API request is empty. The GET request must include the information
required to return the response.
REST Example: Retrieve Parameters Using a REST API
Request
Request
The body of the request is empty. The GET request includes the information required
to return the response.
{
}
Response to a Successful Request
{
    "id": "{{organization id}}",
    "customizations": {
        Your configured parameters response data appears here.
    },
    "customizationMetadata": {
        Your possible values for parameters response data appears here.
    }
}
Customize Parameters Using a REST API Request
You can use a REST API request to update customizable parameters for a portfolio,
merchant, or transacting merchant ID (MID).
You must authenticate each request that you send to a
Cybersource
API. In
order to authenticate an API request, you can use a REST shared secret key or a REST
certificate. For more information about authentication requirements, see the .Endpoints
Test:
PUT
https://apitest.cybersource.com
/dms/v2/customizationProduction:
PUT
https://api.cybersource.com
/dms/v2/customizationRequired Fields to Customize Parameters Using a REST API Request
- type
- Set the value toorganization.
- id
- Set the value toorganization idfor the portfolio, merchant, or transacting MID.
- customizations
- Set the value to the parameters to be updated.
REST Example: Customize Parameters Using a REST API
Request
Request
{
    "type": "organization",
    "id": "{{organization id}}",
    "customizations":
    {
        "OPERATING_MODE": "SEMI_INTEGRATED",
        "TIPPING_TYPE": "TIP_AMOUNT",
        "SIGNATURE_TYPE": "ON_RECEIPT"
    }
}
Response to a Successful Request
The body of the response is empty. A successful response is indicated with a
200 OK
status.{ }