On This Page
Activating an Android Device in the Acceptance Devices App
To process payments on your Android device using the Acceptance Devices app and your
point-of-sale (POS) system, you must use an activation code to activate the Android
device in the Acceptance Devices app. You can generate the code in the
Business Center
or by using an API request. After generating the activation code, you
must enter it in the Acceptance Devices app. Generate an Android Device Activation Code in the Business Center
Business Center
Before activating the Android device in the Acceptance Devices app, you must generate a device
activation code.
You can generate an activation code in the
Business Center
. The code is valid
for 24 hours. Follow these steps to generate an Android device activation code:
- In theBusiness Center, go to the left navigation panel and chooseAcceptance Devices>Activation Codes. The Activation Codes page appears.
- Click theSelect Transacting MIDdrop-down menu.
- Choose a transacting MID from the list.
- Click theSelect number of Activation Codesdrop-down menu.
- Choose the number of activation codes that you want to generate. The maximum number of codes is 15.
- ClickGenerate. The activation codes display on the page. To copy the codes to your clipboard, click the icon next to the code.
- To download a text file containing the activation codes, click theDownload codes as a .txt filebutton.
- Navigate to the Download folder on your computer to access the text file.
Generate an Android Device Activation Code Using a REST API Request
Before activating an Android device in the Acceptance Devices app, you must generate a
device activation code.
You can use a REST API request to generate a device activation code, which is valid for
24 hours.
You must authenticate each request that you send to a
Cybersource
API. In order to authenticate an API request, you can use a REST shared secret key or a
REST certificate. For more information about authentication requirements, see the .Endpoints
The POST request must include the transacting merchant ID (MID) that is sending the
request and the quantity of activation codes to be generated. You can request up to
15 activation codes in a single request.
Test:
POST
https://apitest.cybersource.com
/dms/v2/merchants/{transacting
mid}/activation-codes?size={number of activation codes}Production:
POST
https://api.cybersource.com
/dms/v2/merchants/{transacting
mid}/activation-codes?size={number of activation codes}Required Fields for Generating an Android Device Activation Code
The body of the API request is empty. The POST request must include the information
required to return the response.
REST Example: Generating an Android Device Activation Code
Request
The body of the request is empty. The POST request includes the information
required to return the response.
{
}
Response to a Successful Request
The response includes the activation code (
token
field)
and the amount of time (ttl
field) that the activation
code is valid. The ttl
field value is shown in
milliseconds. The activation code is valid for 24 hours. { "tokens": [ { "token": "%N5wU2jH", "ttl": 86399805 } ] }
Enter an Activation Code in the Acceptance Devices App
Before activating an Android device, you must generate an activation code for the
device in the
Business Center
or by using a REST API request. The activation
code is valid for 24 hours. Follow these steps to enter an activation code for an Android device in the Acceptance Devices
app:
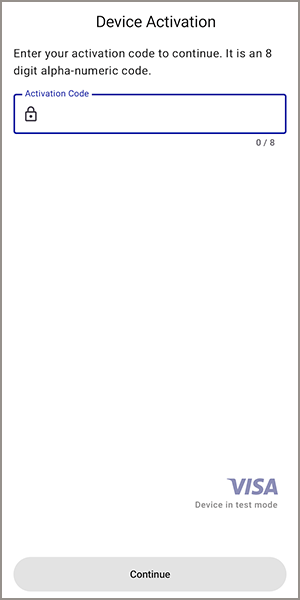
- On the Device Activation screen, enter the activation code that you generated. TapContinue.
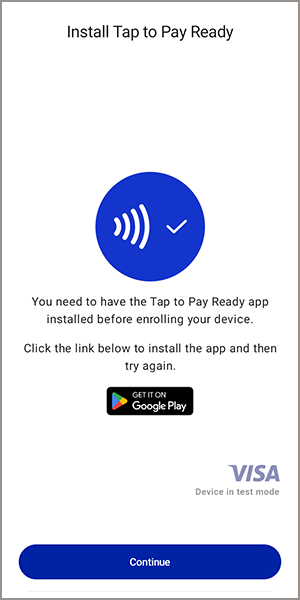
- When the Tap to Pay Ready app is not installed on your Android device, you are prompted to install the app. Tap the Google Play icon to install the app. When installation is complete, return to the Acceptance Devices app and tapContinue.
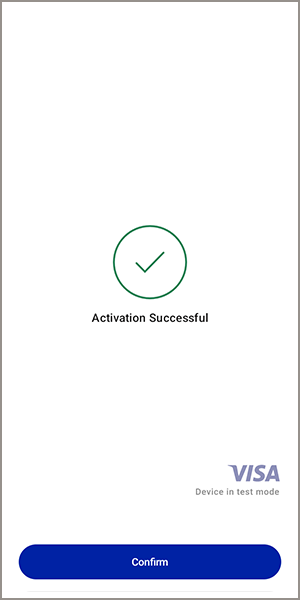
- When the Tap to Pay Ready app is installed and the activation code is accepted, the Activation Successful screen appears. TapConfirm.
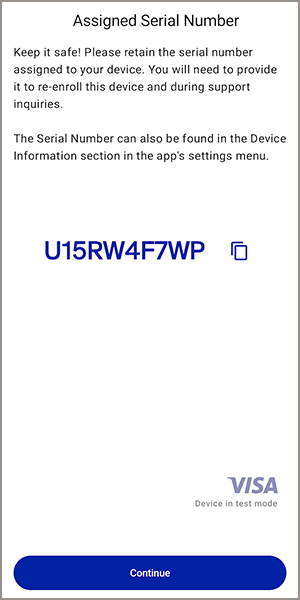
- The Assigned Serial Number screen appears. Record the serial number assigned to your device for future reference. You must provide the serial number when re-enrolling a device or when communicating with customer support. TapContinue.
AFTER COMPLETING THE TASK
If you are using the app in Local mode with Mutual Transport Layer Security (mTLS) enabled, you
must activate a secure mTLS connection between your point-of-sale (POS) system and
the Android device in the Acceptance Devices app. For more information, see Activating a Secure mTLS Connection.
If you are using the app in Local mode with Transport Layer Security (TLS) enabled or
in Cloud mode, you must start the Acceptance Devices app server. For more
information, see Starting the Acceptance Devices App Server.