On This Page
Acceptance Devices | PAX All-in-One Android Solution Integration Guide
This section describes how to use this guide and where to find further information.
Audience and Purpose
This guide is written for application developers who want to integrate the Acceptance
Devices | PAX All-in-One Android Solution with their point-of-sale (POS) systems that use
supported PAX terminals.
Integrating the PAX All-in-One Android Solution SDK requires software development skills.
You must write code that uses the SDK to integrate the PAX All-in-One Android Solution
payment service into your existing payment system.
Conventions
These statements appear in this document:
An
Important
statement contains information essential to
successfully completing a task or learning a concept.A
Warning
contains information or instructions, which, if not
heeded, can result in a security risk, irreversible loss of data, or significant cost in
time or revenue or both.Customer Support
For support information about any service, visit the Support Center:
Recent Revisions to This Document
26.07.01
- Added links to A50, A99, A6630, and A6650 terminal user guides in Supported Payment Terminals and Capabilities.
- Updated instructions and code examples in Sale with Lodging Details.
- Added support for new payment features:
- Added new SDK release and updated release version in code examples. See SDK Version 2.115.0 Release Notes.
26.06.01
Added new SDK release and updated release version in code examples. See SDK Version 2.114.0 Release Notes.
26.05.01
Added new SDK release and updated release version in code examples. See SDK Version 2.113.0 Release Notes.
26.04.01
- Added support for PAX terminals A50, A99, A6630, A6650 in Supported Payment Terminals and Capabilities.
- Added new SDK release and updated release version in code examples. See SDK Version 2.112.0 Release Notes.
26.03.01
- Added support for the Meeza card type withVisa Platform Connectpayment processor. See Supported Payment Terminals and Capabilities.
- Updated and moved code example into the new step 5 instruction in Create an mposUI Instance.
- Removed "Configure the accessory as Tap to Phone" parameter from and updated code example. See Create a UiConfiguration Instance.
- Added support new payment mode: Enabling Kiosk Mode.
- Added support for new transaction types: Sale with Lodging Details and Custom Printing.
- Added new SDK release and updated release version in code examples. See SDK Version 2.111.0 Release Notes.
Introduction to Acceptance Devices | PAX All-in-One Android Solution
The Acceptance Devices | PAX All-in-One Android Solution enables you to integrate your
point-of-sale (POS) system directly with supported PAX terminals in an all-in-one
configuration. With this solution, the POS application runs natively on the PAX
terminal, streamlining both hardware and software management.
To manage the payment flow, you can integrate the PAX All-in-One Android software
development kit (SDK) into your Android app, enabling seamless transaction processing on
the device.
For information about the current version of the SDK, see the Release Notes for PAX All-in-One Android Solution.
Transaction Workflow for PAX All-in-One Android Solution
This diagram shows the transaction workflow for the PAX All-in-One Android Solution.
Figure:
PAX All-in-One Android Solution Transaction Workflow

- The Android Point of Sale (POS) app integrates with the PAX All-in-One Android SDK.
- The merchant's Android POS app sends a request to the PAX All-in-One Android SDK to process a payment.
- The PAX All-In-One Android SDK user interface opens on the PAX terminal screen, and it displays prompts to guide the customer through the payment flow.
- The PAX All-In-One Android SDK sends the transaction result and details to the Android POS app, which completes the transaction.
Supported Payment Terminals and Capabilities
The PAX All-in-One Android Solution supports a variety of PAX payment terminals, card
types, and payment services, as shown in the tables.
Processor support differs across terminals, card types, and payment
services.

| |||

| Android 10 PCI PTS 6.0 4-inch display Privacy shield | Ethernet Wi-Fi | |

| Android 11 PCI PTS 6.0 7-inch display Portable | Ethernet Wi-Fi | |

| Android 10 PCI PTS 6.0 4-inch display | Wi-Fi 4G | |

| Android 8 PCI PTS 6.0 5.5-inch display Professional scanner | Wi-Fi 4G | |

| Android 12 PCI PTS 6.0 5.5-inch display Printer | Wi-Fi 4G | |

| Android 12 PCI PTS 6.0 6.5-inch display Professional scanner | Wi-Fi 4G | |

| Android 12 PCI PTS 6.0 6.5-inch display Professional scanner | Wi-Fi 4G | |

| Android 8 or 10 PCI PTS 6.0 5.5- or 6-inch display Printer | Wi-Fi 4G | |

| Android 10 PCI PTS 6.0 5-inch display Mounting bracket | Ethernet Wi-Fi | |
|
| |||
Card Type | Processor | Payment Service | Processor | ||
|---|---|---|---|---|---|
FDC Nashville Global | Visa Platform Connect | FDC Nashville Global | Visa Platform Connect | ||
American Express | 
|
| Account verification |
|
|
China Union Pay |
| 
| Capture |
|
|
Diners |
|
| Cashback |
|
|
Discover |
|
| Custom card read |
|
|
EBT |
|
| Incremental authorization |
|
|
JCB |
|
| Mail order or telephone order (MOTO) |
|
|
Mastercard |
|
| Offline sale (Deferred authorization/Store and
Forward) |
|
|
Meeza |
|
| On-reader tipping |
|
|
U.S. Common Debit |
|
| On-receipt tipping |
|
|
Visa |
|
| Pre-authorization |
|
|
Refund |
|
| |||
Sale |
|
| |||
Stand-alone credit |
|
| |||
Token refund |
|
| |||
Getting Started with the PAX All-in-One Android Solution
Use this information to get started with integrating the PAX All-in-One Android Solution.
After completing the integration, you can start processing payments. For more
information, see PAX All-in-One Payment Services.
Configuring the PAX All-in-One Android SDK
Use this information to configure the PAX All-in-One Android SDK.
Configure the Project settings.gradle File
settings.gradle
FileFollow this step to configure your project's
settings.gradle
file.- Add the repository to your project'ssettings.gradlefile.dependencyResolutionManagement { repositoriesMode.set(RepositoriesMode.FAIL_ON_PROJECT_REPOS) repositories { mavenCentral() google() exclusiveContent { forRepository { maven { setUrl("https://repo.visa.com/mpos-releases/") } } filter { includeGroup("io.payworks") } } } }
Configure the Project build.gradle File
build.gradle
FileFollow this step to configure your project's
build.gradle
file.- Add the Kotlin Gradle plug-in, which is required to use this solution. Note that Kotlin version 2.1 or later and Android Gradle version 8.2 or later are required.plugins { id("com.android.application") version "8.2.0" apply false id("org.jetbrains.kotlin.android") version "2.1.0" apply false }
Configure the Module build.gradle File
build.gradle
FileFollow these steps to configure your module
build.gradle
file.- In the Android section, add these exclusion rules to your module'sbuild.gradlefile.android { ... packaging { resources { excludes.add("META-INF/*") excludes.add("LICENSE.txt") excludes.add("asm-license.txt") } } }
- In order for the app to support Java 17 features, you must set the compatibility levels.android { ... compileOptions { sourceCompatibility = JavaVersion.VERSION_17 targetCompatibility = JavaVersion.VERSION_17 } kotlinOptions { jvmTarget = "17" } }
- The PAX All-in-One Android Solution library publishes a release build type only. The debug build type is not available, so set thematchingFallbacksfield value torelease.android { ... buildTypes { ... debug { matchingFallbacks.apply { clear() add("release") } } } }
- Stay current with the latest SDK. The SDK repository is continuously updated to make available the six latest versions. When a new version is released, the oldest is removed and can no longer be used for new application builds. Establish a regular process for updating to the newest available SDK version to avoid potential build failures and to ensure that your application runs with the latest features, performance enhancements, and security updates.Add the required Default UI and PAX libraries to the dependencies section of your module'sbuild.gradlefile. The SDK version number shown in the dependencies section should match the current SDK release. For example: 2.115.0.dependencies { ... // This is the Default UI dependency implementation("io.payworks:paybutton-android:2.115.0") // This is the PAX dependency implementation("io.payworks:mpos.android.accessories.pax:2.115.0") }
Update the AndroidManifest.xml File
AndroidManifest.xml
FileTo support a large heap size and ensure the necessary permissions for the Default UI, update your
AndroidManifest.xml
file. Enabling a larger heap is essential
for scenarios where terminal updates require the handling and transfer of large
volumes of data.Follow these steps to update your
AndroidManifest.xml
file.- Set theandroid:allowBackupattribute tofalseand theandroid:largeHeapattribute totrue.<application ... android:allowBackup="false" android:largeHeap="true" > ... </application>
- Enable the needed permissions for the Default UI and PAX.<manifest ... > ... <!-- Needed for Default UI ! --> <uses-permission android:name="android.permission.INTERNET"/> <uses-permission android:name="android.permission.ACCESS_NETWORK_STATE"/> <uses-permission android:name="android.permission.READ_PHONE_STATE"/> <!-- Needed for PAX integrations ! --> <uses-permission android:name="com.pax.permission.ICC"/> <uses-permission android:name="com.pax.permission.PICC"/> <uses-permission android:name="com.pax.permission.MAGCARD"/> <uses-permission android:name="com.pax.permission.PED"/> ... </manifest>
Configure ProGuard Rules to Enable Obfuscation
Follow these steps to configure ProGuard rules that enable obfuscation.
- To enable obfuscation for any of your build types, define the setting in the relevantbuild.gradlefile for your app.buildTypes { release { isMinifyEnabled = true proguardFiles(getDefaultProguardFile("proguard-android-optimize.txt"), "proguard-rules.pro") } }
- If you are using ProGuard as an obfuscation tool in your app, add these rules to theproguard-rules.profile.# Jackson -keep class com.fasterxml.** { *; } -dontwarn com.fasterxml.** # Bolts -keep class bolts.** { *; } -dontwarn bolts.** # Couchbase -keep class com.couchbase.** { *; } -dontwarn com.couchbase.** # OkHttp -keepattributes Signature -keepattributes *Annotation* -dontwarn com.squareup.okhttp.** -keep class com.squareup.okhttp.* { *; } -dontwarn okio.** # Otto -keepclassmembers class ** { @com.squareup.otto.Subscribe public *; @com.squareup.otto.Produce public *; } # Acceptance Devices -keep class io.mpos.** { *; } -dontwarn io.mpos.** #PAX -dontwarn com.pax.** -keep class com.pax.** { *; }
Generating a Secret Key for an Existing Merchant ID
Use this information to generate a secret key for an existing merchant ID
(MID) in the
Business Center
or by using a REST API request. The secret key and
MID are required values that you must enter in the mposUi
instance that
you create. For more information, see Creating an mposUi Instance.Generate a Secret Key for an Existing Merchant ID in the Business Center
Business Center
You can generate an secret key for an existing merchant ID (MID) in the
Business Center
. Enter these values in the mposUi
instance that
you create. For more information, see Creating an mposUi Instance. Follow these steps to
generate a secret key for an existing MID in the
Business Center
:- In theBusiness Center, go to the left navigation panel and choosePayment Configuration>Key Management. The Key Management page appears.
- From the Merchant drop-down list, choose the merchant ID for which you want to generate a secret key.
- ClickGenerate Key.
- In the Recommended Key Types list, scroll down and chooseAcceptance Devices Secret Key.
- ClickGenerate Key. The Key Generation page appears.
- ClickGenerate Key. Your MID and secret key appear on the page.
- Click theCopyorDownloadicon to obtain the MID and secret key.
ADDITIONAL INFORMATION
If you choose to copy the secret key information instead of downloading it, be sure to save it locally. After you leave theBusiness CenterKey Generation page, you will not be able to retrieve the same secret key again. To obtain a new key, you must restart the key generation process.
Generate a Secret Key for an Existing Merchant ID Using a REST API Request
You can use a REST API request to generate a secret key for an existing merchant ID
(MID). Enter these values in the
mposUi
instance you create. You must authenticate each request that you send to a
Cybersource
API. In
order to authenticate an API request, you can use a REST shared secret key or a
REST certificate. For more information about authentication requirements, see .Endpoints:
Test:
POST
https://apitest.cybersource.com
/kms/v2/keys-sym-posProduction:
POST
https://api.cybersource.com
/kms/v2/keys-sym-posRequired Fields for Generating a Secret Key for an Existing Merchant ID Using a REST
API Request
- keyInformation.organizationId
REST Example: Generating a Secret Key for an Existing Merchant ID Using a REST API
Request
Request
{
    "keyInformation":
    [
        {
            "organizationId": "transacting_MID"
        }
    ]
}
Response to a Successful Request
{
    "submitTimeUtc": "2023-08-07T13:07:17Z",
    "status": "ACCEPTED",
    "keyInformation": [
      {
           "organizationId": "transacting_MID",
           "externalOrganizationId": "MerchantId",
           "key": "SecretKey",
           "keyId": "af922a42-6d2c-41fd-92f7-09d908647de4",
           "status": "ACTIVE",
           "expirationDate": "2033-08-07T13:07:17Z"
      }
   ]
}
Creating an mposUi Instance
mposUi
InstanceUse this information to create and configure an
mposUI
instance.Create an mposUI Instance
mposUI
InstanceBefore starting this procedure, you must obtain secret key and merchant ID (MID)
values to enter in to your
mposUI
instance. For more information, see
Generating a Secret Key for an Existing Merchant ID.Create an
mposUI
instance to access the functionality of the PAX
All-in-One Android SDK. Follow these steps to create an
mposUi
instance:- Create anmposUiinstance using thecreatefunction.
- Set themerchantIdfield value to the merchant ID that you obtained.
- Set themerchantSecretfield value to the secret key that you obtained.
- Specify the environment by setting theproviderModefield value toTESTor toLIVE.
- Use theProviderMode.TESTsetting to test your integration without charging a real payment card. Use the merchant ID and secret key you obtained from the test environment.
- Use theProviderMode.LIVEsetting to process live transactions. Use the merchant ID and secret key you obtained from the production environment.
- Configure the accessory as PAX.val mposUi = MposUi.create( providerMode = ProviderMode.LIVE, // ProviderMode.TEST merchantId = "MerchantId", merchantSecret = "SecretKey", terminalParameters = AccessoryParameters.Builder(AccessoryFamily.PAX).integrated().build() )
Configure an mposUI Instance
mposUI
Instance To use the
mposUi
instance with the PAX All-in-One Android SDK, you must
configure the mposUi
instance by next creating a
UiConfiguration
instance.Create a UiConfiguration Instance
UiConfiguration
InstanceUse the
UiConfiguration
instance to configure the UI functionality
of the PAX All-in-One Android SDK.You can configure these parameters in the
UiConfiguration
instance that you create:- Configure these Summary screen features:
- Refund a transaction (REFUND_TRANSACTION).
- Send a receipt by email (SEND_RECEIPT_VIA_EMAIL).
- Capture a transaction (CAPTURE_TRANSACTION).
- Print a customer receipt (PRINT_CUSTOMER_RECEIPT).
- Print a merchant receipt (PRINT_MERCHANT_RECEIPT).
- Retry a failed transaction (RETRY_TRANSACTION).
- Increment a transaction (INCREMENT_TRANSACTION).
- Add a tip after a sale with on-receipt tipping(ADJUST_TIP).
- Configure the Summary screen so that it can be skipped (SKIP_SUMMARY_SCREEN) or so that it closes after 5 seconds (CLOSE_AFTER_TIMEOUT). The default setting is to display the Summary screen.
- Configure the signature capture so that it prints on the paper receipt (ON_RECEIPT) or is skipped (NONE). The default setting is on-screen signature capture.
- Configure the merchant receipt (MERCHANT_RECEIPT) or customer receipt (CUSTOMER_RECEIPT) to be printed automatically.
- Configure the accessibility mode.
Follow this step to create and configure the
UiConfiguration
instance in your app:- Create theUiConfigurationinstance.mposUi.configuration = UiConfiguration( summaryFeatures = setOf( SummaryFeature.REFUND_TRANSACTION, SummaryFeature.SEND_RECEIPT_VIA_EMAIL, SummaryFeature.CAPTURE_TRANSACTION, SummaryFeature.PRINT_CUSTOMER_RECEIPT, SummaryFeature.PRINT_MERCHANT_RECEIPT, SummaryFeature.RETRY_TRANSACTION, SummaryFeature.INCREMENT_TRANSACTION SummaryFeature.ADJUST_TIP ) // Use this to skip the summary screen // resultDisplayBehavior = UiConfiguration.ResultDisplayBehavior.SKIP_SUMMARY_SCREEN, // Use this to set signature capture to be on paper receipt // signatureCapture = SignatureCapture.ON_RECEIPT, // Use this to enable automatic receipt printing // automaticPrintingOption = AutomaticPrintingOption.MERCHANT_RECEIPT, // Use this to enable accessibility mode // accessibilityModeOption = AccessibilityModeOption.OPTION_VISIBLE, )
Customizing the Default User Interface
Use this information to customize the Default UI so that it matches your
brand’s visual identity. The included screenshots highlight several style elements with labels
for reference. Note that not all available style elements are shown. A detailed description of
the style elements follows the screenshots.
Figure:
PAX All-in-One Default UI Style Elements
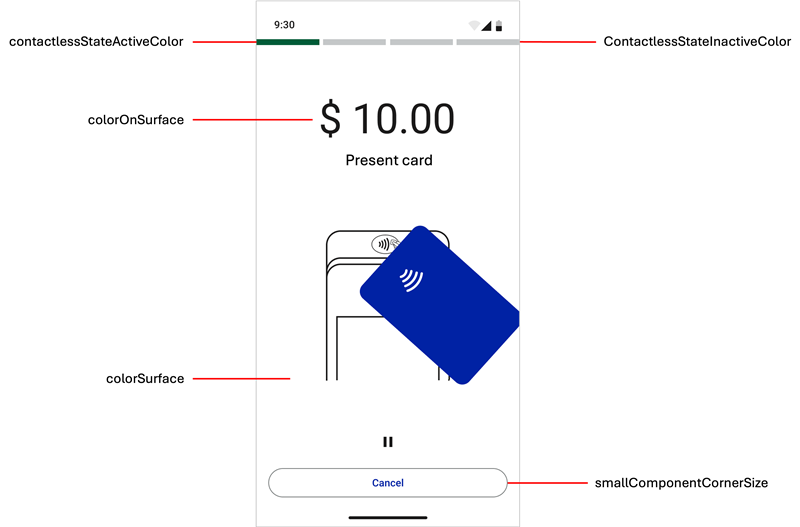
Figure:
PAX All-in-One Default UI Style Elements
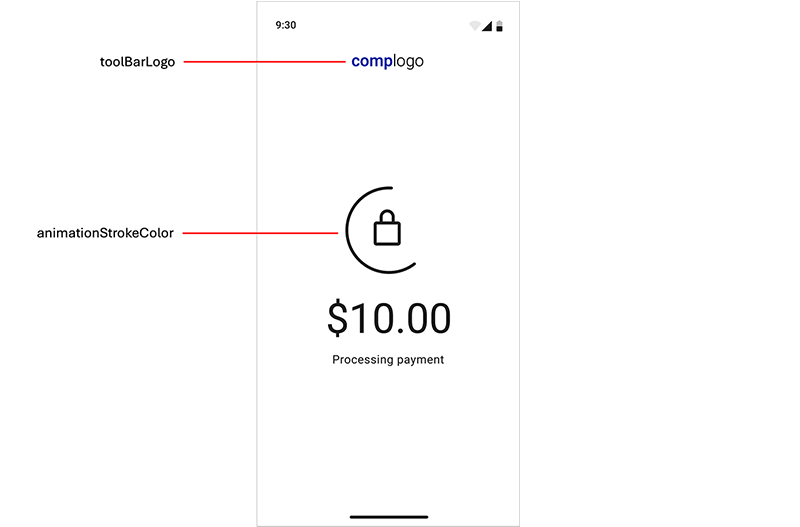
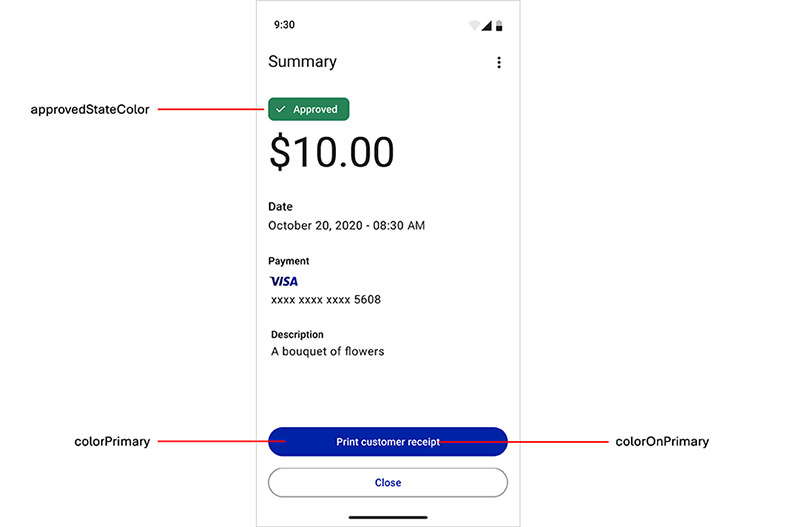
Figure:
PAX All-in-One Default UI Style Elements
- animationStrokeColor
- Stroke or outline color for animations.
- approvedStateColor
- Indicator color that appears for the approved transaction badge and animation.
- cardPresentAnimationStrokeColor
- Overrides theanimationStrokeColorstyle element in the card reader drawing on present-card animations. By default, this element is the same color as theanimationStrokeColorstyle element.
- colorControlActivated
- Color applied to switch controls in their active state.
- colorOnPrimary
- Primary color that appears for the filled button text and animation details.
- colorOnSurface
- Color for text that appears over the content view, transaction status badges text, and outlined button stroke.
- colorPrimary
- Primary color that appears for the filled buttons and animations.
- colorSurface
- Background color that appears for the content view.
- colorSurfaceOnSurface
- Background color for displayed lists such as transaction history.
- contactlessStateActiveColor
- Active indicator color that appears when the contactless interface is ready or when a payment card is tapped on the device.
- contactlessStateErrorColor
- Error indicator color that appears when a problem occurs when the device attempts to read a card on the contactless interface.
- contactlessStateInactiveColor
- Inactive indicator color that appears when the contactless interface is not active.
- declinedErrorStateColor
- Indicator color that appears for these elements:
- Declined transaction badges and animation
- Error transaction badges and animation
- Error dialog boxes
- Input field error messages
- notificationColor
- Alert notification color that appears withPoor connectionandLow batterynotifications. The default color is yellow.
- preAuthorizedStateColor
- Indicator color that appears for the pre-authorized transaction badge.
- smallComponentCornerSize
- Defines the corner radius of the buttons and transaction status badge. Set this element to0dpfor square corners,4dpfor slightly square corners (default), or32dpfor round corners.
- toolBarLogo
- Logo that appears during transaction processing. The image must be rectangular, have the minimum dimensions of 144 x 36 pixels, and a 4:1 ratio.
Customize Style Elements Using a Theme
Follow these steps to customize the Default UI style elements.
- Introduce a new theme to your application that includes theTheme.PayButton2theme as a parent theme:<!-- Paybutton theme --> <style name="Theme.AppTheme.SampleTheme" parent="Theme.PayButton2"> <!-- Text color --> <item name="colorOnSurface">@color/black</item> <!-- Background color --> <item name="colorSurface">@color/white</item> <!-- Contactless indicators --> <item name="contactlessStateActiveColor">@color/dui_green</item> <item name="contactlessStateInactiveColor">@color/dui_light_gray2</item> <item name="contactlessStateErrorColor">@color/dui_red</item> <!-- Transaction status --> <item name="approvedStateColor">@color/dui_green</item> <item name="declinedErrorStateColor">@color/dui_red</item> <!-- Also used for error messages and dialogs --> <item name="preAuthorizedStateColor">@color/dui_dark_gray</item> <!-- Filled buttons and animations primary color --> <item name="colorPrimary">@color/dui_blue</item> <!-- Used over the primary color for text on filled buttons and details on animations --> <item name="colorOnPrimary">@color/dui_white</item> <!-- Corner radius for the buttons and transaction status badges --> <item name="smallComponentCornerSize">4dp</item> <!-- Company logo --> <item name="toolBarLogo">@drawable/logo_140x36</item> <!-- Stroke color for icons and animations --> <item name="animationStrokeColor">@color/dui_black</item> <!-- Stroke color for terminal in present card animation. By default the same as animationStrokeColor --> <item name="cardPresentAnimationStrokeColor">@color/dui_black</item> </style>
- Call one of these methods to set the theme:mposUi.themeRes = R.style.Theme_AppTheme_SampleTheme
Customize Style Elements Using a UiConfiguration Instance
UiConfiguration
InstanceThis customization feature enables you to dynamically change some Default UI style elements
while the app is in use. These style elements can be customized using a
UiConfiguration
instance: - toolbarLogo
- colorScheme(and its sub-elements)
- cornerRadius
UiConfiguration
instance:- Create theUiConfigurationinstance.mposUi.configuration = UiConfiguration( // other UiConfiguration parameters toolbarLogo = "....", colorScheme = UiConfiguration.ColorScheme( colorPrimary = 0xFF1A1F71, colorOnPrimary = 0xFFFFFFFF, colorSurface = 0xFFFFFFFF, colorOnSurface = 0xFF1C1B1B, ), cornerRadius = UiConfiguration.CornerRadius.ROUND )
Enable Dark Mode in the Default User Interface
When the device is in dark mode, the Default UI payment flow screens appear in darker
contrasting colors than the colors used with the default screen settings (light mode). The
Dark Mode feature might be used in low-light settings such as restaurants and bars. For
more information about this setting, see the Android documentation.
The default dark mode background color is dark gray (#121212). To change the background
color to pure black (#000000), add a new
Theme.PayButton2
theme in the
value-night
folder.Follow this step to change dark mode behavior.
- If you want to enforce light or dark mode across your application and Default UI, regardless of the phone's dark mode setting, use this Android method. This example enforces night mode.AppCompatDelegate.setDefaultNightMode(AppCompatDelegate.MODE_NIGHT_YES)
Enabling Kiosk Mode
Use Kiosk mode to hide the navigation and status bars on a PAX terminal and to lock your
application to the device screen. When this mode is enabled, unauthorized users cannot
minimize the app or access other terminal functions.
Kiosk mode is not persistent across device restarts. Your application
must be able to re-enable Kiosk mode when the terminal restarts.
Enable Kiosk Mode
Follow these steps to enable Kiosk mode.
- Determine if the device is already in Kiosk mode.val isCurrentlyInKioskMode = PaxCommand.isKioskMode(context) if (isCurrentlyInKioskMode) { // Device is in kiosk mode Log.d(TAG, "Device is currently in kiosk mode") } else { // Device is in normal mode Log.d(TAG, "Device is in normal mode") }
- If the device is not in Kiosk mode, set Kiosk mode totrue.PaxCommand.setKioskMode(context, true) Log.d(TAG, "Kiosk mode has been enabled")
Installing Your Application on Debug PAX Devices
Use this information to install your application on a debug PAX device.
Debug devices ordered from
Cybersource
display the DEBUG only Not for
COMMERCIAL
watermark in the bottom-right corner of the device screen. This type
of device is required when you are developing your own application. Using a debug device
enables you to install Android package kits (APKs) and transfer files using a USB cable. Production (live) device screens do not display a watermark. For security reasons, you
cannot install an APK directly on a live device. The only way to update applications on
this type of device is by download from PAXSTORE. Also, only production devices can be
deployed in the market. For more information about production devices, see Making Your Application Available on Production PAX Devices.
Install an Android Application on Debug PAX Devices
PAX devices that are ordered from
Cybersource
to debug your application, display
the DEBUG only Not for COMMERCIAL
watermark on the bottom-right corner of the
device screen.Follow this step to install an Android application on a debug PAX device.
- Connect the PAX device to your computer using the USB cable provided with the device.
- Depending on your development tool or operating system, use one of these methods:
- If you are using Android Studio, you can install the Android Package Kit (APK) file directly on the PAX device.
- Alternatively, you can transfer the APK to the test device, by selecting the file on the device, and then following the instructions to install it.
- If you are using an Apple computer, you can use a file transfer tool, such as Android File Transfer, to copy the APK file to the PAX device. Choose the APK file on the device and follow the on-screen instructions to install the file.
- If you are using a Windows computer, you can copy the APK file to the PAX device. Choose the APK file on the device and follow the on-screen instructions to install the APK file.
Making Your Application Available on Production PAX Devices
Use this information to make your app available for use on production
(live) PAX devices.
The difference between a production and debug PAX device is that a debug device ordered
from
Cybersource
has a DEBUG only Not for COMMERCIAL
watermark in
the bottom-right corner of the device screen. A production device does not have a
watermark. For more information about debug devices, see Installing Your Application on Debug PAX Devices.You must prepare and submit your app before it can be added to PAXSTORE, which is a PAX
Technology platform where you can publish your point-of-sale (POS) device apps.
Submit Your Android Application in the Business Center
Business Center
You must submit your app for review in the
Business Center
. The app submission is
reviewed and receives comment or approval. After approval, Cybersource
submits your Android Package Kit (APK) file to PAXSTORE for
publication. The published app can be downloaded and used on production PAX
devices.Before starting the app submission process, verify that your APK file is not larger than 200 MB.
Follow these steps to submit your Android application.
- In theBusiness Center, go to the left navigation panel and chooseAcceptance Devices > App Submission.
- Complete the form to provide required information about your Android application.
- ClickSubmit.
PAX All-in-One Payment Services
Use this information to process PAX All-in-One Solution payment services.
Sale
Use this information to process a sale. This transaction combines an
authorization and a capture into a single transaction.
Follow these steps to process a sale.
- Create aTransactionParametersobject and provide the required information for the payment.
- Retrieve thetransactionIntentvariable from themposUiobject and use thestartActivitymethod to initiate the transaction flow.val transactionParameters = TransactionParameters.Builder() .charge(BigDecimal("1.00"), Currency.EUR) .customIdentifier("yourReferenceForTheTransaction") .build() val transactionIntent = mposUi.createTransactionIntent(transactionParameters) startActivityForResult(transactionIntent, MposUi.REQUEST_CODE_PAYMENT)
- After the transaction is complete and the Summary screen is dismissed, theonActivityResultmethod is triggered. This action returns information about the last transaction.override fun onActivityResult(requestCode: Int, resultCode: Int, data: Intent?) { super.onActivityResult(requestCode, resultCode, data) if (requestCode == MposUi.REQUEST_CODE_PAYMENT) { when (resultCode) { // Result code from a successful transaction MposUi.RESULT_CODE_APPROVED -> { val transactionIdentifier = data?.getStringExtra(MposUi.RESULT_EXTRA_TRANSACTION_IDENTIFIER) Toast.makeText(findViewById(android.R.id.content),"Transaction approved!\nIdentifier: $transactionIdentifier", Toast.LENGTH_LONG).show() } // Result code from a declined, aborted or failed transaction MposUi.RESULT_CODE_FAILED -> { Toast.makeText(findViewById(android.R.id.content), "Transaction was declined, aborted, or failed", Toast.LENGTH_LONG).show() } } } }
- Get the full transaction object by retrieving thelatestTransactionproperty from the mposUi object.val transactionObject = mposUi.latestTransaction
Refund
Use this information to process a refund by referencing the original transaction. You
can issue refunds for either the full amount or a partial amount of the original
transaction.
Stand-alone credits are also supported and can be processed independently of a
previous transaction. For more information, see Stand-Alone Credit.
Follow these steps to process a refund.
- Create aTransactionParametersobject and provide the required information for the payment.
- Retrieve thetransactionIntentvariable from themposUiobject and use thestartActivitymethod to initiate the transaction flow.val transactionParameters = TransactionParameters.Builder() .refund("transactionIdentifier") // Specify amount and currency for partial refunds // .amountAndCurrency(BigDecimal("1.00"), Currency.EUR) .build() val transactionIntent = mposUi.createTransactionIntent(transactionParameters) startActivityForResult(transactionIntent, MposUi.REQUEST_CODE_PAYMENT)
- After the transaction is complete and the Summary screen is dismissed, theonActivityResultmethod is triggered. This action returns information about the last transaction.override fun onActivityResult(requestCode: Int, resultCode: Int, data: Intent?) { super.onActivityResult(requestCode, resultCode, data) if (requestCode == MposUi.REQUEST_CODE_PAYMENT) { when (resultCode) { // Result code from a successful transaction MposUi.RESULT_CODE_APPROVED -> { val transactionIdentifier = data?.getStringExtra(MposUi.RESULT_EXTRA_TRAN SACTION_IDENTIFIER) Toast.makeText(findViewById(android.R.id.content),"Transaction approved!\nIdentifier: $transactionIdentifier", Toast.LENGTH_LONG).show() } // Result code from a declined, aborted or failed transaction MposUi.RESULT_CODE_FAILED -> { Toast.makeText(findViewById(android.R.id.content), "Transaction was declined, aborted, or failed", Toast.LENGTH_LONG).show() } } } }
- Get the full transaction object by retrieving thelatestTransactionproperty from the mposUi object.val transactionObject = mposUi.latestTransaction
Stand-Alone Credit
Use this information to process a stand-alone credit. This transaction enables you to
issue a credit without referencing a previous transaction. The customer must present
their payment card.
When processing a stand-alone credit, there is no limit on the
credit amount because the transaction does not reference the original purchase. To
help manage risk, it is recommended to use a refund transaction whenever possible.
For more information, see Refund.
Follow these steps to process a stand-alone credit.
- Create aTransactionParametersobject and provide the required information for the payment.
- Retrieve thetransactionIntentvariable from themposUiobject and use thestartActivitymethod to initiate the transaction flow.val transactionParameters = TransactionParameters.Builder() .refund(BigDecimal("1.00"), Currency.EUR) .customIdentifier("yourReferenceForTheTransaction") .build() val transactionIntent = mposUi.createTransactionIntent(transactionParameters) startActivityForResult(transactionIntent, MposUi.REQUEST_CODE_PAYMENT)
- After the transaction is complete and the Summary screen is dismissed, theonActivityResultmethod is triggered. This action returns information about the last transaction.override fun onActivityResult(requestCode: Int, resultCode: Int, data: Intent?) { super.onActivityResult(requestCode, resultCode, data) if (requestCode == MposUi.REQUEST_CODE_PAYMENT) { when (resultCode) { // Result code from a successful transaction MposUi.RESULT_CODE_APPROVED -> { val transactionIdentifier = data?.getStringExtra(MposUi.RESULT_EXTRA_TRANSACTION_IDENTIFIER) Toast.makeText(findViewById(android.R.id.content),"Transaction approved!\nIdentifier: $transactionIdentifier", Toast.LENGTH_LONG).show() } // Result code from a declined, aborted or failed transaction MposUi.RESULT_CODE_FAILED -> { Toast.makeText(findViewById(android.R.id.content), "Transaction was declined, aborted, or failed", Toast.LENGTH_LONG).show() } } } }
- Get the full transaction object by retrieving thelatestTransactionproperty from the mposUi object.val transactionObject = mposUi.latestTransaction
Check Transaction Status
Use this information to request a check transaction status. This transaction enables
you to retrieve response data for a transaction that was lost or timed out. You must
have the
transactionIdentifier
value for the transaction that you
want to check. When the check transaction status request is complete, the
transaction details show on the Summary screen.Follow these steps to request a check transaction status.
- Access thetransactionIdentifiervalue in theonActivityResultmethod of the original transaction.
- Retrieve the transactionsummaryIntentvalue from themposUiobject.
- Use thestartActivitymethod to initiate the Summary screen.val summaryIntent = mposUi.createTransactionSummaryIntent(transactionIdentifier = "transactionIdentifier") startActivityForResult(summaryIntent, MposUi.REQUEST_CODE_SHOW_SUMMARY)
- After the Summary screen is dismissed, theonActivityResultmethod is triggered. This action returns information about the previous transaction.override fun onActivityResult(requestCode: Int, resultCode: Int, data: Intent?) { super.onActivityResult(requestCode, resultCode, data) // Result code from closing the summary screen if (resultCode == MposUi.RESULT_CODE_SUMMARY_CLOSED) { // Accessing status from the transaction that was just queried val transactionStatus = mposUi.latestTransaction?.status Toast.makeText(activity, "Summary closed. Transaction status: $transactionStatus", Toast.LENGTH_SHORT).show() } }
- Get the full transaction object by retrieving thelatestTransactionproperty from the mposUi object.val transactionObject = mposUi.latestTransaction
Token Refund
To process a credit through a token, you must have the
Token Management Service
product enabled
and an existing (saved) token from a tokenized transaction. For more information,
see .Use this information to process a token refund. This transaction enables you to
process a stand-alone credit for a tokenized card.
Follow these steps to process a token refund.
- Create aTransactionParametersobject and provide the required information for the payment.
- Create anaccountParametersobject and set theinstrumentIdentifierIDfrom the original transaction’s metadata as theshopperAccountIdentifier.
- Retrieve thetransactionIntentvariable from themposUiobject and use thestartActivitymethod to initiate the transaction flow.val transactionParameters = TransactionParameters.Builder() .refund(BigDecimal("1.00"), Currency.EUR) .customIdentifier("yourReferenceForTheTransaction") .build() val accountParameters = AccountParameters.Builder().token().cybersource().shopperAccountIdentifier("instrumentIdentifierID").build(); val transactionIntent = mposUi.createTransactionIntent(transactionParameters, null, accountParameters) startActivityForResult(transactionIntent, MposUi.REQUEST_CODE_PAYMENT)
- After the transaction is complete and the Summary screen is dismissed, theonActivityResultmethod is triggered. This action returns information about the last transaction.Override fun onActivityResult(requestCode: Int, resultCode: Int, data: Intent?) { super.onActivityResult(requestCode, resultCode, data) if (requestCode == MposUi.REQUEST_CODE_PAYMENT) { when (resultCode) { // Result code from a successful transaction MposUi.RESULT_CODE_APPROVED -> { val transactionIdentifier = data?.getStringExtra(MposUi.RESULT_EXTRA_TRANSACTION_IDENTIFIER) Toast.makeText(findViewById(android.R.id.content),"Transaction approved!\nIdentifier: $transactionIdentifier", Toast.LENGTH_LONG).show() } // Result code from a declined, aborted or failed transaction MposUi.RESULT_CODE_FAILED -> { Toast.makeText(findViewById(android.R.id.content), "Transaction was declined, aborted, or failed", Toast.LENGTH_LONG).show() } } } }
- Get the full transaction object by retrieving thelatestTransactionproperty from the mposUi object.val transactionObject = mposUi.latestTransaction
Pre-Authorization
Use this information to process a pre-authorization for an initial amount. A
pre-authorization transaction places a temporary hold on the customer's payment
card. The transaction amount can be captured at a later time.
Most authorizations expire within 5 to 7 days, as determined by the issuing bank.
When an authorization expires, your bank, the issuing bank, or payment processor
might require you to resubmit the authorization request and include a capture
request in the same message. For more information, see Capture.
To help ensure successful transaction processing, monitor authorization timelines and
use combined authorization and capture requests when necessary.
Follow these steps to process a pre-authorization.
- Create aTransactionParametersobject and provide the required information for the payment.
- Retrieve thetransactionIntentvalue from themposUiobject and use thestartActivitymethod to initiate the transaction flow.val transactionParameters = TransactionParameters.Builder() .charge(BigDecimal("1.00"), Currency.EUR) .customIdentifier("yourReferenceForTheTransaction") .autoCapture(false) .build() val transactionIntent = mposUi.createTransactionIntent(transactionParameters) startActivityForResult(transactionIntent, MposUi.REQUEST_CODE_PAYMENT)
- After the transaction is complete and the Summary screen is dismissed, theonActivityResultmethod is triggered. This action returns information about the previous transaction.Override fun onActivityResult(requestCode: Int, resultCode: Int, data: Intent?) { super.onActivityResult(requestCode, resultCode, data) if (requestCode == MposUi.REQUEST_CODE_PAYMENT) { when (resultCode) { // Result code from a successful transaction MposUi.RESULT_CODE_APPROVED -> { val transactionIdentifier = data?.getStringExtra(MposUi.RESULT_EXTRA_TRANSACTION_IDENTIFIER) Toast.makeText(findViewById(android.R.id.content),"Transaction approved!\nIdentifier: $transactionIdentifier", Toast.LENGTH_LONG).show() } // Result code from a declined, aborted or failed transaction MposUi.RESULT_CODE_FAILED -> { Toast.makeText(findViewById(android.R.id.content), "Transaction was declined, aborted, or failed", Toast.LENGTH_LONG).show() } } } }
- Get the full transaction object by retrieving thelatestTransactionproperty from the mposUi object.val transactionObject = mposUi.latestTransaction
Incremental Authorization
Use this information to process an incremental authorization. An incremental
authorization is used after an approved pre-authorization to increase the authorized
amount before capture.
Follow these steps to process an incremental authorization.
- Create aTransactionParametersobject and provide the required information for the payment.
- Retrieve thetransactionIntentvalue from themposUiobject and use thestartActivitymethod to initiate the transaction flow.val transactionParameters = TransactionParameters.Builder() .incrementalAuthorization("transactionIdentifier") .amountAndCurrency(BigDecimal("1.00"), Currency.EUR) .build() val transactionIntent = mposUi.createTransactionIntent(transactionParameters) startActivityForResult(transactionIntent, MposUi.REQUEST_CODE_PAYMENT)
- After the transaction is complete and the Summary screen is dismissed, theonActivityResultmethod is triggered. This action returns information about the previous transaction.Override fun onActivityResult(requestCode: Int, resultCode: Int, data: Intent?) { super.onActivityResult(requestCode, resultCode, data) if (requestCode == MposUi.REQUEST_CODE_PAYMENT) { when (resultCode) { // Result code from a successful transaction MposUi.RESULT_CODE_APPROVED -> { val transactionIdentifier = data?.getStringExtra(MposUi.RESULT_EXTRA_TRAN SACTION_IDENTIFIER) Toast.makeText(findViewById(android.R.id.content),"Transaction approved!\nIdentifier: $transactionIdentifier", Toast.LENGTH_LONG).show() } // Result code from a declined, aborted or failed transaction MposUi.RESULT_CODE_FAILED -> { Toast.makeText(findViewById(android.R.id.content), "Transaction was declined, aborted, or failed", Toast.LENGTH_LONG).show() } } } }
- Get the full transaction object by retrieving thelatestTransactionproperty from the mposUi object.val transactionObject = mposUi.latestTransaction
Capture
Use this information to capture a pre-authorized transaction. The capture request
references the approved pre-authorization request.
Follow these steps to process a capture.
- Create aTransactionParametersobject and provide the required information for the payment.
- Retrieve thetransactionIntentvariable from themposUiobject and use thestartActivitymethod to initiate the transaction flow.val transactionParameters = TransactionParameters.Builder() .capture("transactionIdentifier") // Specify amount and currency for partial captures // .amountAndCurrency(BigDecimal("1.00"), Currency.EUR) .build() val transactionIntent = mposUi.createTransactionIntent(transactionParameters) startActivityForResult(transactionIntent, MposUi.REQUEST_CODE_PAYMENT)
- After the transaction is complete and the Summary screen is dismissed, theonActivityResultmethod is triggered. This action returns information returns information about the last transaction.Override fun onActivityResult(requestCode: Int, resultCode: Int, data: Intent?) { super.onActivityResult(requestCode, resultCode, data) if (requestCode == MposUi.REQUEST_CODE_PAYMENT) { when (resultCode) { // Result code from a successful transaction MposUi.RESULT_CODE_APPROVED -> { val transactionIdentifier = data?.getStringExtra(MposUi.RESULT_EXTRA_TRAN SACTION_IDENTIFIER) Toast.makeText(findViewById(android.R.id.content),"Transaction approved!\nIdentifier: $transactionIdentifier", Toast.LENGTH_LONG).show() } // Result code from a declined, aborted or failed transaction MposUi.RESULT_CODE_FAILED -> { Toast.makeText(findViewById(android.R.id.content), "Transaction was declined, aborted, or failed", Toast.LENGTH_LONG).show() } } } }
- Get the full transaction object by retrieving thelatestTransactionproperty from the mposUi object.val transactionObject = mposUi.latestTransaction
Account Verification
Use this information to process an account verification. This transaction submits a
zero-amount authorization request to validate the payment card.
Follow these steps to
process an account verification.
- Create aTransactionParametersobject and provide the required information for the payment.
- Retrieve thetransactionIntentvariable from themposUiobject and use thestartActivitymethod to initiate the transaction flow.val transactionParameters = TransactionParameters.Builder() .verification(Currency.EUR) .customIdentifier("yourReferenceForTheTransaction") .build() val transactionIntent = mposUi.createTransactionIntent(transactionParameters) startActivityForResult(transactionIntent, MposUi.REQUEST_CODE_PAYMENT)
- After the transaction is complete and the Summary screen is dismissed, theonActivityResultmethod is triggered, which returns information about the last transaction.Override fun onActivityResult(requestCode: Int, resultCode: Int, data: Intent?) { super.onActivityResult(requestCode, resultCode, data) if (requestCode == MposUi.REQUEST_CODE_PAYMENT) { when (resultCode) { // Result code from a successful transaction MposUi.RESULT_CODE_APPROVED -> { val transactionIdentifier = data?.getStringExtra(MposUi.RESULT_EXTRA_TRANSACTION_IDENTIFIER) Toast.makeText(findViewById(android.R.id.content),”Transaction approved!\nIdentifier: $transactionIdentifier”, Toast.LENGTH_LONG).show() } // Result code from a declined, aborted or failed transaction MposUi.RESULT_CODE_FAILED -> { Toast.makeText(findViewById(android.R.id.content), “Transaction was declined, aborted, or failed”, Toast.LENGTH_LONG).show() } } } }
- Get the full transaction object by retrieving thelatestTransactionproperty from the mposUi object.val transactionObject = mposUi.latestTransaction
Mail Order or Telephone Order
Use this information to process a mail order or telephone order (MOTO) sale and other
transactions. This is a card-not-present transaction so the customer does not
present the payment card at the terminal.
Instructions for processing various MOTO transaction types are
shown in step 2 of the code example.
Follow these steps to process a MOTO transaction.
- Create aTransactionParametersobject and provide the required information for the payment.
- Retrieve thetransactionIntentvariable from themposUiobject and use thestartActivitymethod to initiate the transaction flow.val transactionParameters = TransactionParameters.Builder() // Use for Sale .charge(BigDecimal("1.00"), Currency.EUR) // Use for Account Verification // .verification(Currency.EUR) .customIdentifier("yourReferenceForTheTransaction") // Use for Pre-Authorization // .autoCapture(false) .workflow(new WorkflowConfiguration.Builder() .moto() // Set to false to toggle CVV as optional .cvvRequired(true) // Set to false to toggle address as optional .addressRequired(true) // Set to true to show transaction review screen .reviewRequired(false) .build()) .build() val transactionIntent = mposUi.createTransactionIntent(transactionParameters) startActivityForResult(transactionIntent, MposUi.REQUEST_CODE_PAYMENT)
- After the transaction is complete and the Summary screen is dismissed, theonActivityResultmethod is triggered. This action returns information about the last transaction.Override fun onActivityResult(requestCode: Int, resultCode: Int, data: Intent?) { super.onActivityResult(requestCode, resultCode, data) if (requestCode == MposUi.REQUEST_CODE_PAYMENT) { when (resultCode) { // Result code from a successful transaction MposUi.RESULT_CODE_APPROVED -> { val transactionIdentifier = data?.getStringExtra(MposUi.RESULT_EXTRA_TRANSACTION_IDENTIFIER) Toast.makeText(findViewById(android.R.id.content),”Transaction approved!\nIdentifier: $transactionIdentifier”, Toast.LENGTH_LONG).show() } // Result code from a declined, aborted or failed transaction MposUi.RESULT_CODE_FAILED -> { Toast.makeText(findViewById(android.R.id.content), “Transaction was declined, aborted, or failed”, Toast.LENGTH_LONG).show() } } } }
- Get the full transaction object by retrieving thelatestTransactionproperty from the mposUi object.val transactionObject = mposUi.latestTransaction
Sale with Airline Details
Use this information to process a sale with airline details. This transaction
includes required airline details and related service details in the payment
request.
Follow these steps to process a sale with airline details.
- Create anAdditionalDetailsobject and set one or more airline (airlineDetails) fields and related service (ancillaryDetails) fields.val airlineDetails = AdditionalDetailsBuilder() .airlineDetails( AirlineDetailsBuilder() .agentCode("AGT12345") .agentName("Visa Travel") .arrivalDate(SimpleDateFormat("MMddyyyy", Locale.US).parse("01202024")) .carrierName("Visa Airways") .clearingCount(1) .clearingSequence("1") .creditReasonIndicator(CreditReasonIndicator.OTHER) .customerCode("CORP12345") .documentType(DocumentType.AIRLINE) .electronicTicket(true) .exchangeTicketAmount(BigDecimal("0.00")) .exchangeTicketFee(BigDecimal("0.00")) .firstName("John") .lastName("Doe") .numberOfPassengers("1") .passengerName("John Doe") .planNumber("01") .purchaseType(PurchaseType.TICKET) .reservationSystem("00001") .restrictedTicketIndicator(RestrictedTicketIndicator.NONREFUNDABLE) .ticketIssueDate(SimpleDateFormat("yyyyMMdd", Locale.US).parse("20240115")) .ticketIssuerAddress("1 Market St") .ticketIssuerCity("San Francisco") .ticketIssuerCode("UA") .ticketNumber("0141234567890") .ticketRestrictionText("00000") .ticketUpdateIndicator(TicketUpdateIndicator.NEW) .totalClearingAmount("450.00") .totalFee(BigDecimal("25.00")) .addLegDetails( listOf( LegDetailsBuilder() .arrivalTime("1230") .arrivalTimeSegment(TimeSegment.PM) .carrierCode("UA") .legClass("Y") .conjunctionTicket("0141234567891") .couponNumber("1") .departureDate(SimpleDateFormat("yyyyMMdd", Locale.US).parse("20240115")) .departureTime("0930") .departureTimeSegment(TimeSegment.AM) .destination("JFK") .endorsementsRestrictions("NONREF") .exchangeTicket("0141234567892") .fare(BigDecimal("450.00")) .fareBasis("Y26") .fee(BigDecimal("25.00")) .flightNumber("1234") .originatingAirportCode("SFO") .stopoverCode(StopoverCode.NO_STOPOVER) .tax(BigDecimal("38.00")) ) ) .build() ) .ancillaryDetails( AncillaryDetailsBuilder() .connectedTicketNumber("0149876543210") .creditReasonIndicator(CreditReasonIndicator.OTHER) .feeDescription("Checked baggage") .passengerName("Jane Doe") .ticketNumber("0141234567890") .addServiceDetails( listOf( ServiceDetailsBuilder() .categoryCode("BAGO") .subcategoryCode("CHKD") .feeAmount(BigDecimal("35.00")) .feeCode("0DB") ) ) .build() ) .build()
- Create aTransactionParametersobject and provide the required information for the payment.
- Retrieve thetransactionIntentvariable from themposUiobject and use thestartActivitymethod to initiate the transaction flow.val transactionParameters = TransactionParameters.Builder() .charge(BigDecimal("1.00"), Currency.EUR) .customIdentifier("yourReferenceForTheTransaction") .additionalDetails(airlineDetails) .build() val transactionIntent = mposUi.createTransactionIntent(transactionParameters) startActivityForResult(transactionIntent, MposUi.REQUEST_CODE_PAYMENT)
- After the transaction is complete and the Summary screen is dismissed, theonActivityResultmethod is triggered. This action returns information about the last transaction.override fun onActivityResult(requestCode: Int, resultCode: Int, data: Intent?) { super.onActivityResult(requestCode, resultCode, data) if (requestCode == MposUi.REQUEST_CODE_PAYMENT) { when (resultCode) { // Result code from a successful transaction MposUi.RESULT_CODE_APPROVED -> { val transactionIdentifier = data?.getStringExtra(MposUi.RESULT_EXTRA_TRANSACTION_IDENTIFIER) Toast.makeText(findViewById(android.R.id.content),"Transaction approved!\nIdentifier: $transactionIdentifier", Toast.LENGTH_LONG).show() } // Result code from a declined, aborted or failed transaction MposUi.RESULT_CODE_FAILED -> { Toast.makeText(findViewById(android.R.id.content), "Transaction was declined, aborted, or failed", Toast.LENGTH_LONG).show() } } } }
- Get the full transaction object by retrieving thelatestTransactionproperty from themposUiobject.val transactionObject = mposUi.latestTransaction
Sale with Auto Rental Details
Use this information to process a sale with auto rental details. This transaction
includes required auto rental details in the payment request.
Follow these steps to process a sale with auto rental details.
- Create anAdditionalDetailsobject and set one or more of the auto rental fields.val autoRentalDetails = AdditionalDetailsBuilder() .autoRentalDetails( // Set value of the builder to the number of rental days AutoRentalDetailsBuilder("5") .pickUpState("CA") .pickUpTime(SimpleDateFormat("HHmmss", Locale.US).parse("093000")) .programCode("01") .ratePerMile(BigDecimal("0.25")) .regularMileageCost(BigDecimal("50.00")) .rentalAddress("1 Market St") .rentalLocationID("LOC001") .renterName("Bob Smith") .returnCity("Los Angeles") .returnCountry("USA") .returnDate(SimpleDateFormat("MMddyyyy", Locale.US).parse("01202024")) .returnLocation("LAX Terminal 1") .returnLocationID("LOC002") .returnState("CA") .specialProgramCode(SpecialProgramCode.NONE) .taxAmount(BigDecimal("18.50")) .taxIndicator(true) .taxRate(BigDecimal("0.08")) .taxStatusIndicator("Y") .taxSummary("18.50") .taxType("VAT") .timePeriod(TimePeriod.DAILY) .towingCharge(BigDecimal("0.00")) .vehicleIdentificationNumber("1FTSW21P34EB12345") .vehicleInsuranceIndicator(true) .vehicleMake("Ford") .vehicleModel("Focus") .weeklyRentalRate(BigDecimal("280.00")) .promotion( PromotionDetailsBuilder() .code("PROMO2024") .additionalCode("WKND10") ) .build() ) .build()
- Create aTransactionParametersobject and provide the required information for the payment.
- Retrieve thetransactionIntentvariable from themposUiobject and use thestartActivitymethod to initiate the transaction flow.val transactionParameters = TransactionParameters.Builder() .charge(BigDecimal("1.00"), Currency.EUR) .customIdentifier("yourReferenceForTheTransaction") .additionalDetails(autoRentalDetails) .build() val transactionIntent = mposUi.createTransactionIntent(transactionParameters) startActivityForResult(transactionIntent, MposUi.REQUEST_CODE_PAYMENT)
- After the transaction is complete and the Summary screen is dismissed, theonActivityResultmethod is triggered. This action returns information about the last transaction.override fun onActivityResult(requestCode: Int, resultCode: Int, data: Intent?) { super.onActivityResult(requestCode, resultCode, data) if (requestCode == MposUi.REQUEST_CODE_PAYMENT) { when (resultCode) { // Result code from a successful transaction MposUi.RESULT_CODE_APPROVED -> { val transactionIdentifier = data?.getStringExtra(MposUi.RESULT_EXTRA_TRANSACTION_IDENTIFIER) Toast.makeText(findViewById(android.R.id.content),"Transaction approved!\nIdentifier: $transactionIdentifier", Toast.LENGTH_LONG).show() } // Result code from a declined, aborted or failed transaction MposUi.RESULT_CODE_FAILED -> { Toast.makeText(findViewById(android.R.id.content), "Transaction was declined, aborted, or failed", Toast.LENGTH_LONG).show() } } } }
- Get the full transaction object by retrieving thelatestTransactionproperty from themposUiobject.val transactionObject = mposUi.latestTransaction
Sale with Billing and Shipping Details
Use this information to process a sale with billing and shipping details. This
transaction includes required billing and shipping details in the payment
request.
Follow these steps to process a sale with billing and shipping details.
- Create anAdditionalDetailsobject and set one or more of the billing and shipping fields.val billingAndShippingDetails = AdditionalDetailsBuilder() .billingDetails( BillingDetailsBuilder() .firstName("Alice") .middleName("M") .lastName("Smith") .title("Ms.") .company("Visa Inc.") .companyTaxID("123456789") .street1("123 Main St") .city("San Francisco") .state("CA") .postalCode("94105") .country("US") .email("alice@example.com") .phoneNumber("14155550123") .customerID("CUST12345") .personalID("PID1234567890") .ipAddress("192.0.2.1") .hostname("host.example.com") .comments("VIP customer") .build() ) .shippingDetails( ShippingDetailsBuilder() .firstName("Bob") .lastName("Jones") .company("Visa Inc.") .street1("500 Market St") .city("New York") .state("NY") .postalCode("10001") .country("US") .phoneNumber("12125550188") .build() ) .build()
- Create aTransactionParametersobject and provide the required information for the payment.
- Retrieve thetransactionIntentvariable from themposUiobject and use thestartActivitymethod to initiate the transaction flow.val transactionParameters = TransactionParameters.Builder() .charge(BigDecimal("1.00"), Currency.EUR) .customIdentifier("yourReferenceForTheTransaction") .additionalDetails(billingAndShippingDetails) .build() val transactionIntent = mposUi.createTransactionIntent(transactionParameters) startActivityForResult(transactionIntent, MposUi.REQUEST_CODE_PAYMENT)
- After the transaction is complete and the Summary screen is dismissed, theonActivityResultmethod is triggered. This action returns information about the last transaction.override fun onActivityResult(requestCode: Int, resultCode: Int, data: Intent?) { super.onActivityResult(requestCode, resultCode, data) if (requestCode == MposUi.REQUEST_CODE_PAYMENT) { when (resultCode) { // Result code from a successful transaction MposUi.RESULT_CODE_APPROVED -> { val transactionIdentifier = data?.getStringExtra(MposUi.RESULT_EXTRA_TRANSACTION_IDENTIFIER) Toast.makeText(findViewById(android.R.id.content),"Transaction approved!\nIdentifier: $transactionIdentifier", Toast.LENGTH_LONG).show() } // Result code from a declined, aborted or failed transaction MposUi.RESULT_CODE_FAILED -> { Toast.makeText(findViewById(android.R.id.content), "Transaction was declined, aborted, or failed", Toast.LENGTH_LONG).show() } } } }
- Get the full transaction object by retrieving thelatestTransactionproperty from themposUiobject.val transactionObject = mposUi.latestTransaction
Sale with Installment Details
Use this information to process a sale with installment details. This transaction
includes the required installment payment details in the payment request.
This transaction is available only in the Latin American
and Caribbean (LAC) region.
Follow these steps to process a sale with installment details.
- Create anInstallmentDetailsobject and set one ore more of the installment fields.// Set value of the builder to the number of installments val installmentDetails = InstallmentDetailsBuilder(5) // Set to PlanType.ISSUER_FUNDED for issuer funded plans .planType(PlanType.MERCHANT_FUNDED) .includesInterest(true) .governmentPlan(true) .build()
- Create aTransactionParametersobject and provide the required information for the payment.
- Retrieve thetransactionIntentvariable from themposUiobject and use thestartActivitymethod to initiate the transaction flow.val transactionParameters = TransactionParameters.Builder() .charge(BigDecimal("1.00"), Currency.EUR) .customIdentifier("yourReferenceForTheTransaction") .installmentDetails(installmentDetails) .build() val transactionIntent = mposUi.createTransactionIntent(transactionParameters) startActivityForResult(transactionIntent, MposUi.REQUEST_CODE_PAYMENT)
- After the transaction is complete and the Summary screen is dismissed, theonActivityResultmethod is triggered. This action returns information about the last transaction.override fun onActivityResult(requestCode: Int, resultCode: Int, data: Intent?) { super.onActivityResult(requestCode, resultCode, data) if (requestCode == MposUi.REQUEST_CODE_PAYMENT) { when (resultCode) { // Result code from a successful transaction MposUi.RESULT_CODE_APPROVED -> { val transactionIdentifier = data?.getStringExtra(MposUi.RESULT_EXTRA_TRANSACTION_IDENTIFIER) Toast.makeText(findViewById(android.R.id.content),"Transaction approved!\nIdentifier: $transactionIdentifier", Toast.LENGTH_LONG).show() } // Result code from a declined, aborted or failed transaction MposUi.RESULT_CODE_FAILED -> { Toast.makeText(findViewById(android.R.id.content), "Transaction was declined, aborted, or failed", Toast.LENGTH_LONG).show() } } } }
- Get the full transaction object by retrieving thelatestTransactionproperty from themposUiobject.val transactionObject = mposUi.latestTransaction
Sale with Lodging Details
Use this information to process a sale with lodging details. This transaction includes
required lodging details in the payment request.
Follow these steps to process a sale with lodging details.
- Create anAdditionalDetailsobject and set one or more lodging fields.val lodgingDetails = AdditionalDetailsBuilder() .lodgingDetails( // Set value of the builder to the duration of stay LodgingDetailsBuilder(3) .checkInDate("030125") .checkOutDate("030425") .guestSmokingPreference("N") .numberOfGuests(2) .numberOfRoomsBooked(1) .guestName("John Doe") .roomLocation("Ocean View") .roomTaxElements("VAT") .roomBedType("KING") .roomRateType("CORPORATE") .specialProgramCode("1") .dailyRoomRate1(BigDecimal("150.00")) .dailyRoomRate2(BigDecimal("160.00")) .dailyRoomRate3(BigDecimal("170.00")) .roomNights1(1) .roomNights2(1) .roomNights3(1) .corporateClientCode("CORP123456") .promotionalCode("PROMO2025") .additionalCoupon("DISCOUNT10") .travelAgencyCode("TA789") .travelAgencyName("Premium Travel Agency") .customerServicePhoneNumber("1-800-555-0199") .tax(BigDecimal("45.00")) .prepaidCost(BigDecimal("200.00")) .foodAndBeverageCost(BigDecimal("125.00")) .roomTax(BigDecimal("30.00")) .adjustmentAmount(BigDecimal("15.00")) .phoneCost(BigDecimal("8.00")) .restaurantCost(BigDecimal("95.00")) .roomServiceCost(BigDecimal("40.00")) .miniBarCost(BigDecimal("25.00")) .laundryCost(BigDecimal("18.00")) .miscellaneousCost(BigDecimal("12.00")) .giftShopCost(BigDecimal("35.00")) .movieCost(BigDecimal("10.00")) .healthClubCost(BigDecimal("20.00")) .valetParkingCost(BigDecimal("30.00")) .cashDisbursementCost(BigDecimal("5.00")) .nonRoomCost(BigDecimal("40.00")) .businessCenterCost(BigDecimal("15.00")) .loungeBarCost(BigDecimal("55.00")) .transportationCost(BigDecimal("75.00")) .gratuityCost(BigDecimal("45.00")) .conferenceRoomCost(BigDecimal("120.00")) .audioVisualCost(BigDecimal("65.00")) .banquetCost(BigDecimal("180.00")) .internetAccessCost(BigDecimal("12.00")) .earlyCheckOutCost(BigDecimal("20.00")) .nonRoomTax(BigDecimal("25.00")) .build() ) .build()
- Create aTransactionParametersobject and provide the required information for the payment.
- Retrieve thetransactionIntentvariable from themposUiobject and use thestartActivitymethod to initiate the transaction flow.val transactionParameters = TransactionParameters.Builder() .charge(BigDecimal("1.00"), Currency.EUR) .customIdentifier("yourReferenceForTheTransaction") .additionalDetails(lodgingDetails) .build() val transactionIntent = mposUi.createTransactionIntent(transactionParameters) startActivityForResult(transactionIntent, MposUi.REQUEST_CODE_PAYMENT)
- After the transaction is complete and the Summary screen is dismissed, theonActivityResultmethod is triggered. This action returns information about the last transaction.override fun onActivityResult(requestCode: Int, resultCode: Int, data: Intent?) { super.onActivityResult(requestCode, resultCode, data) if (requestCode == MposUi.REQUEST_CODE_PAYMENT) { when (resultCode) { // Result code from a successful transaction MposUi.RESULT_CODE_APPROVED -> { val transactionIdentifier = data?.getStringExtra(MposUi.RESULT_EXTRA_TRANSACTION_IDENTIFIER) Toast.makeText(findViewById(android.R.id.content),"Transaction approved!\nIdentifier: $transactionIdentifier", Toast.LENGTH_LONG).show() } // Result code from a declined, aborted or failed transaction MposUi.RESULT_CODE_FAILED -> { Toast.makeText(findViewById(android.R.id.content), "Transaction was declined, aborted, or failed", Toast.LENGTH_LONG).show() } } } }
- Get the full transaction object by retrieving thelatestTransactionproperty from themposUiobject.val transactionObject = mposUi.latestTransaction
Sale with Merchant-Defined Data Details
Use this information to process a sale with merchant-defined data details. This
transaction includes required merchant-defined data details in the payment
request.
Follow these steps to process a sale with merchant-defined data details.
- Create anAdditionalDetailsobject and set one or more merchant-defined data fields.val mddDetails = AdditionalDetailsBuilder() .mddDetails( MddDetailsBuilder() .field1("value1") .field2("value2") .field3("value3") .field4("value4") .field5("value5") .field6("value6") .field7("value7") .field8("value8") .field9("value9") .field10("value10") .field11("value11") .field12("value12") .field13("value13") .field14("value14") .field15("value15") .field16("value16") .field17("value17") .field18("value18") .field19("value19") .field20("value20") .build() ) .build()
- Create aTransactionParametersobject and provide the required information for the payment.
- Retrieve thetransactionIntentvariable from themposUiobject and use thestartActivitymethod to initiate the transaction flow.val transactionParameters = TransactionParameters.Builder() .charge(BigDecimal("1.00"), Currency.EUR) .customIdentifier("yourReferenceForTheTransaction") .additionalDetails(mddDetails) .build() val transactionIntent = mposUi.createTransactionIntent(transactionParameters) startActivityForResult(transactionIntent, MposUi.REQUEST_CODE_PAYMENT)
- After the transaction is complete and the Summary screen is dismissed, theonActivityResultmethod is triggered. This action returns information about the last transaction.override fun onActivityResult(requestCode: Int, resultCode: Int, data: Intent?) { super.onActivityResult(requestCode, resultCode, data) if (requestCode == MposUi.REQUEST_CODE_PAYMENT) { when (resultCode) { // Result code from a successful transaction MposUi.RESULT_CODE_APPROVED -> { val transactionIdentifier = data?.getStringExtra(MposUi.RESULT_EXTRA_TRANSACTION_IDENTIFIER) Toast.makeText(findViewById(android.R.id.content),"Transaction approved!\nIdentifier: $transactionIdentifier", Toast.LENGTH_LONG).show() } // Result code from a declined, aborted or failed transaction MposUi.RESULT_CODE_FAILED -> { Toast.makeText(findViewById(android.R.id.content), "Transaction was declined, aborted, or failed", Toast.LENGTH_LONG).show() } } } }
- Get the full transaction object by retrieving thelatestTransactionproperty from themposUiobject.val transactionObject = mposUi.latestTransaction
Sale with On-Reader Tipping
Use this information to process a sale with on-reader tipping. At the start of each
transaction, the terminal prompts the customer to add a tip by showing suggested tip
amounts. The customer chooses or enters a tip amount on the terminal before
presenting their payment card.
Follow these steps to process a sale with on-reader tipping.
- Create aTransactionParametersobject and provide the required information for the payment.
- Create aTippingProcessStepParametersobject to configure the tipping function. The tipping options are percentage choice, tip amount, and total amount.
- Create aTransactionProcessParametersobject to add the tipping step.
- Retrieve thetransactionIntentvariable from themposUiobject and use thestartActivitymethod to initiate the transaction flow.val transactionParameters = TransactionParameters.Builder() .charge(BigDecimal("1.00"), Currency.EUR) .customIdentifier("yourReferenceForTheTransaction") .build() // Use to display three tipping percentage choices val tipStep = TippingProcessStepParameters.Builder() .askForPercentageChoice() // Optional to configure tipping percentages | Default values = 10, 15, 20 // .percentages(BigDecimal("10"), BigDecimal("20"), BigDecimal("30")) // Optional to show confirmation screen // .showTotalAmountConfirmationScreen(true) .build() // Use to ask for tip amount // val tipStep = TippingProcessStepParameters.Builder() // .askForTipAmount() // Optional to show confirmation screen // .showTotalAmountConfirmationScreen(true) // .build() // Use to ask for total transaction amount including tip // val tipStep = TippingProcessStepParameters.Builder() // .askForTotalAmount() // Optional to show confirmation screen // .showTotalAmountConfirmationScreen(true) // .build() val processParameters = TransactionProcessParameters.Builder() .addStep(tipStep) .build() val transactionIntent = mposUi.createTransactionIntent(transactionParameters, processParameters) startActivityForResult(transactionIntent, MposUi.REQUEST_CODE_PAYMENT)
- After the transaction is complete and the Summary screen is dismissed, theonActivityResultmethod is triggered. This action returns information about the last transaction.Override fun onActivityResult(requestCode: Int, resultCode: Int, data: Intent?) { super.onActivityResult(requestCode, resultCode, data) if (requestCode == MposUi.REQUEST_CODE_PAYMENT) { when (resultCode) { // Result code from a successful transaction MposUi.RESULT_CODE_APPROVED -> { val transactionIdentifier = data?.getStringExtra(MposUi.RESULT_EXTRA_TRANSACTION_IDENTIFIER) Toast.makeText(findViewById(android.R.id.content),"Transaction approved!\nIdentifier: $transactionIdentifier", Toast.LENGTH_LONG).show() } // Result code from a declined, aborted or failed transaction MposUi.RESULT_CODE_FAILED -> { Toast.makeText(findViewById(android.R.id.content), “Transaction was declined, aborted, or failed”, Toast.LENGTH_LONG).show() } } } }
- Get the full transaction object by retrieving thelatestTransactionproperty from the mposUi object.val transactionObject = mposUi.latestTransaction
Sale with On-Receipt Tipping
Use this information to process a sale with on-receipt tipping. After the original
transaction amount is pre-authorized, the customer writes the tip or total amount on the
printed receipt. A follow-on tip adjust request must be sent within 24 hours to capture
the transaction. For more information, see Tip Adjust.
By using this feature, you assume the risk of the
overcapture being declined and increased chargebacks. Only use this feature when
required. The recommendation is to process a sale with on-reader tipping whenever
possible. For more information, see Sale with On-Reader Tipping.
Process a Sale with On-Receipt Tipping
After completing a sale with on-receipt tipping transaction, a follow-on tip adjust
request must be sent within 24 hours to capture the transaction. For more information,
see Tip Adjust.
Follow these steps to process a sale with on-receipt tipping.
- Create aTransactionParametersobject and provide the required information for the payment.
- Retrieve thetransactionIntentvariable from themposUiobject and use thestartActivitymethod to initiate the transaction flow.val transactionParameters = TransactionParameters.Builder() .charge(BigDecimal("50.00"), Currency.USD) .customIdentifier("yourReferenceForTheTransaction") .autoCapture(false) .TipAdjustable(true) .build() val transactionIntent = mposUi.createTransactionIntent(transactionParameters) startActivityForResult(transactionIntent, MposUi.REQUEST_CODE_PAYMENT)
- After the transaction is complete and the Summary screen is dismissed, theonActivityResultmethod is triggered. This action returns information about the last transaction.override fun onActivityResult(requestCode: Int, resultCode: Int, data: Intent?) { super.onActivityResult(requestCode, resultCode, data) if (requestCode == MposUi.REQUEST_CODE_PAYMENT) { when (resultCode) { // Result code from a successful transaction MposUi.RESULT_CODE_APPROVED -> { val transactionIdentifier = data?.getStringExtra(MposUi.RESULT_EXTRA_TRANSACTION_IDENTIFIER) Toast.makeText(findViewById(android.R.id.content),"Transaction approved!\nIdentifier: $transactionIdentifier", Toast.LENGTH_LONG).show() } // Result code from a declined, aborted or failed transaction MposUi.RESULT_CODE_FAILED -> { Toast.makeText(findViewById(android.R.id.content), "Transaction was declined, aborted, or failed", Toast.LENGTH_LONG).show() } } } }
- Get the full transaction object by retrieving thelatestTransactionproperty from the mposUi object.val transactionObject = mposUi.latestTransaction
Tip Adjust
Use this information to process a tip adjust. This is a required follow-on
transaction after processing a sale with on-receipt tipping. The tip adjust request
must be sent within 24 hours to capture the transaction.
After the original sale transaction is pre-authorized, the customer writes the tip or
total amount on the printed receipt. The tip adjust request must be submitted with the
tip amount or with
0
, if no tip was provided. The tip adjust amount is
limited to 20% of the original transaction amount. Requests for higher amounts will be
rejected. A follow-on tip adjust request is then sent to capture the additional tip
amount. This transaction is also called an overcapture
. For more information, see Sale with On-Receipt Tipping.
Process a Tip Adjust
Follow these steps to process a tip adjust.
- Create aTransactionParametersobject and provide the required information for the payment.
- Retrieve thetransactionIntentvariable from themposUiobject and use thestartActivitymethod to initiate the transaction flow.val transactionParameters = TransactionParameters.Builder() .adjustTip("transactionIdentifier", BigDecimal("10.00"), Currency.USD) .build() val transactionIntent = mposUi.createTransactionIntent(transactionParameters) startActivityForResult(transactionIntent, MposUi.REQUEST_CODE_PAYMENT)
- After the transaction is complete and the Summary screen is dismissed, theonActivityResultmethod is triggered. This action returns information about the last transaction.override fun onActivityResult(requestCode: Int, resultCode: Int, data: Intent?) { super.onActivityResult(requestCode, resultCode, data) if (requestCode == MposUi.REQUEST_CODE_PAYMENT) { when (resultCode) { // Result code from a successful transaction MposUi.RESULT_CODE_APPROVED -> { val transactionIdentifier = data?.getStringExtra(MposUi.RESULT_EXTRA_TRANSACTION_IDENTIFIER) Toast.makeText(findViewById(android.R.id.content),"Transaction approved!\nIdentifier: $transactionIdentifier", Toast.LENGTH_LONG).show() } // Result code from a declined, aborted or failed transaction MposUi.RESULT_CODE_FAILED -> { Toast.makeText(findViewById(android.R.id.content), "Transaction was declined, aborted, or failed", Toast.LENGTH_LONG).show() } } } }
- Get the full transaction object by retrieving thelatestTransactionproperty from the mposUi object.val transactionObject = mposUi.latestTransaction
Sale with Payment Facilitator Details
Use this information to process a sale with payment facilitator details. This
transaction includes the required payment facilitator details in the payment
request.
Follow these steps to process a sale with payment facilitator details.
- Create aMerchantDetailsobject and set one ore more of the payment facilitator fields.val merchantDetails = MerchantDetailsBuilder() .salesOrganizationId("12345") .subMerchantId("SM67890") .merchantDescriptor("ExampleMerchant") .build()
- Create aTransactionParametersobject and provide the required information for the payment.
- Retrieve thetransactionIntentvariable from themposUiobject and use thestartActivitymethod to initiate the transaction flow.val transactionParameters = TransactionParameters.Builder() .charge(BigDecimal("1.00"), Currency.EUR) .customIdentifier("yourReferenceForTheTransaction") .merchantDetails(merchantDetails) .build() val transactionIntent = mposUi.createTransactionIntent(transactionParameters) startActivityForResult(transactionIntent, MposUi.REQUEST_CODE_PAYMENT)
- After the transaction is complete and the Summary screen is dismissed, theonActivityResultmethod is triggered. This action returns information about the last transaction.override fun onActivityResult(requestCode: Int, resultCode: Int, data: Intent?) { super.onActivityResult(requestCode, resultCode, data) if (requestCode == MposUi.REQUEST_CODE_PAYMENT) { when (resultCode) { // Result code from a successful transaction MposUi.RESULT_CODE_APPROVED -> { val transactionIdentifier = data?.getStringExtra(MposUi.RESULT_EXTRA_TRANSACTION_IDENTIFIER) Toast.makeText(findViewById(android.R.id.content),"Transaction approved!\nIdentifier: $transactionIdentifier", Toast.LENGTH_LONG).show() } // Result code from a declined, aborted or failed transaction MposUi.RESULT_CODE_FAILED -> { Toast.makeText(findViewById(android.R.id.content), "Transaction was declined, aborted, or failed", Toast.LENGTH_LONG).show() } } } }
- Get the full transaction object by retrieving thelatestTransactionproperty from themposUiobject.val transactionObject = mposUi.latestTransaction
Sale with Tax Details
Use this information to process a sale with tax details. This type of transaction can
be used to include required tax details as part of the transaction.
Follow these steps to process a sale with tax details.
- Create aTaxDetailsobject and set one ore more of the tax fields.val taxDetails = TaxDetailsBuilder() .merchantTaxId("TaxID1234") .salesSlipNumber(12345678) .includedTaxAmount(BigDecimal("5.00")) .includedLocalTaxAmount(BigDecimal("1.00")) .includedNationalTaxAmount(BigDecimal("2.00")) .build()
- Create aTransactionParametersobject and provide the required information for the payment.
- Retrieve thetransactionIntentvariable from themposUiobject and use thestartActivitymethod to initiate the transaction flow.val transactionParameters = TransactionParameters.Builder() .charge(BigDecimal("1.00"), Currency.EUR) .customIdentifier("yourReferenceForTheTransaction") .taxDetails(taxDetails) .build() val transactionIntent = mposUi.createTransactionIntent(transactionParameters) startActivityForResult(transactionIntent, MposUi.REQUEST_CODE_PAYMENT)
- After the transaction is complete and the Summary screen is dismissed, theonActivityResultmethod is triggered. This action returns information about the last transaction.override fun onActivityResult(requestCode: Int, resultCode: Int, data: Intent?) { super.onActivityResult(requestCode, resultCode, data) if (requestCode == MposUi.REQUEST_CODE_PAYMENT) { when (resultCode) { // Result code from a successful transaction MposUi.RESULT_CODE_APPROVED -> { val transactionIdentifier = data?.getStringExtra(MposUi.RESULT_EXTRA_TRANSACTION_IDENTIFIER) Toast.makeText(findViewById(android.R.id.content),"Transaction approved!\nIdentifier: $transactionIdentifier", Toast.LENGTH_LONG).show() } // Result code from a declined, aborted or failed transaction MposUi.RESULT_CODE_FAILED -> { Toast.makeText(findViewById(android.R.id.content), "Transaction was declined, aborted, or failed", Toast.LENGTH_LONG).show() } } } }
- Get the full transaction object by retrieving thelatestTransactionproperty from themposUiobject.val transactionObject = mposUi.latestTransaction
Offline Transactions
Use this information to process offline sale or refund transactions when internet
connectivity is unavailable.
Using offline transaction functionality involves risk. Because these
transactions are not authorized in real time, you assume responsibility for potential
issues such as failed transactions, increased fraud, and higher chargeback rates. Only
use offline transactions when necessary such as during temporary internet outages.
Whenever possible, it is recommended to process online sale transactions to ensure
secure and immediate authorization. For more information, see Sale.
Review these considerations before performing offline transactions:
- Contactless transactions are not supported for offline sales.
- A terminal must have successfully processed at least one online transaction before it can perform offline transactions.
- Offline transactions must be submitted for authorization once internet connectivity is restored. For more information, see Submit an Offline Transactions Batch for Authorization.
Process an Offline Sale
Use this information to process an offline sale. This transaction is also called a
deferred authorization
or store-and-forward
transaction.Offline sales can be performed only on terminals that have
successfully processed at least one online transaction.
When internet connectivity is unavailable, an offline sale enables you to capture
transaction details locally. These stored transactions must be submitted for
authorization when connectivity is restored. For more information, see Submit an Offline Transactions Batch for Authorization.
Only process offline sales when required. The recommendation is
to process online sale transactions whenever possible. For more information, see
Sale.
Follow these steps to process an offline sale.
- Create aTransactionParametersobject and provide the required information for the payment.
- Retrieve thetransactionIntentvariable from themposUiobject and use thestartActivitymethod to initiate the transaction flow.// Use this to configure the maximum amount per offline transaction and maximum amount for an offline batch. // MposUI.offlineModule.offlineTransactionConfiguration = OfflineTransactionConfiguration( // maximumAmountPerTransaction = BigDecimal("100.00"), // maximumTotalAmountForBatch = BigDecimal("1000.00") // ) val transactionParameters = TransactionParameters.Builder() .charge(BigDecimal("1.00"), Currency.EUR) .customIdentifier("yourReferenceForTheTransaction") .build() val transactionIntent = mposUi.offlineModule.createTransactionIntent(transactionParameters) startActivityForResult(transactionIntent, MposUi.REQUEST_CODE_PAYMENT)
- After the transaction is complete and the Summary screen is dismissed, theonActivityResultmethod is triggered. This action returns information about the last transaction.override fun onActivityResult(requestCode: Int, resultCode: Int, data: Intent?) { super.onActivityResult(requestCode, resultCode, data) if (requestCode == MposUi.REQUEST_CODE_PAYMENT) { when (resultCode) { // Result code from a successful transaction MposUi.RESULT_CODE_APPROVED -> { val transactionIdentifier = data?.getStringExtra(MposUi.RESULT_EXTRA_TRANSACTION_IDENTIFIER) Toast.makeText(findViewById(android.R.id.content),"Transaction approved!\nIdentifier: $transactionIdentifier", Toast.LENGTH_LONG).show() } // Result code from a declined, aborted or failed transaction MposUi.RESULT_CODE_FAILED -> { Toast.makeText(findViewById(android.R.id.content), "Transaction was declined, aborted, or failed", Toast.LENGTH_LONG).show() } } } }
Refund an Offline Sale Pending Submission
Use this information to process a refund for an offline sale before it is submitted
for authorization.
Follow these steps to refund an offline sale pending submission.
- Create aTransactionParametersobject and provide the required information for the payment.
- Retrieve thetransactionIntentvariable from themposUiobject and use thestartActivitymethod to initiate the transaction flow.val transactionParameters = TransactionParameters.Builder() .refund("transactionIdentifier") .build() val transactionIntent = mposUi.offlineModule.createTransactionIntent(transactionParameters) startActivityForResult(transactionIntent, MposUi.REQUEST_CODE_PAYMENT)
- After the transaction is complete and the Summary screen is dismissed, theonActivityResultmethod is triggered. This action returns information about the last transaction.override fun onActivityResult(requestCode: Int, resultCode: Int, data: Intent?) { super.onActivityResult(requestCode, resultCode, data) if (requestCode == MposUi.REQUEST_CODE_PAYMENT) { when (resultCode) { // Result code from a successful transaction MposUi.RESULT_CODE_APPROVED -> { val transactionIdentifier = data?.getStringExtra(MposUi.RESULT_EXTRA_TRANSACTION_IDENTIFIER) Toast.makeText(findViewById(android.R.id.content),"Transaction approved!\nIdentifier: $transactionIdentifier", Toast.LENGTH_LONG).show() } // Result code from a declined, aborted or failed transaction MposUi.RESULT_CODE_FAILED -> { Toast.makeText(findViewById(android.R.id.content), "Transaction was declined, aborted, or failed", Toast.LENGTH_LONG).show() } } } }
Request a Check Transaction Status for an Offline Sale Pending Submission
Use this information to request a check transaction status for a single offline sale
transaction before it is submitted for authorization. The transaction status shows
on the Summary screen.
Follow these steps to request a check transaction status for an offline sale pending
submission.
- Access thetransactionIdentifiervalue in theonActivityResultmethod of the original transaction.
- Retrieve the transactionsummaryIntentvalue from themposUiobject.
- Use thestartActivitymethod to initiate the Summary screen.val summaryIntent = mposUi.offlineModule.createTransactionSummaryIntent(transactionIdentifier = "transactionIdentifier") startActivityForResult(summaryIntent, MposUi.REQUEST_CODE_SHOW_SUMMARY)
- After the Summary screen is dismissed, theonActivityResultmethod is triggered. This action returns information about the previous transaction.override fun onActivityResult(requestCode: Int, resultCode: Int, data: Intent?) { super.onActivityResult(requestCode, resultCode, data) if (requestCode == MposUi.REQUEST_CODE_SHOW_SUMMARY) { when (resultCode) { // Result code from a successful transaction MposUi.RESULT_CODE_APPROVED -> { val transactionIdentifier = data?.getStringExtra(MposUi.RESULT_EXTRA_TRANSACTION_IDENTIFIER) Toast.makeText(findViewById(android.R.id.content),"Transaction approved!\nIdentifier: $transactionIdentifier", Toast.LENGTH_LONG).show() } // Result code from a declined, aborted or failed transaction MposUi.RESULT_CODE_FAILED -> { Toast.makeText(findViewById(android.R.id.content), "Transaction was declined, aborted, or failed", Toast.LENGTH_LONG).show() } } } }
Retrieve a List of Offline Transactions Pending Submission
Use this information to retrieve a list of stored offline transactions before they
are submitted for authorization.
Follow this step to retrieve a list of offline transactions pending submission:
- Use thequeryTransactionsfunction from themposUiobject to retrieve the list.mposUi.offlineModule.queryTransactions( filterParameters = FilterParameters.Builder().build(), includeReceipts = false, offset = 0, limit = 20 ) { _, _, _, _, transactions, mposError -> if (transactions != null && transactions.isNotEmpty()) { // Handle Success scenario } else { // Handle Error Scenario } }
Submit an Offline Transactions Batch for Authorization
Use this information to submit an offline transactions batch for authorization. After
processing offline sale transactions, you must submit these transactions for
authorization. The recommendation is to submit the batch as soon as internet
connectivity is available.
Follow these steps to submit an offline transactions batch for authorization.
- Retrieve thebatchSubmissionIntentfrom themposUiobject.
- Use thestartActivitymethod to initiate the offline transactions batch submission.val batchSubmissionIntent = mposUi.offlineModule.submitOfflineTransactionBatchIntent() startActivityForResult(batchSubmissionIntent, MposUi.REQUEST_CODE_SUBMIT_BATCH)
- After the batch submission result is dismissed, theonActivityResultmethod is triggered. This action returns information about the last batch submission.override fun onActivityResult(requestCode: Int, resultCode: Int, data: Intent?) { super.onActivityResult(requestCode, resultCode, data) if (requestCode == MposUi.REQUEST_CODE_SUBMIT_BATCH) { when (resultCode) { // Result code from a successful batch submission MposUi.RESULT_CODE_SUBMIT_BATCH_SUCCESS -> { Toast.makeText(findViewById(android.R.id.content),"Batch submission successful", Toast.LENGTH_LONG).show() } // Result code from a failed batch submission MposUi.RESULT_CODE_SUBMIT_BATCH_FAILED -> { Toast.makeText(findViewById(android.R.id.content),"Batch submission failed", Toast.LENGTH_LONG).show() } } } }
Cashback
Use this information to process a cashback transaction. This transaction enables
a customer to request that a specified amount of cash be given to them as part of
the transaction. A cashback transaction can be performed with or without a
purchase.
Follow these steps to process a cashback.
- Create aTransactionParametersobject and provide the required information for the payment.
- Retrieve thetransactionIntentvariable from themposUiobject and use thestartActivitymethod to initiate the transaction flow.val transactionParameters = TransactionParameters.Builder() .charge(BigDecimal("30.00"), Currency.GBP) .withCashback(BigDecimal("10.00")) .customIdentifier("yourReferenceForTheTransaction") .build() val transactionIntent = mposUi.createTransactionIntent(transactionParameters) startActivityForResult(transactionIntent, MposUi.REQUEST_CODE_PAYMENT)
- After the transaction is complete and the Summary screen is dismissed, theonActivityResultmethod is triggered. This action returns information about the last transaction.override fun onActivityResult(requestCode: Int, resultCode: Int, data: Intent?) { super.onActivityResult(requestCode, resultCode, data) if (requestCode == MposUi.REQUEST_CODE_PAYMENT) { when (resultCode) { // Result code from a successful transaction MposUi.RESULT_CODE_APPROVED -> { val transactionIdentifier = data?.getStringExtra(MposUi.RESULT_EXTRA_TRANSACTION_IDENTIFIER) Toast.makeText(findViewById(android.R.id.content),"Transaction approved!\nIdentifier: $transactionIdentifier", Toast.LENGTH_LONG).show() } // Result code from a declined, aborted or failed transaction MposUi.RESULT_CODE_FAILED -> { Toast.makeText(findViewById(android.R.id.content), "Transaction was declined, aborted, or failed", Toast.LENGTH_LONG).show() } } } }
- Get the full transaction object by retrieving thelatestTransactionproperty from the mposUi object.val transactionObject = mposUi.latestTransaction
Electronic Benefits Transfer
Public assistance programs in the United States use Electronic Benefits Transfer (EBT)
payment cards to issue monthly food and cash benefits to eligible individuals. EBT cards
function like prepaid debit cards that can be used at authorized retailers.
Food benefits are issued through the Supplemental Nutrition Assistance Program (SNAP),
which helps individuals with low incomes purchase eligible food items.
Process EBT SNAP and EBT Cash Transactions
Use this information to process an EBT sale and other transactions for EBT SNAP (food
benefit) and EBT cash.
Instructions for processing various EBT transaction types are
shown in step 2 of the code example.
Follow these steps to process an EBT transaction.
- Create aTransactionParametersobject and provide the required information for the payment.
- Retrieve thetransactionIntentvariable from themposUiobject and use thestartActivitymethod to initiate the transaction flow.val transactionParameters = TransactionParameters.Builder() // Use for Sale .charge(BigDecimal("1.00"), Currency.USD) // Use for Stand-Alone Credit // .refund(BigDecimal("1.00"), Currency.USD) // Use for Cashback // .withCashback(BigDecimal("10.00")) .customIdentifier("yourReferenceForTheTransaction") .workflow(new WorkflowConfiguration.Builder() .ebt() // Set to CASH for EBT cash .category(FOOD) // Set to true for Balance Inquiry and set amount to 0 .balanceInquiry(false) // Set to true for Voucher transaction .voucher(false) .build()) .build() val transactionIntent = mposUi.createTransactionIntent(transactionParameters) startActivityForResult(transactionIntent, MposUi.REQUEST_CODE_PAYMENT)
- After the transaction is complete and the Summary screen is dismissed, theonActivityResultmethod is triggered. This action returns information about the last transaction.override fun onActivityResult(requestCode: Int, resultCode: Int, data: Intent?) { super.onActivityResult(requestCode, resultCode, data) if (requestCode == MposUi.REQUEST_CODE_PAYMENT) { when (resultCode) { // Result code from a successful transaction MposUi.RESULT_CODE_APPROVED -> { val transactionIdentifier = data?.getStringExtra(MposUi.RESULT_EXTRA_TRANSACTION_IDENTIFIER) Toast.makeText(findViewById(android.R.id.content),"Transaction approved!\nIdentifier: $transactionIdentifier", Toast.LENGTH_LONG).show() } // Result code from a declined, aborted or failed transaction MposUi.RESULT_CODE_FAILED -> { Toast.makeText(findViewById(android.R.id.content), "Transaction was declined, aborted, or failed", Toast.LENGTH_LONG).show() } } } }
- Get the full transaction object by retrieving thelatestTransactionproperty from the mposUi object.val transactionObject = mposUi.latestTransaction
Custom Card Read
The Custom Card Read feature enables you to obtain data from custom cards such as gift
cards, loyalty program cards, and employee cards. This feature cannot be used to perform
payment functions.
Custom Card Read is supported for non-PCI cards
only. To use this feature, the card type must be on your allowlist. To add a card type
to your allowlist, contact your implementation manager.
To retrieve the card data, swipe the card’s magnetic stripe through the payment device.
The custom card read-only function reads and returns the raw card identifier to your app
or point-of-sale (POS) system. You can then use the raw data within your app or POS
system.
These are examples of how you might use the Custom Card Read feature:
- Custom gift card:Use the card number to check a balance or process a payment in your private gift card network.
- Employee card:Use the card number to look up an employee's profile or account.
Process a Custom Card Read
Follow these steps to process a custom card read.
- Retrieve theReadCardIntentvalue from themposUiobject and use thestartActivitymethod to initiate the card read flow.val ReadCardIntent = mposUi.createReadCardIntent() startActivityForResult(ReadCardIntent, MposUi.REQUEST_CODE_READ_CARD)
- After the card read activity is complete, theonActivityResultmethod is triggered. This action returns information about the status of the card read activity and the card details.override fun onActivityResult(requestCode: Int, resultCode: Int, data: Intent?) { super.onActivityResult(requestCode, resultCode, data) if (requestCode == MposUi.REQUEST_CODE_READ_CARD) { when (resultCode) { // Result code from a successful card read MposUi.RESULT_CODE_READ_CARD_SUCCESS -> { val cardDetailsObject = (mposUi.lastExecution as ExecutionProcess.ReadCardExecutionProcess.Completed).cardDetails Toast.makeText(findViewById(android.R.id.content), "Card read successful", Toast.LENGTH_LONG).show() } // Result code from a failed card read MposUi.RESULT_CODE_READ_CARD_FAILED -> { Toast.makeText(findViewById(android.R.id.content), "Card read failed", Toast.LENGTH_LONG).show() } } } }
Custom Printing
Use the Custom Printing feature to print custom content directly to the integrated
printer of a PAX terminal. This feature enables you to print text, label-value pairs,
images, barcodes, and QR codes. It is not limited to receipts and does not affect
standard printed or emailed receipts.
A label-value pair consists of two related text elements: a label that describes the data
and a value that displays the associated information. For example: Card (label): Visa
(value) or Amount (label): 10.00 (value).
Use Custom Printing
Follow these steps to use custom printing on a PAX device with an integrated
printer.
- Create aPrintLayoutFactoryobject to set a custom print layout.val customReceipt = PrintLayoutFactory.Builder() .addParagraph("This is Custom Receipt") .addParagraph("This is centered", AccessoryPrinter.Align.CENTER) .addParagraph("This is right", AccessoryPrinter.Align.RIGHT) .addParagraph("This is left", AccessoryPrinter.Align.LEFT) .addLabelValue("Label", "Value") .addImage(prepareImageFile("image.jpg", context)) .addBarcode( type = PrintLayout.Section.Barcode.Type.QRCODE, value = "https://www.example.com" ) .addEject() .build() // Adding an image requires the absolute file path of the image. Use this to refer to an image in your asset folder. fun prepareImageFile(imageFileName: String, context: Context): String { val inputStream = context.assets.open(imageFileName) val file = File(context.cacheDir, imageFileName) file.outputStream().use { output -> inputStream.copyTo(output) } return file.absolutePath }
- Retrieve theCustomPrintIntentvariable from themposUiobject and use thestartActivitymethod to initiate the custom printing flow.val CustomPrintIntent = mposUi.createCustomPrintIntent(customReceipt) startActivityForResult(CustomPrintIntent, MposUi.REQUEST_CODE_CUSTOM_PRINT)
- After the printing activity is complete, theonActivityResultmethod is triggered. This action returns information about the last transaction.override fun onActivityResult(requestCode: Int, resultCode: Int, data: Intent?) { super.onActivityResult(requestCode, resultCode, data) when (requestCode) { MposUi.REQUEST_CODE_CUSTOM_PRINT -> { when (resultCode) { MposUi.RESULT_CODE_PRINT_SUCCESS -> { // Printing was successful Log.d(TAG, "Printing successful.") } MposUi.RESULT_CODE_PRINT_FAILED -> { // Printing failed Log.e(TAG, "Printing failed.") } } } } }
Print a Customer or Merchant Receipt
Follow these steps to print a customer or merchant receipt from a previous
transaction.
- Retrieve thePrintCustomerReceiptIntentvariable from themposUiobject and use thestartActivitymethod to initiate the printing a receipt flow.// Use to print a customer receipt val PrintCustomerReceiptIntent = mposUi.createPrintCustomerReceiptIntent(transactionIdentifier, false) startActivityForResult(PrintCustomerReceiptIntent, MposUi.REQUEST_CODE_PRINT_CUSTOMER_RECEIPT) // Use to print a merchant receipt val PrintMerchantReceiptIntent = mposUi.createPrintMerchantReceiptIntent(transactionIdentifier, false) startActivityForResult(PrintMerchantReceiptIntent, MposUi.REQUEST_CODE_PRINT_MERCHANT_RECEIPT)
- After the printing activity is complete,onActivityResultmethod is triggered. This action returns information about the last transaction.override fun onActivityResult(requestCode: Int, resultCode: Int, data: Intent?) { super.onActivityResult(requestCode, resultCode, data) "onActivityResult: $resultCode".logDebug(TAG) val parentLayout: View = activity!!.findViewById(android.R.id.content) if (requestCode == MposUi.REQUEST_CODE_PRINT_CUSTOMER_RECEIPT || requestCode == MposUi.REQUEST_CODE_PRINT_MERCHANT_RECEIPT) { if (resultCode == MposUi.RESULT_CODE_PRINT_SUCCESS) { Snackbar.make(parentLayout, "Printing success", Snackbar.LENGTH_SHORT).show() } else if (resultCode == MposUi.RESULT_CODE_PRINT_FAILED) { Snackbar.make(parentLayout, "Printing failed", Snackbar.LENGTH_SHORT).show() } }
Email a Customer Receipt
Follow these steps to email a customer receipt from a previous
transaction.
- Retrieve theSendEmailReceiptIntentvalue from themposUiobject and use thestartActivitymethod to initiate the emailing a receipt flow.val SendEmailReceiptIntent = mposUi.createSendEmailReceiptIntent(transactionIdentifier) startActivityForResult(SendEmailReceiptIntent, MposUi.REQUEST_CODE_SEND_EMAIL)
- After the emailing activity is complete,onActivityResultmethod is triggered, which returns information about the status of the emailing activity.override fun onActivityResult(requestCode: Int, resultCode: Int, data: Intent?) { super.onActivityResult(requestCode, resultCode, data) "onActivityResult: $resultCode".logDebug(TAG) val parentLayout: View = activity!!.findViewById(android.R.id.content) if (requestCode == MposUi.REQUEST_CODE_SEND_EMAIL) { if (resultCode == MposUi.RESULT_CODE_EMAIL_SUCCESS) { Snackbar.make(parentLayout, "Receipt sent via email", Snackbar.LENGTH_SHORT).show() } else if (resultCode == MposUi.RESULT_CODE_EMAIL_FAILED) { Snackbar.make(parentLayout, "Fail while sending receipt via email", Snackbar.LENGTH_SHORT).show() } } }
Release Notes for PAX All-in-One Android Solution
These release notes are organized by release name and version, from newest to oldest.
Each release note includes these details:
- Name of release
- Type of release: app or SDK
- Version number
- Operating system: Android or iOS
- Release date: MM-DD-YYYY format
- General information
- Improvements
- New features
- Fixed issues
- Updated requirements
- Security updates
- Hot fixes
SDK Version 2.115.0 Release Notes
These release notes are for the PAX All-in-One and Tap to Pay on Android SDKs, version
2.115.0 for Android. The release date is 07-20-2026.
Fixed Issues
Fixed an intermittent issue that could cause the device to crash during contactless
transactions.
SDK Version 2.114.0 Release Notes
These release notes are for the PAX All-in-One and Tap to Pay on Android SDKs, version
2.114.0 for Android. The release date is 06-09-2026.
New Features
The solution supports adding these types of details during transactions:
- Airline
- Auto rental
- Billing and shipping
Improvements
Improved the user experience when performing an EBT balance inquiry.
SDK Version 2.113.0 Release Notes
These release notes are for the PAX All-in-One and Tap to Pay on Android SDKs, version 2.113.0
for Android. The release date is 05-26-2026.
Fixed Issues
- Fixed an issue where the secure PIN keyboard was incorrectly positioned on the PAX A3700 device screen, obscuring the PIN entry field.
- Fixed an issue where thecolorSchemeproperty ofuiConfigurationwas ignored for Tap to Pay integrations.
SDK Version 2.112.0 Release Notes
These release notes are for the PAX All-in-One and Tap to Pay on Android SDKs, version
2.112.0 for Android. The release date is 04-20-2026.
Improvements
Applied general fixes to the UI.
Fixed Issues
Fixed an intermittent issue that caused email receipts to display incorrect
locale-specific formatting.
Archive of Release Notes
This archive of release notes for the PAX All-in-One Android Solution and Tap to Pay on
Android Solution is organized by release name and version, from newest to oldest. For
information about current releases, see . Also see, .
Each release note includes these details:
- Name of release
- Type of release: app or SDK
- Version number
- Operating system: Android or iOS
- Release date: MM-DD-YYYY format
These are the types of release notes published:
- General information
- Improvements
- New features
- Fixed issues
- Updated requirements
- Security updates
- Hot fixes
SDK Version 2.111.0 Release Notes
These release notes are for the PAX All-in-One and Tap to Pay on Android SDKs, version
2.111.0 for Android. The release date is 03-15-2026.
New Features
Added support for these new devices and features:
- PAX A6650, A6630, A99, and A50 payment terminals.
- Printing custom content when using PAX terminals with integrated printers.
- Providing lodging details during a transaction.
- Enabling Kiosk mode on PAX terminals.
- Meeza card type, Egypt's national payment scheme.
SDK Version 2.110.0 Release Notes
These release notes are for the PAX All-in-One and Tap to Pay on Android SDKs, version
2.110.0 for Android. The release date is 02-16-2026.
New Features
Tap to Pay: Added support for processing transactions in multiple currencies with a
single device enrollment.
Improvements
- Improved the user experience when performing a magstripe transaction.
- Improved error messages shown during transactions.
- Tap to Pay: Re-enrolling a device no longer requires clearing Tap to Pay Ready App data.
Fixed Issues
- Tap to Pay: Fixed the issue where the enrollment screen appeared in dark mode even when the app was not set to dark mode.
- Fixed the issue that could prevent the credit and debit selection from appearing during a magstripe transaction.
- Fixed the issue where an oversized toolbar logo was not resized correctly.
- Applied general UI fixes.
General Information
Deprecated
AccessoryParameters
from the UiConfiguration
instance.
Starting from this SDK version, use AccessoryParameters
in the
mposUI
instance instead.SDK Version 2.109.0 Release Notes
These release notes are for the PAX All-in-One and Tap to Pay on Android SDKs, version
2.109.0 for Android. The release date is 01-22-2026.
New Features
Added the ability to configure the maximum amount allowed for an offline transaction and
the maximum total amount allowed for an offline transaction batch submitted for
authorization.
Fixed Issues
Applied general fixes to UI.
SDK Version 2.108.0 Release Notes
These release notes are for the PAX All-in-One and Tap to Pay on Android SDKs, version
2.108.0 for Android. The release date is 12-03-2025.
New Features
Added the ability to perform an incremental authorization on the Summary screen.
Improvements
Improved the tipping calculation to exclude tax amounts.
Fixed Issues
Fixed the issue that rarely caused a crash when performing a magstripe transaction.
General Information
Removed the
SHOW_TOTAL_PREAUTHORIZED
configuration option from the
Summary screen features.SDK Version 2.107.0 Release Notes
These release notes are for the PAX All-in-One and Tap to Pay on Android SDKs, version
2.107.0 for Android. The release date is 11-19-2025.
New Features
Tap to Pay: Added support for Discover and Diners payment cards.
Improvements
Improved the logic for displaying the Summary screen features.
Fixed Issues
- Fixed the issue that occasionally caused stand-alone credit transactions to stall.
- Fixed the issue that caused the SDK to crash when providing tax, installments, or payment facilitator details.
- PAX: Fixed the issue that caused the Retry button to not work after a failed receipt print for a completed transaction.
- Tap to Pay: Fixed the issue that caused the Tap icon to not appear on the Present Card screen.
- Tap to Pay: Fixed the issue that occasionally caused the touch area to not align correctly with the Cancel button.
General Information
- Deprecated PayButton 1.0 from the SDK. It will be removed from the next release.
- Removed thedefaultSummaryFeatureconfiguration option from the Summary screen parameters.
SDK Version 2.106.0 Release Notes
These release notes are for the PAX All-in-One and Tap to Pay on Android SDKs, version
2.106.0 for Android. The release date is 10-09-2025.
New Features
- PAX: Added the ability to process Electronic Benefit Transfer (EBT) payment card transactions.
- PAX: Added the ability to read non-PCI custom magstripe cards such as gift cards and loyalty program cards.
SDK Version 2.105.0 Release Notes
These release notes are for the PAX All-in-One and Tap to Pay on Android SDKs, version
2.105.0 for Android. The release date is 09-15-2025.
Improvements
Tap to Pay: Added the ability to configure the enrollment process to show or hide the serial number confirmation screen after a successful enrollment.
Fixed Issues
- Fixed the issue that caused the SDK to occasionally crash while using the tipping feature in some languages.
- Fixed the issue that caused automatic printing to occasionally fail when performing a refund.
SDK Version 2.104.0 Release Notes
These release notes are for the PAX All-in-One and Tap to Pay on Android SDKs, version
2.104.0 for Android. The release date is 08-18-2025.
Improvements
- Improved the user experience on some screens by removing the requirement for user interaction.
- Improved the error messages that can appear during transactions.
- Tap to Pay Phone: Added the ability to configure the enrollment process to show a list of previously enrolled devices or to enable the merchant to enter the device serial number manually.
SDK Version 2.103.1 Release Notes
These release notes are for the PAX All-in-One and Tap to Pay on Android SDKs, version
2.103.1 for Android. The release date is 07-24-2025.
Fixed Issues
Fixed the issue that caused a blank screen to occasionally appear on the device after a
transaction processes.
SDK Version 2.103.0 Release Notes
These release notes are for the PAX All-in-One and Tap to Pay on Android SDKs, version
2.103.0 for Android. The release date is 07-16-2025.
New Features
- Tap to Pay: Added a Device Selection screen that enables merchants to enroll a previously enrolled device without manually entering the serial number. This is now the default process when performing a device enrollment.
- Added the ability to customize the DefaultUI style elements using aUiConfigurationinstance.
Improvements
Tap to Pay: Re-enrolling a device can now be done without clearing the app data.
Fixed Issues
Applied general fixes to UI.
SDK Version 2.102.0 Release Notes
These release notes are for the PAX All-in-One and Tap to Pay on Android SDKs, version
2.102.0 for Android. The release date is 06-27-2025.
New Features
- Tap to Pay: The solution is now PCI-MPoC compliant, which requires the Tap to Pay Ready app to be installed on the Android devices. After upgrading to this SDK version, re-enroll devices.
- Tap to Pay: Added support for American Express.
Improvements
- ThetoolBarlogostyle element now appears on the Present Card screen.
- The customer is no longer prompted for the tip amount a second time when a failed transaction is retried. Whatever tip amount the customer chose during the original transaction is included in the transaction.
- Tap to Pay: Improved the error messages that can appear during device enrollment and transaction processing.
SDK Version 2.101.1 Release Notes
These release notes are for the PAX All-in-One and Tap to Pay on Android SDKs, version
2.101.1 for Android. The release date is 05-23-2025.
New Features
- Added support for landscape mode on large-screen devices.
- Added support for the PAX A3700.
Improvements
- Improved the error message that can appear when a magnetic-stripe card is not read correctly by the device.
- Tap To Phone: Improved the error messages that can appear during enrollment of previously enrolled device.
Fixed Issues
- Fixed the issue that caused thetoolBarlogoelement not to work when using an XML file. This element controls the logo that appears on the device during transactions.
- Fixed the issue on the Signature screen that caused the transaction to fail when the Continue button was tapped multiple times.
SDK Version 2.100.0 Release Notes
These release notes are for the PAX All-in-One and Tap to Phone Android SDKs, version
2.100.0 for Android. The release date is 04-21-2025.
Improvements
Updated the UI to use Google Material Design 3.
Fixed Issues
Tap To Phone: Fixed the issue that caused the device serial number to not be shown after a failed device enrollment.
SDK Version 2.99.0 Release Notes
These release notes are for the PAX All-in-One and Tap to Phone Android SDKs, version
2.99.0 for Android. The release date is 03-25-2025.
New Features
Tap To Phone: Added the ability to re-enroll a previously enrolled device by providing the serial number to the SDK.
Improvements
- Improved the error message that appears when trying to start an unsupported transaction type.
- Tap To Phone: Improved the error messages that can appear during enrollment and transactions.
- Tap To Phone: The device serial number is now returned in theEnrollResultIntentafter performing a device enrollment.
SDK Version 2.98.0 Release Notes
These release notes are for the PAX All-in-One and Tap to Phone Android SDKs, version
2.98.0 for Android. The release date is 02-19-2025.
Updated Requirements
Tap to Phone: Added new ProGuard rule for Visa sensory branding. Include this rule in
your
proguard-rules.pro
file going forward.New Features
Added Arabic as a supported language.
Improvements
- Tap to Phone: Improved the device enrollment experience by removing the requirement to provide an International Mobile Equipment Identity (IMEI) number. After upgrading to this SDK version, devices need to be re-enrolled.
- Tap to Phone: Improved experience when attempting to perform a transaction with an unsupported card.
- Tap to Phone: Improved the error messages that can appear during enrollment and transactions.
- Tap to Phone: Added a check to confirm that NFC is enabled when a transaction is started.
Fixed Issues
- Fixed the issue that caused the print receipt buttons to not appear after requesting a check transaction status.
- Fixed the issue that required some dependencies to be imported manually.
SDK Version 2.97.0 Release Notes
These release notes are for the PAX All-in-One and Tap to Phone Android SDKs, version
2.97.0 for Android. The release date is 01-29-2025.
Improvements
- Tap to Phone: Improved the error messages that can appear during enrollment.
- Tap to Phone: Improved experience when attempting to perform a transaction with an unsupported currency.
- MOTO transactions will no longer prompt for tip if tipping is configured.
SDK Version 2.96.0 Release Notes
These release notes are for the PAX All-in-One and Tap to Phone Android SDKs, version
2.96.0 for Android. The release date is 11-26-2024.
Fixed Issues
Fixed various issues that occasionally caused the SDK to crash.
SDK Version 2.95.0 Release Notes
These release notes are for the PAX All-in-One and Tap to Phone Android SDKs, version
2.95.0 for Android. The release date is 10-22-2024.
Improvements
Tap to Phone: Improved the error messages that can appear during enrollment and
transactions.
Fixed Issues
- Fixed the issue that occasionally caused the "Low Battery" notification to be shown incorrectly.
- Fixed the issue that caused the value provided formerchantDescriptorto not be captured correctly.
SDK Version 2.94.0 Release Notes
These release notes are for the PAX All-in-One and Tap to Phone Android SDKs, version
2.94.0 for Android. The release date is 09-11-2024.
Fixed Issues
- Fixed the issue that rarely caused a crash when performing a magstripe transaction.
- Fixed the issue that rarely caused a crash during the card selection process.
New Features
- Added the ability to provide payment facilitator details when performing a transaction.
- Added the ability to provide tax details when performing a transaction.
- Added the ability to provide installment details for the Latin America & Caribbean (LAC) region when performing a transaction.
SDK Version 2.93.0 Release Notes
These release notes are for the PAX All-in-One and Tap to Phone Android SDKs, version
2.93.0 for Android. The release date is 08-19-2024.
Improvements
Improved the error messages that can appear for connection-related issues.
Updated Requirements
Updated the Mastercard sonic branding library to version 1.5.0. Use this version of the branding library with the SDK going forward.
Fixed Issues
- Fixed the issue that caused a crash ifMposUi.createwas called twice.
- Fixed the issue that caused receipt data to be missing when usingtransaction.getCustomerReceiptortransaction.getMerchantReceiptfunctions for Tap to Phone transactions.
- Fixed the issue that caused some devices to not have the expected behavior when the signature capture configuration was set toNONE.
- Fixed the issue that causedmposUi.latestTransactionobject to not be updated after requesting a check transaction status.
SDK Version 2.92.0 Release Notes
These release notes are for the PAX All-in-One and Tap to Phone Android SDKs, version
2.92.0 for Android. The release date is 07-05-2024.
Improvements
- Error message screens now have a timeout of 15 seconds.
- Improved the error message that appears when an offline transaction is attempted before the first online transaction is processed on the device.
SDK Version 2.91.0 Release Notes
These release notes are for the PAX All-in-One and Tap to Phone Android SDKs, version
2.91.0 for Android. The release date is 06-12-2024.
New Features
In order to skip signature capture, the signature capture configuration can be now be set to
NONE
.Improvements
Tap to Phone: Improved the error messages that can appear during device enrollment.
Fixed Issues
- Fixed the issue that caused the A920 MAX terminal not to be recognized correctly.
- Fixed the issue that caused the Retry button to appear on the Summary screen of approved transactions when theRETRY_TRANSACTIONfeature was configured as the default summary feature.
SDK Version 2.90.0 Release Notes
These release notes are for the PAX All-in-One and Tap to Phone Android SDKs, version
2.90.0 for Android. The release date is 05-16-2024.
New Features
- Added the ability to process partial refunds and captures from the transaction summary screen.
- Added support for PAX IM30 and PAX A920 MAX devices.
Improvements
Updated the Present Card animation that appears when processing an offline transaction.
Updated Requirements
- Tap to Phone: Updated the minimum supported operating system to Android 12.
- Updated the minimum supported Kotlin version to 1.8.
Fixed Issues
Fixed the issue that rarely caused the terminal to become unresponsive after attempting to use an unsupported card.
General Information
- Removed deprecatedstatementDescriptionandapplicationFeeparameters.
- Removed deprecated NightMode configuration.
SDK Version 2.89.0 Release Notes
These release notes are for the PAX All-in-One and Tap to Phone Android SDKs, version
2.89.0 for Android. The release date is 04-18-2024.
Fixed Issues
Fixed the issue that caused the merchant receipt for MOTO transactions not to include the
transaction status.
Improvements
Tap to Phone: Added translations for error messages in all supported languages.
SDK Version 2.88.0 Release Notes
These release notes are for the PAX All-in-One and Tap to Phone Android SDKs, version
2.88.0 for Android. The release date is 03-18-2024.
New Features
- PAX All-in-One SDK now supports:
- Offline transactions, also known asdeferred authorizationorstore and forward
- On-receipt tipping
- Added support for 67 additional currencies.
Improvements
Added the necessary ProGuard rules to the Tap to Phone SDK. This improvement eliminates
the need to maintain the rules in the app project.
SDK Version 2.87.0 Release Notes
These release notes are for the PAX All-in-One and Tap to Phone Android SDKs, version
2.87.0 for Android. The release date is 02-20-2024.
General Information
- NightMode was deprecated fromUiConfigurationand will be removed in the next release.
- Changed the "Bugfixes" release note title to "Fixed Issues."
Updated Requirements
Updated the Visa sensory branding library to version 2.2. Use this version of the
branding library with the SDK going forward.
Fixed Issues
- Fixed the issue that caused Default UI to crash if the app was running in the background during the card selection process.
- Fixed the issue that caused the incorrect formatting of the signature line on a printed receipt.
SDK Version 2.86.0 Release Notes
These release notes are for the PAX All-in-One and Tap to Phone Android SDKs, version
2.86.0. The release date is 01-16-2024.
Improvements
Improved error messages that appear during Tap to Phone device enrollment.
SDK Version 2.85.0 Release Notes
These release notes are for the PAX All-in-One and Tap to Phone Android SDKs, version
2.85.0. The release date is 12-19-2023.
Improvements
- Improved the UI experience when cancelling a Tap to Phone transaction from the PIN entry screen.
- Enabled the PAX device screen to power on automatically when a transaction is started when the screen is off.
Fixed Issues
- Fixed the issue related to integrators using WorkManager to schedule background work.
- Fixed the issue that occasionally caused the last screen of a canceled Tap to Phone transaction not to be dismissed automatically.
- Fixed the issue that caused MOTO transactions to crash if the language was set to German.
SDK Version 2.84.0 Release Notes
These release notes are for the PAX All-in-One and Tap to Phone Android SDKs, version
2.84.0. The release date is 11-23-2023.
Improvements
- Improved error handling at the start of a Tap to Phone transaction.
- Improved UI during initialization of a Tap to Phone transaction.
- Improved UX during cancellation of a Tap to Phone transaction.
SDK Version 2.83.0 Release Notes
These release notes are for the PAX All-in-One and Tap to Phone Android SDKs, version
2.83.0. The release date is 10-19-2023.
New Features
Tap to Phone now supports these transaction types: pre-authorization, incremental authorization, and capture.
Improvements
- Improved the display of error messages that are more than 40 characters long.
- Added an indicator on the Summary screen that the customer signature should be captured on the printed receipt for Tap to Phone transactions.
Fixed Issues
- Fixed the issue that resulted in an inconsistent state when a new transaction was started while the Summary screen was displayed.
- Fixed the issue that occurred during a successful refund transaction in which the Information screen showed the original transaction amount instead of the refunded amount.
- Fixed the issue that caused transactions that used currencies with two-digit numeric codes to fail.
SDK Version 2.82.0 Release Notes
These release notes are for the PAX All-in-One and Tap to Phone Android SDKs, version
2.82.0. The release date is 09-19-2023.
New Features
Tap to Phone now supports the on-device tipping feature.
Fixed Issues
- Fixed the issue that caused Tap to Phone transactions to freeze when using the signature on-receipt feature.
- Fixed the issue that caused the SDK to crash when attempting to recover a transaction after the Inconclusive screen is shown.
- Fixed the issue that caused the SDK to crash when starting a transaction with a zero amount and custom tipping.
- Fixed the issue that caused the wrong value to be returned when calling theisReadyForTransactionmethod before the first transaction.