This section describes how to use this guide and where to find further information.
Audience and Purpose
This guide is written for merchants who want to activate and use the PAX A35 payment
terminal to process transactions using Acceptance Devices solutions. The guide describes how
to get started with and configure the PAX A35 terminal.
Convention
This statement is used in this document:
IMPORTANT
An
Important
statement contains information essential to
successfully completing a task or learning a concept.
Support
For support information about any service, visit the Support Center:
Improved clarity and reduced repetition in instructions.
Replaced all screenshots.
25.01
This revision contains only editorial changes and no technical updates.
VISA Platform Connect: Specifications and Conditions for
Resellers/Partners
The following are specifications and conditions that apply to a Reseller/Partner enabling
its merchants through
Cybersource for
Visa Platform Connect
(“VPC”)
processing
. Failure to meet any of the specifications and conditions below is
subject to the liability provisions and indemnification obligations under
Reseller/Partner’s contract with Visa/Cybersource.
Before boarding merchants for payment processing on a VPC acquirer’s connection,
Reseller/Partner and the VPC acquirer must have a contract or other legal agreement
that permits Reseller/Partner to enable its merchants to process payments with the
acquirer through the dedicated VPC connection and/or traditional connection with
such VPC acquirer.
Reseller/Partner is responsible for boarding and enabling its merchants in
accordance with the terms of the contract or other legal agreement with the relevant
VPC acquirer.
Reseller/Partner acknowledges and agrees that all considerations and fees associated
with chargebacks, interchange downgrades, settlement issues, funding delays, and
other processing related activities are strictly between Reseller and the relevant
VPC acquirer.
Reseller/Partner acknowledges and agrees that the relevant VPC acquirer is
responsible for payment processing issues, including but not limited to, transaction
declines by network/issuer, decline rates, and interchange qualification, as may be
agreed to or outlined in the contract or other legal agreement between
Reseller/Partner and such VPC acquirer.
DISCLAIMER: NEITHER VISA NOR CYBERSOURCE WILL BE RESPONSIBLE OR LIABLE FOR ANY ERRORS OR
OMISSIONS BY THE
Visa Platform Connect
ACQUIRER IN PROCESSING TRANSACTIONS. NEITHER VISA
NOR CYBERSOURCE WILL BE RESPONSIBLE OR LIABLE FOR RESELLER/PARTNER BOARDING MERCHANTS OR
ENABLING MERCHANT PROCESSING IN VIOLATION OF THE TERMS AND CONDITIONS IMPOSED BY THE
RELEVANT
Visa Platform Connect
ACQUIRER.
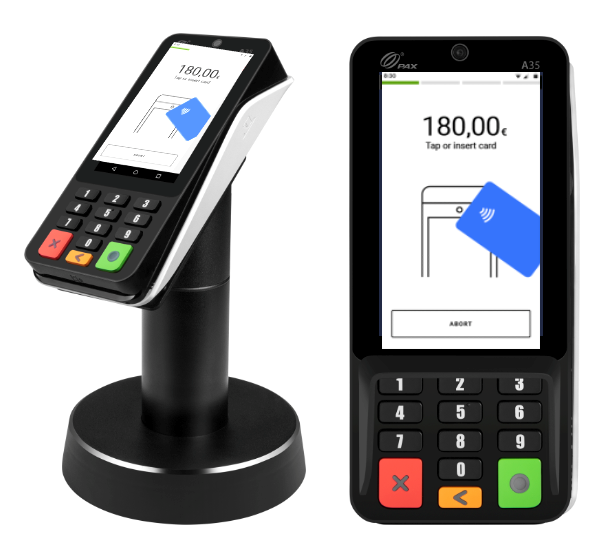
Introduction to the Acceptance Devices | PAX A35 Terminal
The fixed-lane PAX A35 is a countertop Android PIN pad payment terminal that is suitable
for high-volume retail and hospitality environments. These are the features:
The PAX terminal supports these payment card types:
American Express
Diners/Discover
Mastercard
JCB
UPI
Visa
Supported Payment Card Entry Modes on the PAX Terminal
The PAX terminal supports these payment card entry modes:
EMV contact
Holding the card with the chip facing up, the customer inserts (dips) the card
into the card slot.
EMV contactless
The sensor area is located at the top of the terminal and is indicated by the
Tap (contactless) icon printed on the device. The customer holds and places the
card near the sensor area on the payment terminal.
Magnetic stripe
The device supports bi-directional (left-to-right or right-to-left) swiping of
the magnetic stripe on the back of the card. Holding the card with the magnetic
stripe facing down, the customer inserts the card into the magnetic card reader
slot and swipes the card through the slot at a steady speed.
Getting Started with the PAX A35 Terminal
Use the information is this section to get started with using the PAX A35 payment
terminal.
Ordering PAX Terminal Equipment
Use this information to order PAX terminal test and production equipment in the European
Union (EU), United Kingdom (UK), and United States (US). The ordering procedures
described here vary due to differences in regional regulations and procedures.
Ordering PAX Terminal Test Equipment in the US
If you are located within the US, you can order equipment to test your integration and
various payment workflows with the
Cybersource
Card Present Gateway.
Two types of devices are available to order in this region.
Test device
A test device is intended for development and testing purposes only. It can be
used to download applications that have been published in PAXSTORE. It cannot
process live transactions.
Use case:
Order a test device if you plan to integrate the Acceptance
Devices | PAX Acceptance Devices App and want to run test transactions using the
Acceptance Devices app on the PAX terminal.
Debug device
A debug device is required when you are developing your own application. You can
do these things with a debug device:
Install Android package kits (APKs)
Transfer files using a USB cable
Download published applications from PAXSTORE
Like the test device, the debug device is intended for development purposes
only and cannot be used for live transactions.
Use case:
Order a debug device if you plan to use the Acceptance Devices
| PAX All-in-One Solution and want to integrate your custom application into
this solution.
You can order this test equipment in the US:
Test card reader (payment terminal).
Model does not include an integrated printer.
Debug card reader (payment terminal).
Model does not include an integrated printer.
Test card, which can be used with a test or debug card reader.
The standard testing equipment box contains these items:
Test or debug card reader. Model does
not include an integrated printer.
USB Type-C cable (power input).
Multifunctional connector cable.
Order PAX Terminal Test Equipment in the US
Follow these steps to order PAX terminal test equipment in the US.
To order a test device, visit the US Fulfillment page and follow the ordering instructions.
Ordering PAX Terminal Test Equipment in the EU and UK
If you are located within the EU or UK, you can order equipment to test your integration
and various payment workflows with the
Cybersource
Card Present
Gateway.
One type of device is available to order in these regions.
Debug device
A debug device is required when you are developing your own application. You can
do these things with a debug device:
Install Android package kits (APKs)
Transfer files using a USB cable
Download published applications from PAXSTORE
Like the test device, the debug device is intended for development purposes
only and cannot be used for live transactions.
Use case:
Order a debug device if you plan to use the Acceptance Devices
| PAX All-in-One Solution and want to integrate your custom application into
this solution.
You can order this test equipment in the EU and UK:
Debug card reader (payment terminal).
Model does not include an integrated printer.
Test card.
The standard testing equipment box contains these items:
Debug card reader. Model does not
include an integrated printer.
USB Type-C cable (power input).
Multifunctional connector cable.
Order PAX Terminal Test Equipment in the EU and UK
Follow this step to order PAX terminal test equipment in the EU and UK.
Visit the Fulfillment page for your region and follow the ordering
instructions:
EU Fulfillment: When ordering test equipment
from the EU, you must have your company's Value-Added Tax (VAT) ID and
Economic Operators Registration and Identification (EORI) number available
to enter on your order. If this information is not provided, your shipment
might be delayed.
UK Fulfillment: When ordering test equipment
from the UK, you must have your company's Value-Added Tax (VAT) ID available
to enter on your order. If this information is not provided, your shipment
might be delayed.
Ordering PAX Terminal Production Equipment in All Regions
Production PAX terminals are designed to process live payment transactions using the
Cybersource
Card Present Gateway. Production devices are intended
for deployment in live environments and are the only type approved for market use.
IMPORTANT
For security reasons, APKs cannot be installed
directly on live devices. Application updates must be delivered through PAXSTORE to
ensure a secure and controlled distribution.
For small-quantity orders, place your order directly on the Fulfillment page. For help
with bulk orders or questions about complex hardware distribution, contact terminalfulfillment@visa.com.
You can order this production equipment in all regions:
Card reader (payment terminal). Model
does not include an integrated printer.
The standard PAX equipment box contains these items:
Card reader. Model does not
include an integrated printer.
USB Type-C cable (power input).
Multifunctional connector cable.
Order PAX Terminal Production Equipment in All Regions
Follow this step to order PAX terminal production equipment in all
regions.
Visit the Fulfillment page for your region and follow the ordering
instructions:
EU Fulfillment: When ordering test equipment
from the EU, you must have your company's Value-Added Tax (VAT) ID and
Economic Operators Registration and Identification (EORI) number available
to enter on your order. If this information is not provided, your shipment
might be delayed.
UK Fulfillment: When ordering test equipment
from the UK, you must have your company's Value-Added Tax (VAT) ID available
to enter on your order. If this information is not provided, your shipment
might be delayed.
US Fulfillment: You are not required to provide
VAT and EORI information when ordering for US fulfillment.
Signing Up for a Test or Production Account
Use this information to sign up for test (sandbox) and production (live) accounts.
Perform integration and testing in your test account. After receiving a go-live
approval, use your production account to process live transactions on the PAX
terminal.
IMPORTANT
Test credentials do not work in the production
environment, and production credentials should never be used for testing.
Sign Up for a Test or Production Account
Follow these steps to sign up for test (sandbox) and production (live)
accounts.
Sign up for a test account.
ADDITIONAL INFORMATION
Visit the Test Account sign-up page to complete
account registration.
Request a production account.
ADDITIONAL INFORMATION
Contact your Solution Delivery team. They will guide you through the go-live
process and enable production processing on your PAX terminal.
Setting Up the PAX Terminal
Use the information in this section to set up the PAX A35 terminal. This device is
designed for fixed-lane environments and is powered through its connection to a
point-of-sale (POS) system. It does not include an integrated printer and does not
support battery-powered operation.
The product drawing show the PAX device features. The table provides descriptions of the
function keys on the physical keypad of the PAX terminal.
Figure:
PAX A35 Product Drawing with Features Labeled
PAX A35 Function Keys
Function Key Icon
Description
Cancel/Clear
: When navigating menus, press
this key to cancel (close) the current screen and return to the previous
menu. When entering data, press this key to clear all previously entered
characters and numbers. You can then re-enter data on the current
screen.
Replace/Delete
: When entering data, press
this key to replace or delete previously entered data, one character at
a time. For example, if you enter a wrong number during PIN entry, use
this key to backspace and enter the correct number.
Enter/Confirm
: When entering data, press
this key to submit (enter) the data. For example, when entering a PIN.
When navigating menus, press this key to confirm the action shown or
described on the terminal screen. For example, when confirming the
transaction amount.
Access the Multifunctional Connector Cable Port on the PAX Terminal
Have a screwdriver available to remove the screws from the compartment
cover.
Follow these steps to connect the multifunctional connector cable to the PAX terminal.
Locate the multifunctional port plug on the multifunctional connector cable.
ADDITIONAL INFORMATION
Figure:
PAX A35 Multifunctional Connector Cable with Parts Labeled
Insert the port plug into the multifunctional port in the compartment on the
back of the PAX terminal.
ADDITIONAL INFORMATION
Figure:
PAX A35 Back Compartment Showing Multifunctional Port and Connector
Cable Attachment
Make sure to place the cable into the channel located at the end of the
compartment so that the cover can be closed over it.
Replace the cover on the terminal and slide it closed over the cable and
compartment.
Replace each screw in its hole and tighten with a screwdriver until the cover
is secure. To avoid damaging the terminal, do not over-tighten the screws.
You are prompted for the Developer Options password on test devices only.
Settings password
pax9876@@
Developer option password (for use with test devices only)
Dev9876@@
Configuring an Internet Connection for the PAX Terminal
For the PAX terminal to operate correctly, it must be configured for internet
connectivity. Use this information to configure an internet connection for the PAX
terminal.
Before the terminal can be used to process payments, it must also be associated with a
merchant ID in the
Create a Password for the PAX Terminal Settings Menu
The Settings menu on a PAX terminal is where you configure device features, internet connections,
and other options. Access to the menu is password protected. The PAX device ships
with a default password. Replace the default password with a unique, secure one when
setting up the device.
Follow these steps to create a Settings password on the PAX terminal.
Figure:
Settings Menu on PAX Terminal Home Screen and Password Input Screen in
Settings Menu
On the terminal Home screen, tap the
Settings
icon. You
are prompted to enter the Settings password.
If you are a first-time user, enter the default Settings password:
pax9876@@
. Tap the
Checkmark
. The
Settings screen appears.
Replace the default Settings password with a unique, secure one. In the Device
section, tap
Password
. Follow the prompts to change the
Settings password.
Configuring Ethernet IP Connections on the PAX Terminal
You can connect the PAX A35 payment terminal to your local area network (LAN) using a
wired Ethernet IP connection.
These are the IP connections that you can use to connect the PAX terminal to your
LAN.
Dynamic IP connection
Description:
When using Dynamic Host Configuration Protocol (DHCP)
IP connection, the payment terminal is randomly assigned IP addresses by your
internet service provider when you access the internet. This connection is also
called a
dynamic IP connection
.
Benefits:
Simplifies network management and eliminate the need to
manually configure settings on each PAX terminal.
Benefits of Using an Ethernet IP Connection with the PAX Terminal
These are some of the benefits of using a wired Ethernet IP connection instead of a Wi-Fi
connection with the PAX terminal:
Security:
Ethernet IP connections are typically more secure because
access is restricted to devices physically connected to the router or network
switch.
Stability:
Wired connections are less susceptible to interference from
nearby wireless devices, resulting in more consistent performance.
Speed:
An Ethernet connection typically provides lower latency than
Wi-Fi, meaning data travels more quickly and reliably between devices.
Connect the Ethernet Cable to the PAX Terminal
An Ethernet cable is required to connect the PAX A35 payment terminal to a
point-of-sale (POS) system. This cable is not included with the PAX device, so you must
have one available to complete this task.
IMPORTANT
You cannot connect the
PAX A35 terminal to a point-of-sale (POS) system using a standard USB or RS-232
serial port.
Follow these steps to connect the Ethernet cable to the PAX terminal.
Connect the other plug on the Ethernet cable to the compatible port on your POS
system.
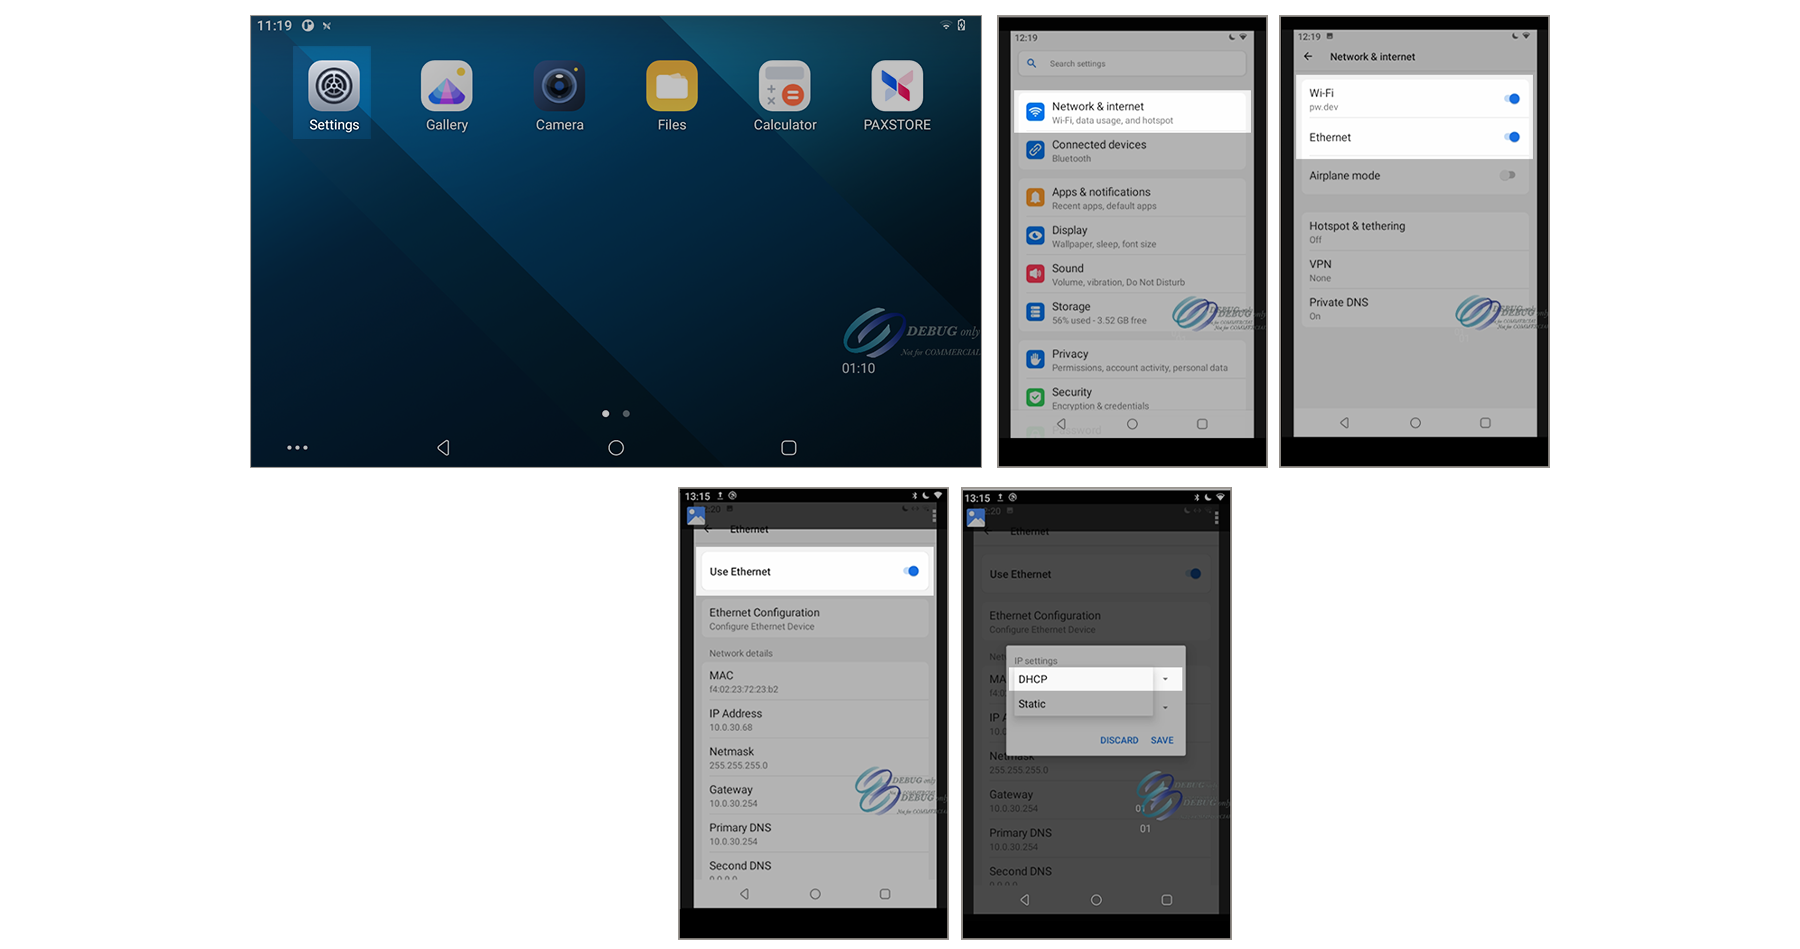
Configuring an Ethernet Dynamic IP Connection on the PAX Terminal
Use the information in this section to configure an Ethernet Dynamic Host Configuration
Protocol (DHCP) IP connection on the PAX A35 terminal. This connection is also called a
dynamic IP connection
. When this type of connection is enabled, your payment
terminal is automatically assigned an IP address by your network service provider each
time it connects to the internet.
Enable an Ethernet Dynamic IP Connection on the PAX Terminal
To enable an Ethernet IP connection, use an Ethernet cable to connect your PAX A35
terminal to your point-of-sale (POS) system. For more information, see Connect the Ethernet Cable to the PAX Terminal.
Figure:
Settings Menu Screens Used to Enable an Ethernet Dynamic IP Connection on PAX
Terminal
Follow these steps to enable the Ethernet Dynamic IP connection on the PAX
terminal.
icon. The Ethernet network connection
settings screen appears.
Scroll down and then tap
Ethernet Configuration
. A
pop-up menu appears.
Choose
DHCP
.
Leave the Proxy type set to
None
. This setting is the
default.
Tap
Save
. Network details, including IP address,
Gateway, and DNS, appear on the terminal screen.
Use the IP address that is shown on the terminal screen in your POS
system.
To exit the screen, tap the back arrow until you reach the Home screen.
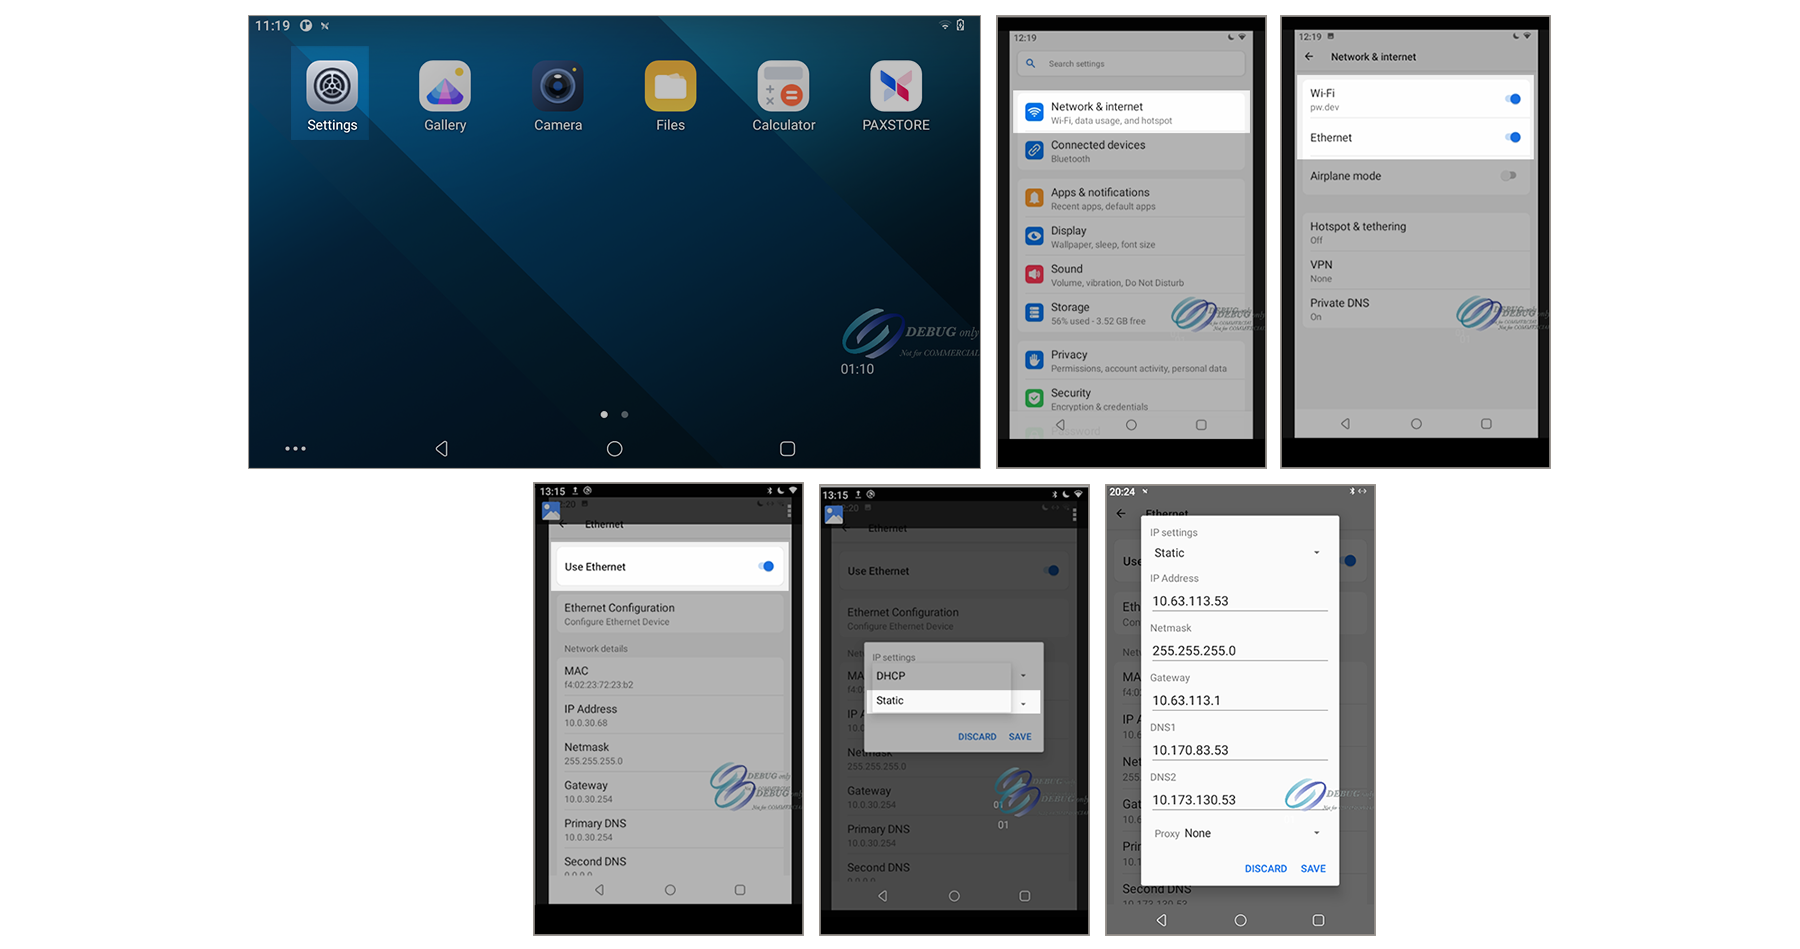
Configuring an Ethernet Static IP Connection on the PAX Terminal
Use the information in this section to configure an Ethernet static IP connection for the
PAX terminal. This type of connection uses a single IP address that you specify in the
terminal settings.
IMPORTANT
Before starting this configuration, you might need to consult your IT
department to obtain the information required to configure this type of network
connection.
Enable an Ethernet Static IP Connection on the PAX Terminal
To enable an Ethernet IP connection, use an Ethernet cable to connect your PAX A35
terminal to your point-of-sale (POS) system. For more information, see Connect the Ethernet Cable to the PAX Terminal.
Figure:
Settings Menu Screens Used to Enable an Ethernet Static IP Connection on PAX
Terminal
Follow these steps to enable the Ethernet static IP connection on the PAX
terminal.
icon. The Ethernet network connection
settings screen appears.
Scroll down and then tap
Ethernet Configuration
. A
pop-up menu appears.
Choose
Static
. A screen appears with fields in which
you will enter this information:
ADDITIONAL INFORMATION
IP address
field: Enter the static IP address for
your network.
Netmask
field: Enter the IP address for your
netmask.
Gateway
field: Enter the IP address for your
gateway.
DNS 1
field: Enter the IP address for the first
domain name system server.
DNS 2
field: Enter the IP address for the second
domain name system server.
Tap
Save
.
To exit the screen, tap the back arrow until you reach the Home screen.
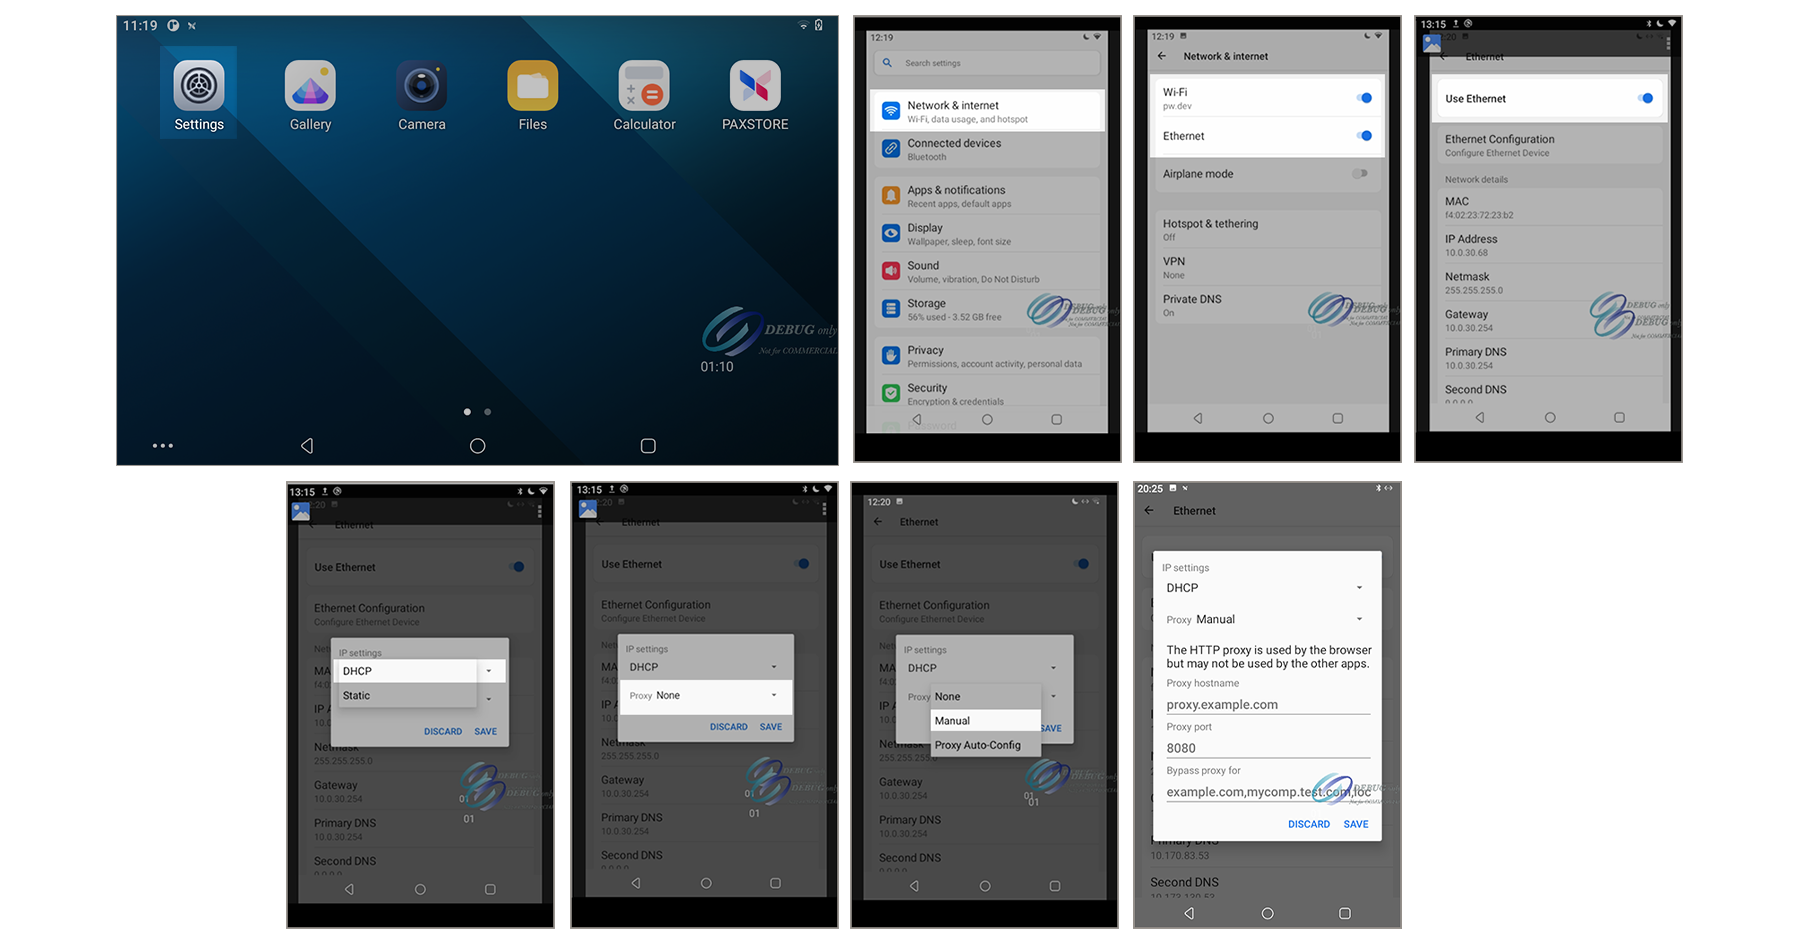
Configuring an Ethernet Proxy IP Connection on the PAX Terminal
Use the information in this section to configure a Ethernet proxy IP connection on the
PAX terminal.
If your business hides its Wi-Fi network from the public, you are using a proxy server.
In this instance, you must use the Proxy IP configuration option to connect the PAX
terminal to your network.
IMPORTANT
Before starting this configuration, consult your IT department to
obtain the information required to configure this type of network connection.
Enable an Ethernet Proxy IP Connection on the PAX Terminal
To enable an Ethernet IP connection, use an Ethernet cable to connect your PAX A35
terminal to your point-of-sale (POS) system. For more information, see Connect the Ethernet Cable to the PAX Terminal.
Figure:
Settings Menu Screens Used to Enable an Ethernet Proxy IP Connection on PAX
Terminal
Follow these steps to enable the Ethernet proxy IP connection on the PAX
terminal.
icon. The Ethernet network connection
settings screen appears.
Scroll down and then tap
Ethernet Configuration
. A
pop-up menu appears.
Choose
DHCP
.
Click the Proxy drop-down menu arrow.
Choose
Manual
. A screen appears with fields in which you
will enter this information:
ADDITIONAL INFORMATION
Proxy hostname
field: Enter the proxy URL.
Proxy port
field: Enter the 4-digit proxy port
number.
Bypass proxy
field: Enter safelist URLs that are
allowed to bypass the proxy. This field is optional.
Tap
Save
.
To exit the screen, tap the back arrow until you reach the Home screen.
Configuring Wi-Fi Network IP Connections on the PAX Terminal
These are the IP connections that you can use to connect the PAX terminal to your Wi-Fi
network:
Dynamic IP connection
Description:
When using the Dynamic Host Configuration Protocol
(DHCP) IP connection, the payment terminal is randomly assigned IP addresses by
your internet service provider when you access the internet. This type of
connection is also called a
dynamic IP connection
.
Benefits:
Simplifies network management and eliminate the need to
manually configure Wi-Fi settings on each PAX terminal.
Configuring a Dynamic IP Connection for a Wi-Fi Network on the PAX Terminal
Use this information to configure a dynamic IP connection for a Wi-Fi
network on the PAX terminal.
Using a dynamic IP connection is a convenient option for simple device set up, which
eliminates the need to manually manage static IP addresses. The payment terminal
receives a randomly assigned IP address from your internet service provider each time it
connects to the network.
. The device connects to your Wi-Fi network.
A Password screen appears.
Enter the PAX terminal settings password that you entered in step 1. The Wi-Fi
settings menu appears, showing that the terminal is connected to your Wi-Fi
network.
To exit the screen, tap the back arrow until you reach the Home screen.
Configuring a Static IP Connection for a Wi-Fi Network on the PAX Terminal
Use this information to configure a static IP connection for a Wi-Fi
network on the PAX terminal. This configuration uses a single IP address when connecting
to the internet, which you specify in the terminal settings.
IMPORTANT
Before starting this configuration, you might need to consult your IT
department to obtain the information required to configure this type of network
connection.
field, enter the SSID (network name)
of your Wi-Fi network. The field is case sensitive.
Tap the
Advanced options
drop-down arrow. You might need
to scroll down to see this menu option.
Open the IP settings drop-down menu, choose
Static
.
Enter the required information in these Static fields:
ADDITIONAL INFORMATION
IP address
field: Enter the static IP address for
your Wi-Fi network.
Gateway
field: Enter the IP address for your
gateway.
Network prefix length
field: Enter the prefix
length for the subnetwork.
DNS 1
field: Enter the IP address for the first
domain name system server.
DNS 2
field: Enter the IP address for the second
domain name system server.
Tap
Save
. The Wi-Fi screen appears, showing that the
terminal is connected to your Wi-Fi network.
To exit the screen, tap the back arrow until you reach the Home screen.
Configuring a Proxy IP Connection for a Wi-Fi Network on the PAX Terminal
Use this information to configure a proxy IP connection for a Wi-Fi
network on the PAX terminal. Use this configuration when your Wi-Fi network is hidden by
a proxy server so that it cannot be detected as a publicly available network.
IMPORTANT
Before starting this configuration, consult your IT department to
obtain the information required to configure this type of network connection.
Enter the required information in these Manual fields:
ADDITIONAL INFORMATION
Proxy hostname
field: Enter the proxy host
name.
Proxy port
field: Enter the port number for the
proxy server.
Bypass proxy for
field: If your Wi-Fi network
uses a bypass proxy, enter domain names or IP addresses.
Tap
Save
. The Wi-Fi screen appears, showing that the
terminal is connected to your Wi-Fi network.
To exit the screen, tap the back arrow until you reach the Home screen.
Automatic Installation of Software and Encryption Keys on the PAX Terminal
A PAX terminal must have the required software installed and encryption keys injected to
operate correctly. Terminals are configured to automatically download and install these
components through a secure process known as
remote software and key injection
.
This automated process enables merchants to perform injections securely at the point of
sale, without manual intervention or the need for specialized equipment.
These types of software and encryption keys are automatically downloaded and installed on
the terminal:
Operating system
PAX terminals operate on a preinstalled Android-based operating system known as
PayDroid
.
Developed by PAX Technology, PayDroid is a customized version of the
standard Android OS, specifically designed to support secure payment
applications and services.
Although it shares the core framework of the Android OS, PayDroid
includes modifications that enhance security and reliability for payment
processing. It supports the installation of third-party applications.
However, due to the sensitive nature of payment data, all apps must be
approved by PAX before installation on the device.
Acceptance Devices app
The Acceptance Devices app installs only on terminals running the Acceptance Devices | PAX
Acceptance Devices App in either Semi-Integrated or Standalone mode.
In Semi-Integrated mode, the app enables communication between the PAX terminal and the
integrated POS system by using simple API requests over a local Wi-Fi
network or through the cloud. In Standalone mode, the app enables
transactions to be initiated directly from the terminal without
requiring integration with a POS system.
Payment apps
To read payment card data and process payments, every PAX terminal must have
BroadPOS Point-to-Point Encryption (P2PE) installed. BroadPOS P2PE is a
payment app developed by PAX that manages card data encryption. It serves as
the interface that enables a PAX terminal to perform these functions:
Acquire card information
Support inserted, tapped, swiped, and keyed entry modes
Capture PINs
Encrypt the transaction process
All PAX terminals ordered through
Cybersource
and
shipped by its distribution partner automatically include BroadPOS P2PE as
part of the provisioning process.
Third-party POS app
This app installs only on devices running the Acceptance Devices | PAX
All-in-One Solution. When integrating with the SDK or PAX All-in-One, a
third-party POS app that includes the SDK is installed and run directly on
the PAX terminal. On a debug device, you can install (or sideload) the app
for development and testing by using a USB connection to your laptop. Mac
users must use Android File Transfer to sideload applications. For more
information about debug devices, see Ordering PAX Terminal Equipment.
Encryption keys
Every terminal running Acceptance Devices solutions is equipped with a set
of encryption keys through remote key injection, after the terminal connects
to a Wi-Fi network for the first time. The Online PIN key is responsible for
encrypting and verifying PIN data in real time. The Secure Reading and
Exchange of Data (SRED) key is used to encrypt card data captured at the
Point of Interaction (POI). This process ensures P2PE between the terminal
and the payment gateway.
Software Installation and Encryption Keys Injection on the PAX Terminal
Before a payment terminal can automatically perform remote software installation and
encryption key injection, it must first be activated on the
Cybersource
platform. To perform these automated processes, the terminal must be connected to the
internet using a Wi-Fi or Ethernet connection.
The PAX terminal initiates this automated process to install software and inject
encryption keys.
System connection:
The terminal establishes a secure link to the PAX
terminal management system (PAXSTORE) using a Wi-Fi or Ethernet
connection.
Download initiation:
The terminal automatically begins downloading all
required software packages and encryption keys.
Activity notification:
The terminal makes a brief audible signal to
indicate the start of the download process.
Progress display:
The terminal screen displays
real-time status messages about the components being downloaded. If the terminal
does not emit a sound or display download progress messages, open the PAXSTORE
app on the Home screen to verify that the terminal is connected to the PAX
terminal management system. You can also manually trigger downloads in the
PAXSTORE app.
Fix the
Accessory Update Required
Error on the PAX Terminal
The
Accessory Update Required
error appears on the PAX terminal when the
installed version of the Android SDK is incompatible with the BroadPOS P2PE version
installed on the device.
To resolve this issue, update the terminal to the latest SDK version. If you need help
with the update process, contact terminals@cybersource.com.
Access the BroadPOS Log on a Test or Debug PAX Terminal
Access the BroadPOS log on a Windows computer to troubleshoot and debug a test or debug PAX
terminal.
Follow these steps to access the BroadPOS log.
Connect the PAX terminal to a Windows computer using the USB cable provided
with the terminal. The computer detects the terminal.
Open
File Explorer
.
Choose the
A35
device folder.
Click
Internal storage > Android > data >
comp.pax.us.pay.std.broadpos.p2pe
in the device folder.
Choose a BroadPOS log file. The BroadPOS log file names start with
BroadPOS
and append the date to the file names in this format:
BroadPOS_logYYYYMMDD
.
Access the POSLink Log on a Test or Debug PAX Terminal
Access the POSLink log on a Windows computer to troubleshoot and debug a test or
debug PAX terminal.
Follow these steps to access the POSLink log.
Connect the PAX terminal to a Windows computer using the USB cable provided
with the terminal. The computer detects the terminal.
Open
File Explorer
.
Choose the
A35
device folder.
Click
Internal storage
in the device folder.
Choose a POSLink log file. The POSLink log file names start with
POSLink
and append the date to the file names in this format:
POSLinkYYYYMMDD
.
Performing a Factory Reset on the PAX Terminal
A factory reset restores the terminal to the state that it was in when shipped to you.
This procedure applies to test, debug, and live devices. Performing a factory reset does
not affect the device key that was preloaded on the terminal before it was shipped to
you.
IMPORTANT
If you are considering performing a factory reset to resolve an
issue, it is recommended that you explore other troubleshooting options first. A reset
erases all configurations, installed applications, and locally stored data, which might
not be necessary for resolving common issues.
Use these default passwords to access the menus where you perform a factory reset on a
PAX terminal:
Settings password
pax9876@@
(If you created a custom password, use it
instead.)
Developer option password
Dev9876@@
(Use with test devices only.)
Perform a Factory Reset on the PAX Terminal
Follow these steps to perform a factory reset on a PAX terminal.