Configuring Ethernet IP Connections on the PAX Terminal
You can connect the PAX A35 payment terminal to your local area network (LAN) using a
wired Ethernet IP connection.
These are the IP connections that you can use to connect the PAX terminal to your
LAN.
Dynamic IP connection
Description:
When using Dynamic Host Configuration Protocol (DHCP)
IP connection, the payment terminal is randomly assigned IP addresses by your
internet service provider when you access the internet. This connection is also
called a
dynamic IP connection
.
Benefits:
Simplifies network management and eliminate the need to
manually configure settings on each PAX terminal.
Benefits of Using an Ethernet IP Connection with the PAX Terminal
These are some of the benefits of using a wired Ethernet IP connection instead of a Wi-Fi
connection with the PAX terminal:
Security:
Ethernet IP connections are typically more secure because
access is restricted to devices physically connected to the router or network
switch.
Stability:
Wired connections are less susceptible to interference from
nearby wireless devices, resulting in more consistent performance.
Speed:
An Ethernet connection typically provides lower latency than
Wi-Fi, meaning data travels more quickly and reliably between devices.
Connect the Ethernet Cable to the PAX Terminal
An Ethernet cable is required to connect the PAX A35 payment terminal to a
point-of-sale (POS) system. This cable is not included with the PAX device, so you must
have one available to complete this task.
IMPORTANT
You cannot connect the
PAX A35 terminal to a point-of-sale (POS) system using a standard USB or RS-232
serial port.
Follow these steps to connect the Ethernet cable to the PAX terminal.
Connect the other plug on the Ethernet cable to the compatible port on your POS
system.
Configuring an Ethernet Dynamic IP Connection on the PAX Terminal
Use the information in this section to configure an Ethernet Dynamic Host Configuration
Protocol (DHCP) IP connection on the PAX A35 terminal. This connection is also called a
dynamic IP connection
. When this type of connection is enabled, your payment
terminal is automatically assigned an IP address by your network service provider each
time it connects to the internet.
Enable an Ethernet Dynamic IP Connection on the PAX Terminal
To enable an Ethernet IP connection, use an Ethernet cable to connect your PAX A35
terminal to your point-of-sale (POS) system. For more information, see Connect the Ethernet Cable to the PAX Terminal.
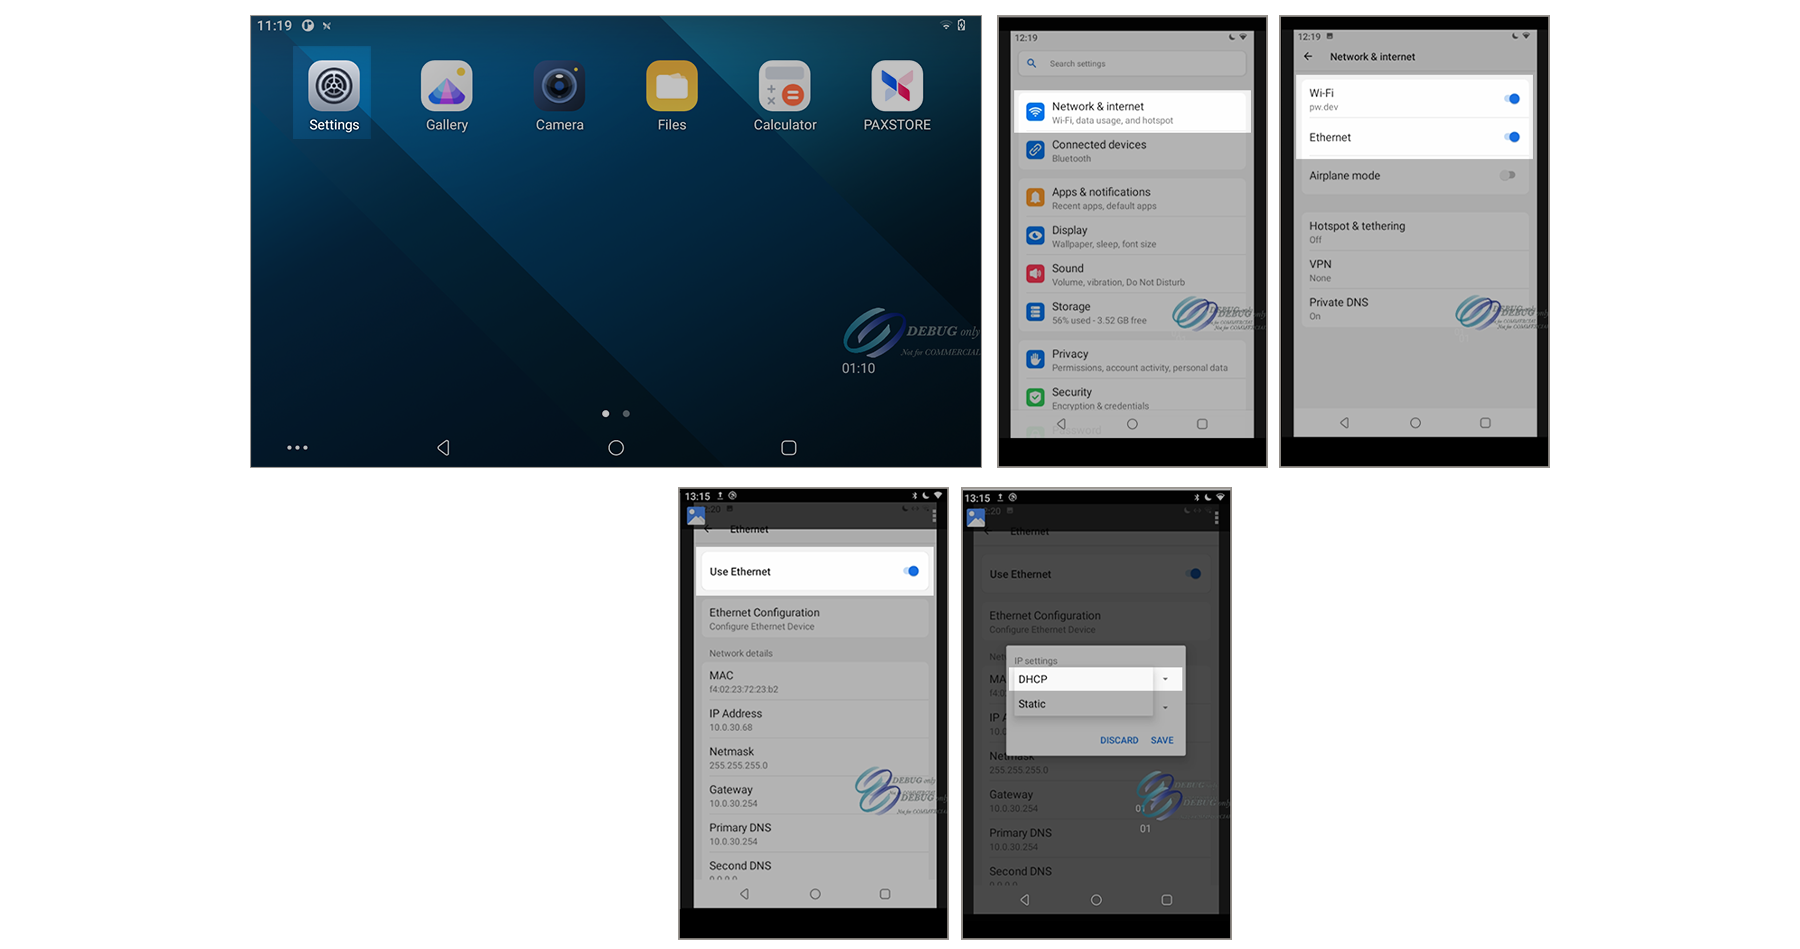
Figure:
Settings Menu Screens Used to Enable an Ethernet Dynamic IP Connection on PAX
Terminal
Follow these steps to enable the Ethernet Dynamic IP connection on the PAX
terminal.
icon. The Ethernet network connection
settings screen appears.
Scroll down and then tap
Ethernet Configuration
. A
pop-up menu appears.
Choose
DHCP
.
Leave the Proxy type set to
None
. This setting is the
default.
Tap
Save
. Network details, including IP address,
Gateway, and DNS, appear on the terminal screen.
Use the IP address that is shown on the terminal screen in your POS
system.
To exit the screen, tap the back arrow until you reach the Home screen.
Configuring an Ethernet Static IP Connection on the PAX Terminal
Use the information in this section to configure an Ethernet static IP connection for the
PAX terminal. This type of connection uses a single IP address that you specify in the
terminal settings.
IMPORTANT
Before starting this configuration, you might need to consult your IT
department to obtain the information required to configure this type of network
connection.
Enable an Ethernet Static IP Connection on the PAX Terminal
To enable an Ethernet IP connection, use an Ethernet cable to connect your PAX A35
terminal to your point-of-sale (POS) system. For more information, see Connect the Ethernet Cable to the PAX Terminal.
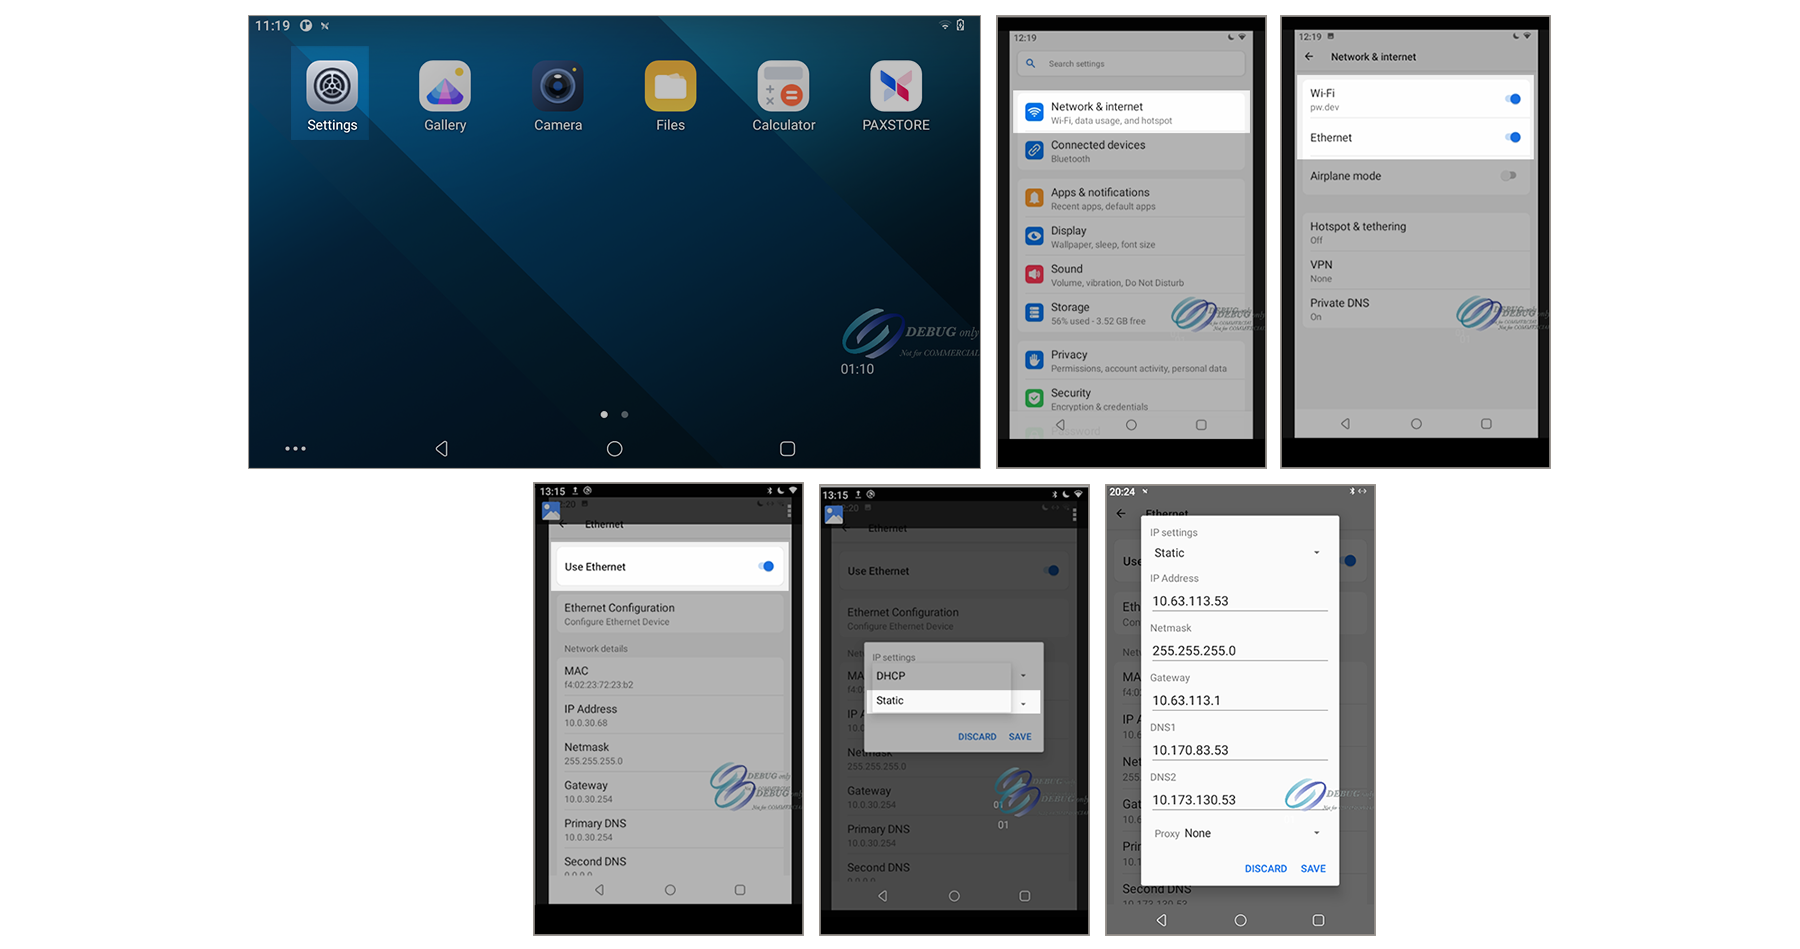
Figure:
Settings Menu Screens Used to Enable an Ethernet Static IP Connection on PAX
Terminal
Follow these steps to enable the Ethernet static IP connection on the PAX
terminal.
icon. The Ethernet network connection
settings screen appears.
Scroll down and then tap
Ethernet Configuration
. A
pop-up menu appears.
Choose
Static
. A screen appears with fields in which
you will enter this information:
ADDITIONAL INFORMATION
IP address
field: Enter the static IP address for
your network.
Netmask
field: Enter the IP address for your
netmask.
Gateway
field: Enter the IP address for your
gateway.
DNS 1
field: Enter the IP address for the first
domain name system server.
DNS 2
field: Enter the IP address for the second
domain name system server.
Tap
Save
.
To exit the screen, tap the back arrow until you reach the Home screen.
Configuring an Ethernet Proxy IP Connection on the PAX Terminal
Use the information in this section to configure a Ethernet proxy IP connection on the
PAX terminal.
If your business hides its Wi-Fi network from the public, you are using a proxy server.
In this instance, you must use the Proxy IP configuration option to connect the PAX
terminal to your network.
IMPORTANT
Before starting this configuration, consult your IT department to
obtain the information required to configure this type of network connection.
Enable an Ethernet Proxy IP Connection on the PAX Terminal
To enable an Ethernet IP connection, use an Ethernet cable to connect your PAX A35
terminal to your point-of-sale (POS) system. For more information, see Connect the Ethernet Cable to the PAX Terminal.
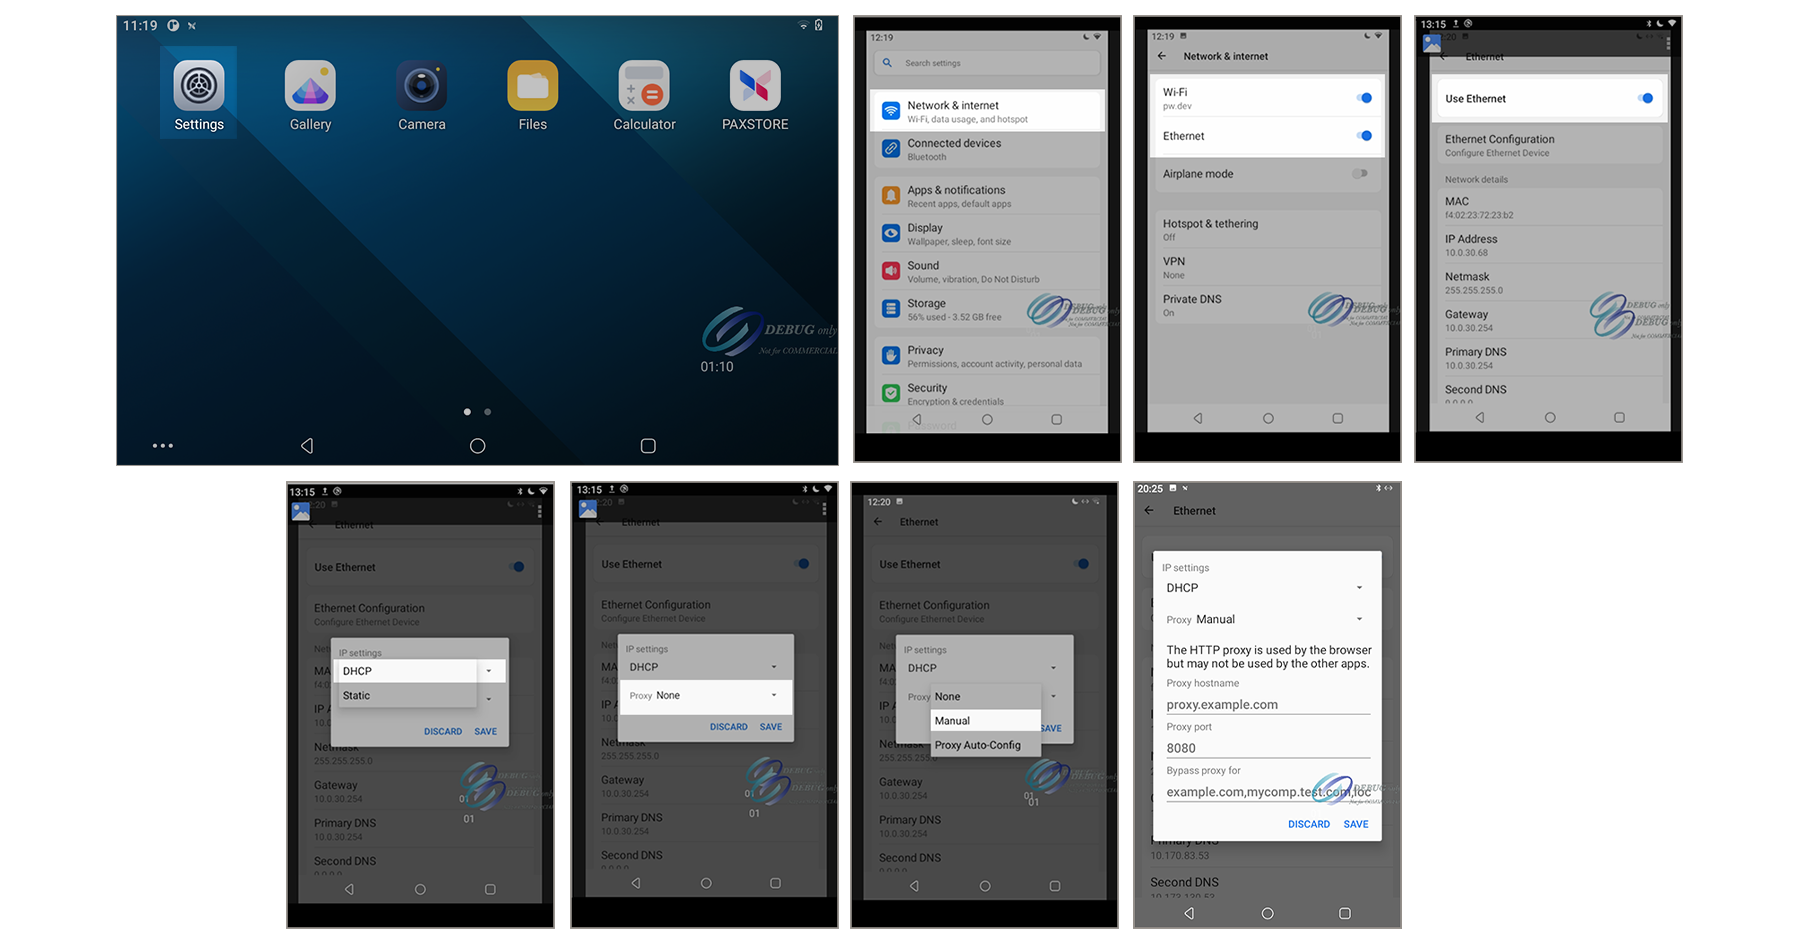
Figure:
Settings Menu Screens Used to Enable an Ethernet Proxy IP Connection on PAX
Terminal
Follow these steps to enable the Ethernet proxy IP connection on the PAX
terminal.