On This Page
P12 Authentication Upgrade for SOAP Toolkit Key Users Migration Guide
Audience and Purpose
This guide is written for merchants who need to upgrade their system to use P12
authentication.
Convention
This statement appears in this document:
An
Important
statement contains information essential to
successfully completing a task or learning a concept.Customer Support
For support information about any service, visit the Support Center:
Recent Revisions to This Document
26.05.01
Updated the required transition dates for the test and production environments. See
Introduction to P12 Authentication for SOAP Toolkit Key Users.
25.08.01
This revision contains only editorial changes and no technical updates.
25.07.01
Updated the deadline for transitioning your system to certificate-based authentication. See
Introduction to P12 Authentication for SOAP Toolkit Key Users.
25.05.01
This guide has undergone a reorganization.
Added information about how to verify your P12 authentication upgrade. See Verify Your P12 Certificate in Transaction Management.
25.04.01
Changed title of guide to
P12 Authentication Upgrade for SOAP Toolkit Key Users
Migration Guide
.Added authorization example request endpoint information. See Send a Test Request with P12 Authentication.
Added new section about how to configure WS-Security 1.0. See Overview of WS-Security 1.0 with the SOAP API.
Updated the instructions for creating and downloading a Simple Order API key as a .p12
file. See Create a P12 Certificate.
25.02.02
Updated the deadline for when merchants must upgrade to P12 authentication. See the
deadline for upgrading section in the Introduction to P12 Authentication for SOAP Toolkit Key Users.
25.02.01
Initial release.
VISA Platform Connect: Specifications and Conditions for
Resellers/Partners
The following are specifications and conditions that apply to a Reseller/Partner enabling
its merchants through
Cybersource for
. Failure to meet any of the specifications and conditions below is
subject to the liability provisions and indemnification obligations under
Reseller/Partner’s contract with Visa/Cybersource.Visa Platform Connect
(“VPC”)
processing- Before boarding merchants for payment processing on a VPC acquirer’s connection, Reseller/Partner and the VPC acquirer must have a contract or other legal agreement that permits Reseller/Partner to enable its merchants to process payments with the acquirer through the dedicated VPC connection and/or traditional connection with such VPC acquirer.
- Reseller/Partner is responsible for boarding and enabling its merchants in accordance with the terms of the contract or other legal agreement with the relevant VPC acquirer.
- Reseller/Partner acknowledges and agrees that all considerations and fees associated with chargebacks, interchange downgrades, settlement issues, funding delays, and other processing related activities are strictly between Reseller and the relevant VPC acquirer.
- Reseller/Partner acknowledges and agrees that the relevant VPC acquirer is responsible for payment processing issues, including but not limited to, transaction declines by network/issuer, decline rates, and interchange qualification, as may be agreed to or outlined in the contract or other legal agreement between Reseller/Partner and such VPC acquirer.
DISCLAIMER: NEITHER VISA NOR CYBERSOURCE WILL BE RESPONSIBLE OR LIABLE FOR ANY ERRORS OR
OMISSIONS BY THE
Visa Platform Connect
ACQUIRER IN PROCESSING TRANSACTIONS. NEITHER VISA
NOR CYBERSOURCE WILL BE RESPONSIBLE OR LIABLE FOR RESELLER/PARTNER BOARDING MERCHANTS OR
ENABLING MERCHANT PROCESSING IN VIOLATION OF THE TERMS AND CONDITIONS IMPOSED BY THE
RELEVANT Visa Platform Connect
ACQUIRER. Introduction to P12 Authentication for SOAP Toolkit Key Users
Cybersource
will no longer support username and password-based authentication for
merchants who use the SOAP toolkit key
. You are required to remove username and
password-based authentication from your SOAP toolkit integration, and transition to
certificate-based authentication, by these dates:- Test Environment:April 15, 2026
- Production Environment:June 24, 2026
Your API requests to
Cybersource
will be rejected
if you do not implement P12 authentication by the above dates.This migration guide explains how to transition your SOAP authentication to use a compliant P12
certificate. You must complete this update to remain compliant and avoid service
disruptions. Updated toolkit examples for these programming environments are available
in GitHub:
If your SOAP integration uses a different programming environment or commercial off-the-shelf
software (COTS), see Overview of WS-Security 1.0 with the SOAP API for more information
about implementing this change.
How to Set Up P12 Certificate Keys
These are the tasks you must complete to configure your system to support P12 certificate
authentication.
- Create a .p12 file in theBusiness Center. For more information, see Introduction to P12 Authentication for SOAP Toolkit Key Users.
- Edit the files in your application to use P12 authentication. How you edit your files is dependent on your system's programming environment:
- Send a test authorization request using your P12 certificate. For more information, see Send a Test Request with P12 Authentication.
- Verify that your request used your P12 certificate. For more information, see Verify Your P12 Certificate in Transaction Management.
Endpoints for the Simple Order API
While you complete this security update, verify that your integration uses one of these valid
Simple Order API endpoints.
Production endpoints:
- https://ics2ws.ic3.com/commerce/1.x/transactionProcessor
- https://ics2wsa.ic3.com/commerce/1.x/transactionProcessor
- India:https://ics2ws.in.ic3.com/commerce/1.x/transactionProcessor
Test endpoints:
- https://ics2wstest.ic3.com/commerce/1.x/transactionProcessor
- https://ics2wstesta.ic3.com/commerce/1.x/transactionProcessor
- India:https://ics2wstest.in.ic3.com/commerce/1.x/transactionProcessor
Master Shared Secret Keys
If you are a portfolio user who creates
master shared secret keys
using the API,
contact your technical account manager for more information about automatically
creating security keys. The current process for creating master shared secret keys
is not compatible with the certificate-based authentication.Create a P12 Certificate
To begin upgrading to P12 authentication, you must first create a P12 certificate.
Follow these steps to create a .p12 file that contains your P12 certificate.
- Log in to theBusiness Center:
- On the left navigation panel, choose
 Payment Configuration > Key Management.
 - Click+ Generate key.
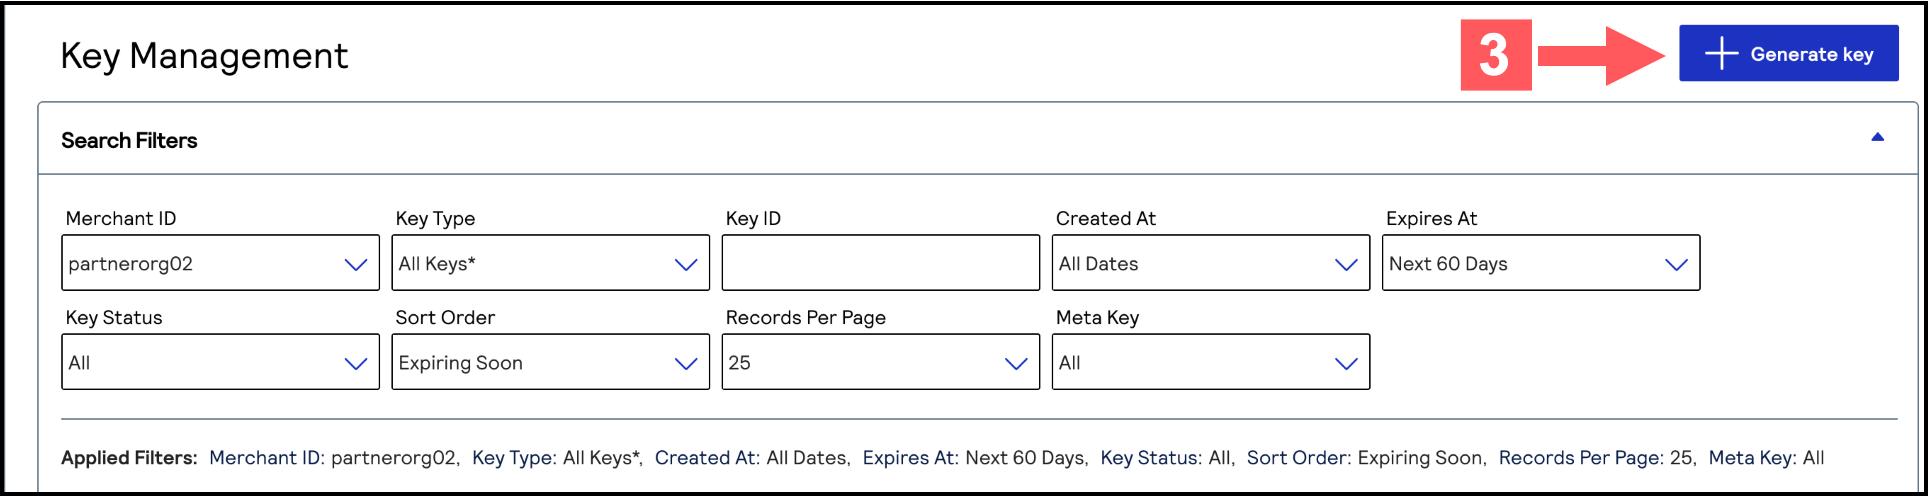 The Create Key page appears.
 - SelectSimple Order APIand clickGenerate Key.


- ClickDownload keyto download the .p12 file.
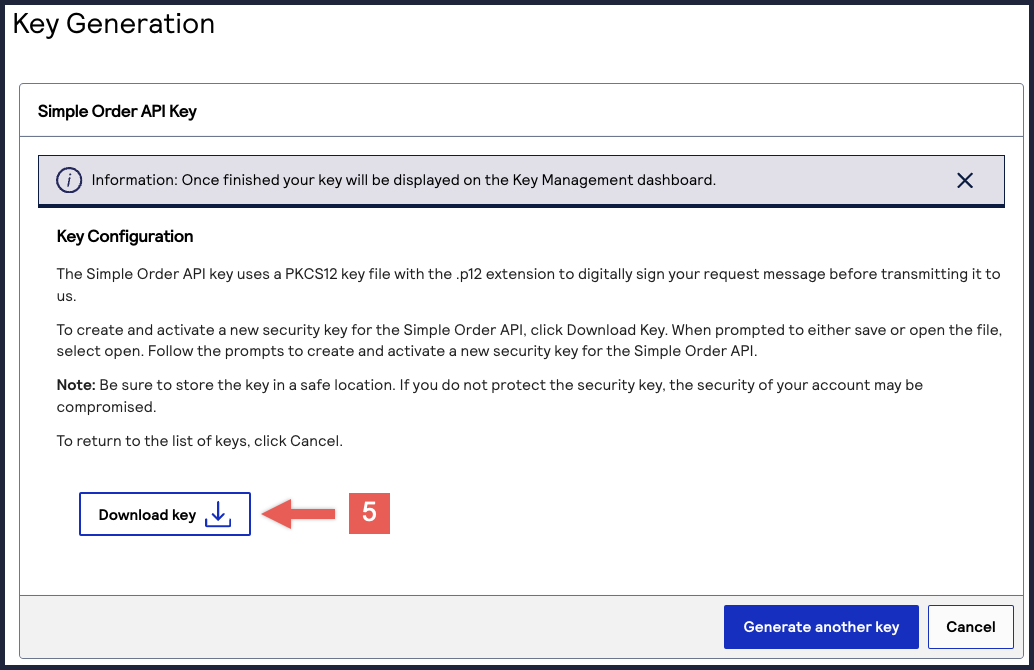 TheSet Passwordpage appears.
 - Enter your new password and confirm it.
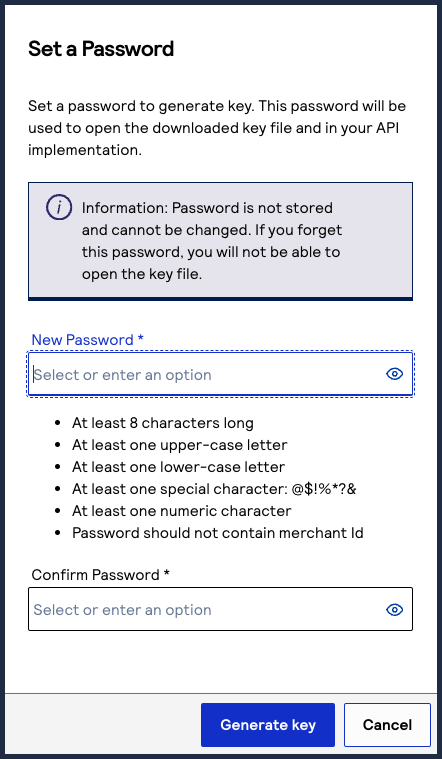
- ClickGenerate Keywhen done.
- The .p12 file that contains your Simple Order API key downloads to your desktop.Store your .p12 file in a secure location with restricted access.
AFTER COMPLETING THE TASK
After creating your .p12 file, you must edit the files in your application to use
P12 authentication.
How you edit your files is dependent on your system's programming environment:
Overview of WS-Security 1.0 with the SOAP API
Upgrading to certificate-based authentication requires your programming library to
support WS-Security 1.0. This overview section provides helpful information about which
WS-Security elements all merchants must configure in their SOAP integration. If your
SOAP integration uses a programming environment that is not available as a toolkit
example or a commercial off-the-shelf software (COTS), follow the instructions in this
section to remain compliant.
Configurable WS-Security Elements
WS-Security ensures secure SOAP communications between you and
Cybersource
. These are the WS-Security elements you must support and
configure for this upgrade: - Digest algorithmto verity the integrity of message bodies.
- X.509 Binary Security Token (BST)for authentication.
- Security timestampsto prevent replay attacks.
- Digital signatureto ensure message integrity.
- Canonicalizationto standardize XML formatting for signing.
For more information about the WS-Security standards, see the OASIS
Web Services Security: SOAP Message Security
1.0 (WS-Security 2004)
guide.Configure WS-Security Algorithms
Find the elements listed in the Security Element column in your payment system and
set them to the values in the Required Value column. You must verify that your
WS-Security library is configured to use these algorithms. The method for setting
these values is dependent on your language library.
Some WS-Security libraries use algorithms by default, while others require you to
configure the algorithms. Before setting these values, verify what your library's
default values are and configure the necessary values.
Security Element | Required Value |
|---|---|
Signature Algorithm | http://www.w3.org/2001/04/xmldsig-more#rsa-sha256 |
Digest Algorithm | http://www.w3.org/2001/04/xmlenc#sha256 |
Canonicalization Algorithm | http://www.w3.org/10/xml-exc-c14n# |
Signature Transformations | http://www.w3.org/2001/10/xml-exc-c14n# |
Update Your Authentication Method
You must configure your SOAP payment system to authenticate using the X.509
certificate in your .p12 file as a Binary Security Token (BST). For more
information, see the Security Tokens section on page 18 in the OASIS
Web Services Security: SOAP Message Security
1.0 (WS-Security 2004)
guide.Add Security Timestamps
Verify that security timestamps are enabled in your WS-Security configuration.
Enabling timestamps is typically sufficient for most payment systems. Timestamps
help prevent replay attacks by validating how recent message was sent.
Generate Digital Signatures
Use your private key in your .p12 file to generate digital signatures. Embed the
signatures in your SOAP message. For more information about how to message
signatures, see the Signing Messages section on page 28 in the OASIS
Web Services Security: SOAP Message Security
1.0 (WS-Security 2004)
guide.Extract Keys from .p12 File
Run these commands to the extract your private key and public certificate from your
.p12 file:
openssl pkcs12 -in <Merchant_ID>.p12 -nocerts -out <Merchant_ID>.key
openssl pkcs12 -in <Merchant_ID>.p12 -clcerts -nokeys -out <Merchant_ID>.crt
To create your p12 certificate, see Create a P12 Certificate.
Remove Username and Password Authentication
Search your application for any code or configuration related to your merchant
credentials and remove it. Your WS-Security library should now automatically add
your binary security token instead.
If your integration contains multiple merchants that require you to complete this
transition over a period of time,
Cybersource
will support both
authentication methods until the deadline.C++ Upgrade to P12 Authentication
This section describes how to upgrade your application using the C++ programming
language.
Application Requirements
Your C++ SOAP toolkit must have access to these system requirements:
- gSOAP 2.8.135 or later (developer version including header files)
- OpenSSL 3.4.0 or later (developer version including header files)
- G++ compiler
Version Compatibility for C++
This P12 authentication upgrade is compatible with WSDL and XSD version
1.219
or later.Migrate with C++
This section explains how to edit the files in your application to use P12
authentication. If you do not have the files that are mentioned in this section, you can
find them in the most recent version of the C++ SOAP toolkit in GitHub.
Follow these steps to upgrade your existing C++ code:
- Update your existing.Makefileby changing thecybsdemotarget from the text in the first example to the text in the second example:cybsdemo: sample.cpp $(SOAPH) $(SOAPCPP) ../gsoap/dom.cpp wsseapi.o smdevp.o $(CPP) $(CFLAGS) -o cybsdemo sample.cpp soapC.cpp soapClient.cpp ../gsoap/dom.cpp $(SOAPCPP) wsseapi.o smdevp.o $(LIBS)cybsdemo: sample.cpp $(SOAPH) $(SOAPCPP) ../gsoap/dom.cpp wsseapi.o smdevp.o $(CPP) $(CFLAGS) -o cybsdemo sample.cpp soapC.cpp ../gsoap/dom.cpp stdsoap2.cpp ../gsoap/import/custom/struct_timeval.cpp ../gsoap/plugin/threads.c ../gsoap/plugin/mecevp.c ../gsoap/plugin/wsaapi.c wsseapi.o smdevp.o soapITransactionProcessorProxy.cpp ../gsoap/import/gsoapWinInet.cpp PropertiesUtil.cpp BinarySecurityTokenHandler.cpp $(LIBS)If you do not have an existing.Makefile, you can use one of these.Makefilefiles from theCPlusPlusSoapToolkitfolder in GitHub:Cybersourcerecommends that you useUnixBuildAllCommented.MakefileorWindowsBuildAllCommented.Makefile. If you need to make changes to individual targets,Cybersourcerecommends that you useUnixQuickBuild.MakefileorWindowsQuickBuild.Makefile, which enable you to build each target individually.
- Download either theCyberSourceTransactionWSDL or XSD version 1.224 file from theCPlusPlusSoapToolkitfolder in GitHub to your project directory:If you want to use a different version, download your preferred version to the project directory and update the versions in theheadertarget of your.Makefilefrom the text in the first example to the text in the second example.header: CyberSourceTransaction_1.224.wsdl $(GWSDL) -t ../gsoap/WS/WS-typemap.dat -s -o cybersource.h CyberSourceTransaction_1.224.wsdlheader: CyberSourceTransaction_1.219.wsdl $(GWSDL) -t ../gsoap/WS/WS-typemap.dat -s -o cybersource.h CyberSourceTransaction_1.219.wsdl
- Addgsoapto the compile path by using one of these methods:
- Option 1:Copy thegsoapdirectory, including the header files, to one level above the project directory.
- Option 2:Update all paths in the .Makefile that referencegsoapto point to thegsoaplocation.
- Update yoursample.cppfile to include your test credentials:
If you do not have an existingconst char *MERCHANT_ID = "your_merchant_id"; const char *TRANSACTION_KEY = "your_transaction_key";sample.cppfile, you can use thefile in thesample.cppCPlusPlusSoapToolkitfolder in GitHub.If you are using an existingsample.cppfile from a previous C++ SOAP Toolkit, you must refer to current version of thesample.cppfile and find allupgrading from previous versionscomments to see what has changed. - Include these new source files from theCPlusPlusSoapToolkitfolder in your project:
- TheEdit thetoolkit.propertiesconfiguration file to include your test credentials:MERCHANT_ID= KEY_ALIAS= KEY_FILE= KEY_PASS= KEY_DIRECTORY=toolkit.propertiesconfiguration file is read from the same location as the executable at run time.You must verify that there are no spaces at the start and end of each line, or on either side of the equal sign (=).If you do not have an existingtoolkit.propertiesfile, you can use thefile in thetoolkit.propertiesCPlusPlusSoapToolkitfolder in GitHub.
- Run this command in your terminal:make headerThis command generates thecybersource.hfile.
- Insert this text in the Import section of thecybersource.hfile:#import "WS-Header.h"
- Run this command in your terminal:make sourceThis command generates these files:
- soapITransactionProcessorProxy.cpp
- soapITransactionProcessorProxy.h
- ITransactionProcessor.runTransaction.req.xml
- ITransactionProcessor.runTransaction.res.xml
- ITransactionProcessor.nsmap
- soapStub.h
- soapH.h
- soapC.cpp
- Run these three commands in this order in your terminal to generate thecybsdemo.exeexecutable file:make wsseapi.o make smdevp.o make cybsdemo
- Add your P12 certificate to the Key directory.
- Run thecybsdemo.exeexecutable file in your terminal.A successful console output consists of thekeyFilefull path, followed by the response from the web service, and no errors.keyFile full path: C:/keys/test_p12_file.p12 decision = APPROVED reasonCode = 0 requestID = 6017349752184504643266 requestToken = Axxd6DCgJoj77wSTjm5pe7DwFPfjpNDMyadDIZ/u1Pfje7D9IGU1ogwAGkmXoDc3JoZmTToZDIAAvxSz ccAuthReply.reasonCode = 0
What to Do Next
After completing the above migration steps, you must send a test authorization
request using your P12 certificate to validate your migration. For more information,
see Send a Test Request with P12 Authentication.
C# Upgrade to P12 Authentication
This section describes how to upgrade your application using the C# programming
language.
Application Requirements
Your C# SOAP toolkit must have access to these system requirements:
- The .NET Framework 4.7.2 and later Redistributable Package
- Portable.BouncyCastle
Version Compatibility for C#
This P12 authentication upgrade is compatible with WSDL and XSD version
1.219
or later.Migrate with C#
This section explains how to edit the files in your application to use P12
authentication. If you do not have the files that are mentioned in this section, you can
find them in the most recent version of the C# SOAP toolkit in GitHub.
Follow these steps to upgrade your C# code:
- Add this service URL as a service reference to your project, and setN.NNNto the most recent server API version.https://ics2wstest.ic3.com/commerce/1.x/transactionProcessor/CyberSourceTransaction_N.NNN.wsdlThis step generates a Connected Services section in your project. It will also generate anapp.configfile for your project.
- Add these sections to the top of yourapp.configfile:<configuration> <configSections> <section name="toolkitProperties" type="System.Configuration.NameValueSectionHandler"/> </configSections> <toolkitProperties> <add key="MERCHANT_ID" value="<your_merchant_id>"/> <add key="KEY_ALIAS" value="<your_certificate_key_alias>"/> <add key="KEY_FILE" value="<your_certificate_file>"/> <add key="KEY_PASS" value="<your_certificate_password>"/> <add key="KEY_DIRECTORY" value="<path/to/certificate/file>"/> </toolkitProperties> </configuration>The<configSections>element must be the first dependent element in the<configurations>element.
- In the generatedapp.configfile, leave the<binding>section as it is.The<binding>section must look like this:<bindings> <basicHttpBinding> <binding name="ITransactionProcessor"> <security mode="Transport"/> </binding> </basicHttpBinding> </bindings>
- Add this dependency to thepackages.configfile:<packages> <package id="Portable.BouncyCastle" version="1.9.0" targetFramework="net472" /> </packages>
- Install this dependency by either running this command in your terminal or by another method:nuget install packages.config -OutputDirectory packages
- Add this package reference to your.csprojfile:
The steps for adding a new dependency can also be comleted through Visual Studio Package Manager.<Reference Include="BouncyCastle.Crypto, Version=1.9.0.0, Culture=neutral, PublicKeyToken=0e99375e54769942, processorArchitecture=MSIL"> <HintPath>packages\Portable.BouncyCastle.1.9.0\lib\net40\BouncyCastle.Crypto.dll</HintPath> </Reference> - Add your P12 certificate to the Key directory.ThisKEY_DIRECTORYlocation must be accessible to your code. Ensure that your code has permission to read this location.
- Copy these files from theCSharpSoapToolkit/CSharpSoapToolkitfolder to your project directory and import them to your project:
- Find these lines in your existing code:
Replace them with these lines:TransactionProcessorClient proc = new TransactionProcessorClient(); proc.ChannelFactory.Credentials.UserName.UserName = request.merchantID; proc.ChannelFactory.Credentials.UserName.Password = TRANSACTION_KEY; ReplyMessage reply = proc.runTransaction(request);TransactionProcessorClient proc = new TransactionProcessorClient(); proc.Endpoint.EndpointBehaviors.Add(new InspectorBehavior()); ReplyMessage reply = proc.runTransaction(request); - Find your installation of the .NET Framework.It is often in one of these locations:
- C:\Windows\Microsoft.NET\Framework\v4.0.30319(32-bit)
- C:\Windows\Microsoft.NET\Framework64\v4.0.30319(64-bit)
- Use themsBuild.exefile that is already in your system to compile your project.<path_to_framework>\msBuild.exe <name_of_project>.csproj
- Run the project executable:bin\<configuration>\<project_name>.exe
- To confirm that your configuration is updated successfully, you can use a Bearer token that verifies that your request is authenticated. To do so, add this command after line 59 in theInspectorBehavior.csfile from theCSharpSoapToolkitfolder:Console.WriteLine(request.ToString());
What to Do Next
After completing the above migration steps, you must send a test authorization
request using your P12 certificate to validate your migration. For more information,
see Send a Test Request with P12 Authentication.
Java Upgrade to P12 Authentication
This section describes how to upgrade your application using the Java programming
language.
Application Requirements
Your Java SOAP toolkit must have access to these system requirements:
- Java 9 or later
- Jakarta XML Web Services API
- JAX-WS Runtime
- Jakarta XML Web Services distribution
- Bouncy Castle Cryptography APIs for JDK 1.5 to JDK 1.8
- Apache XML Security
Version Compatibility for Java
This P12 authentication upgrade is compatible with WSDL and XSD version
1.219
or earlier.Migrate with Java
This section explains how to edit the files in your application to use P12 authentication. If
you do not have the files that are mentioned in this section, you can find them in the
most recent version of the Java SOAP toolkit in GitHub.
Follow these steps to upgrade your Java code:
- Add these dependencies in thepom.xmlfile.<dependencies> <dependency> <groupId>jakarta.xml.ws</groupId> <artifactId>jakarta.xml.ws-api</artifactId> <version>4.0.2</version> </dependency> <dependency> <groupId>com.sun.xml.ws</groupId> <artifactId>jaxws-rt</artifactId> <version>4.0.3</version> <scope>runtime</scope> </dependency> <dependency> <groupId>com.sun.xml.ws</groupId> <artifactId>jaxws-ri</artifactId> <version>4.0.3</version> <type>pom</type> </dependency> <dependency> <groupId>org.bouncycastle</groupId> <artifactId>bcprov-jdk15to18</artifactId> <version>1.78</version> </dependency> <dependency> <groupId>org.apache.santuario</groupId> <artifactId>xmlsec</artifactId> <version>4.0.3</version> </dependency> </dependencies>If you do not have an existingpom.xmlfile, you can use the one in theJavaSoapToolkitfolder in GitHub.
- Add this plugin in yourpom.xmlfile:<build> <plugins> <plugin> <groupId>com.sun.xml.ws</groupId> <artifactId>jaxws-maven-plugin</artifactId> <version>4.0.3</version> <configuration> <wsdlUrls> <wsdlUrl>https://ics2wstest.ic3.com/commerce/1.x/transactionProcessor/CyberSourceTransaction_1.219.wsdl</wsdlUrl> </wsdlUrls> <keep>true</keep> <packageName>com.cybersource.stub</packageName> <sourceDestDir>src/main/java</sourceDestDir> </configuration> </plugin> </plugins> </build>
- Verify that thewsdlUrltag is set to a valid WSDL version value, and update it if necessary. Only version 1.219 or earlier is valid.
- Run this command in your terminal:mvn clean jaxws:wsimport
- Find these lines in your existing code:
Replace them with these lines:TransactionProcessorLocator service = new TransactionProcessorLocator(); URL endpoint = new URL(SERVER_URL); ITransactionProcessorStub stub = (ITransactionProcessorStub) service.getportXML (endpoint); stub._setProperty(WSHandlerConstants.USER, request .getMerchantID());TransactionProcessor service = new TransactionProcessor(); service.setHandlerResolver(portInfo - >{ List < Handler > handlerList = new ArrayList < >(); handlerList.add(new BinarySecurityTokenHandler()); return handlerList; }); ITransactionProcessor stub = service.getPortXML(); - Go to GitHub and copy these files from theJavaSoapToolkit/src/main/java/com/cybersourcefolder. Add them to your project directory:
- Add thetoolkit.propertiesfile from thesrc/main/resourcesfolder in GitHub to your project.Edit thetoolkit.propertiesfile to contain this required content:MERCHANT_ID = <your_merchant_id> LIB_VERSION = 4.0.3 KEY_ALIAS = <your_certificate_key_alias> KEY_FILE = <your_certificate_file> KEY_PASS = <your_certificate_password> KEY_DIRECTORY = src/main/resourcesIf you are using your own properties file, you can make these changes in yourPropertiesUtil.javafile.
- Add your P12 certificate to your key directory.
- Run these two commands in your terminal:mvn clean installjava -jar target\JavaSoapToolkit.jar
- To confirm that your configuration is updated successfully, you can add a Bearer token that verifies that your requests are authenticated. To do so, add this command after line 54 in theBinarySecurityTokenHandler.javafile in thesrc\main\java\com\cybersourcefolder.System.out.println( soapMessageContext );
What to Do Next
After completing the above migration steps, you must send a test authorization
request using your P12 certificate to validate your migration. For more information,
see Send a Test Request with P12 Authentication.
PHP Upgrade to P12 Authentication
This section describes how to upgrade your application using the PHP programming
language.
Application Requirements
Your PHP SOAP toolkit must have access to these system requirements:
- PHP 5.6x or higher
- PHP SOAP extension
- PHP OpenSSL extension
Version Compatibility for PHP
This P12 authentication upgrade is compatible with WSDL and XSD version
1.219
or later.Migrate with PHP
This section explains how to edit the files in your application to use P12
authentication. If you do not have the files that are mentioned in this section, you can
find them in the most recent version of the PHP SOAP toolkit in GitHub:
Follow these steps to upgrade your existing PHP code:
- Update this service URL (WSDL_URL) in your code, and set theN.NNNto the most recent server API version.https://ics2wstest.ic3.com/commerce/1.x/transactionProcessor/CyberSourceTransaction_N.NNN.wsdl
- Copy these files from thePHPSoapToolkitfolder and put them in your project directory:
- Find these lines in your existing code:
Replace them with these lines:$soapClient = new ExtendedClient(WSDL_URL, array());$soapClient = new ExtendedClientWithToken( WSDL_URL, array( 'SSL' => array( 'KEY_ALIAS' => 'YOUR KEY ALIAS', 'KEY_FILE' => 'YOUR CERTIFICATE FILE', 'KEY_PASS' => 'YOUR KEY PASS', 'KEY_DIRECTORY' => 'PATH TO CERTIFICATES' ) ) ); - Update these field values in your code with your information:
- MERCHANT_ID
- KEY_ALIAS
- KEY_FILE
- KEY_PASS
- KEY_DIRECTORY
- Add your P12 certificate to the Key directory.This Key directory location must be accessible to your code. Ensure that your code has permission to read this location.
- Run this command in your terminal:php <sample_PHP_file>
- To confirm that your configuration is updated successfully, you can use a Bearer token that verifies that your request is authenticated. To do so, add this command after line 109 in theExtendedClientWithToken.phpfile from thePHPSoapToolkitfolder:print_r($request);
What to Do Next
After completing the above migration steps, you must send a test authorization
request using your P12 certificate to validate your migration. For more information,
see Send a Test Request with P12 Authentication.
Send a Test Request with P12 Authentication
After you complete the migration requirements documented in this guide, you can send this
valid SOAP API request with P12 authentication to verify that your migration is
valid.
You must configure the header information in this example to include your
credentials.
Endpoint
Send your test request to one of these valid test endpoints:
- https://ics2wstest.ic3.com/commerce/1.x/transactionProcessor
- https://ics2wstesta.ic3.com/commerce/1.x/transactionProcessor
- India:https://ics2wstest.in.ic3.com/commerce/1.x/transactionProcessor
Request with P12 Authentication
<?xml version="1.0" encoding="UTF-8"?>
<soapenv:Envelope xmlns:soapenv="http://schemas.xmlsoap.org/soap/envelope/" xmlns:urn="urn:schemas-cybersource-com:transaction-data-1.215">
	<SOAP-ENV:Header>
		<wsse:Security
			xmlns:wsse="http://docs.oasis-open.org/wss/2004/01/oasis-200401-wss-wssecurity-secext-1.0.xsd">
			<wsse:BinarySecurityToken
				xmlns:wsu="http://docs.oasis-open.org/wss/2004/01/oasis-200401-wss-wssecurity-utility-1.0.xsd" ValueType="http://docs.oasis-open.org/wss/2004/01/oasis-200401-wss-x509-token-profile-1.0#X509v3"
EncodingType="http://docs.oasis-open.org/wss/2004/01/oasis-200401-wss-soap-message-security-1.0#Base64Binary" wsu:Id="X509Token">
MIICXzCCAcigAMIICXzCCAcigAMIICXzCCAcigAMIICXzCCAcigAMIICXzCCAcigAMIICXzCCAcigAMIICXzCCAcigAMIICXzCCAcigAMIICXzCCAcigAMIICXzCCAcigAMIICXzCCAcigAMIICXzCCAcigAMIICXzCCAcigAMIICXzCCAcigAMIICXzCCAcigAMIICXzCCAcigAMIICXzCCAcigAMIICXzCCAcigAMIICXzCCAcigAMIICXzCCAcigAMIICXzCCAcigAMIICXzCCAcigAMIICXzCCAcigAMIICXzCCAcigAMIICXzCCAcigAMIICXzCCAcigAMIICXzCCAcigA........

			</wsse:BinarySecurityToken>
			<ds:Signature
				xmlns:ds="http://www.w3.org/2000/09/xmldsig#">
				<ds:SignedInfo>
					<ds:CanonicalizationMethod Algorithm="http://www.w3.org/2001/10/xml-exc-c14n#" />
					<ds:SignatureMethodAlgorithm="http://www.w3.org/2001/04/xmldsig-more#rsa-sha256" />
					<ds:Reference URI="#Body">
						<ds:Transforms>
							<ds:Transform Algorithm="http://www.w3.org/2001/10/xml-exc-c14n#" />
						</ds:Transforms>
						<ds:DigestMethod Algorithm="http://www.w3.org/2001/04/xmlenc#sha256" />
						<ds:DigestValue>
KRmKx6digestvalye12389012367u7hlkV1vvbtec...........
</ds:DigestValue>
					</ds:Reference>
				</ds:SignedInfo>
				<ds:SignatureValue>otrfnrck17dwxI4UR12345612yNG7TtE8L3XFhfEa/63r2uBDsg7b2YY8C6nKvkJGop4NHW7d30yfrz5dK2CHkp18TM+hVkyNIVLGokZzZpAwuc0sXm33+J4i765421duLsE4jM0FfIABsPHT2vgSq+T0g+812312jOeIk5R5kLhwnlVd92wQvBmpxINBW2Hh5adwwtpv+gj4AtvuhLYe1ky4R/oDNSWLPmyY1dSIyGDKO4ko8CT0mFlAvxECa8dLHRsyFrZVlK6................
</ds:SignatureValue>
				<ds:KeyInfo>
					<wsse:SecurityTokenReference>
						<wsse:Reference URI="#X509Token" />
					</wsse:SecurityTokenReference>
				</ds:KeyInfo>
			</ds:Signature>
		</wsse:Security>
	</SOAP-ENV:Header>
	<soapenv:Body>
		<requestMessage
			xmlns="urn:schemas-cybersource-com:transaction-data-1.215">
			<merchantID>johndoe</merchantID>
			<merchantReferenceCode>MRC-123</merchantReferenceCode>
			<billTo>
				<firstName>John</firstName>
				<lastName>Doe</lastName>
				<street1>123 Example Road</street1>
				<city>Austin</city>
				<state>TX</state>
				<postalCode>12345</postalCode>
				<country>US</country>
				<email>abc@company.com</email>
			</billTo>
			<shipTo>
				<firstName>John</firstName>
				<lastName>Doe</lastName>
				<street1>123 Example Road</street1>
				<city>Austin</city>
				<state>TX</state>
				<postalCode>12345</postalCode>
				<country>US</country>
			</shipTo>
			<purchaseTotals>
				<currency>USD</currency>
				<grandTotalAmount>100.00</grandTotalAmount>
			</purchaseTotals>
			<card>
				<accountNumber>4111111111111111</accountNumber>
				<expirationMonth>12</expirationMonth>
				<expirationYear>2029</expirationYear>
				<cvNumber>111</cvNumber>
			</card>
			<ccAuthService run="true"></ccAuthService>
			<ccCaptureService run="true"></ccCaptureService>
		</requestMessage>
	</soapenv:Body>
</soapenv:Envelope>
What to Do Next
After sending a test request, you must verify that the request used your p12 certificate.
For more information, see Verify Your P12 Certificate in Transaction Management.
Verify Your P12 Certificate in Transaction Management
After transitioning your SOAP authentication to use a P12 certificate, you must
verify that your transaction requests are using the P12 certificate. Send a test
request before beginning this task. For more information about sending a test
request, see Send a Test Request with P12 Authentication.
Choose one of these methods to verify that your P12 certificate using transaction
management in the
Business Center
:- Use theclient applicationsearch filter.
- Add theclient applicationsearch results column.
- View the request transaction details.
Verifying with a Search Filter
Follow these steps to verify that your test request used your P12 certificate by
adding a search filter.
- Log in to theBusiness Center:
- On the left navigation panel, choose
 Transaction Management > Transactions.The Transactions page appears.
 - In the New Filter field, chooseClient Application.
- In the Client Application field, chooseSimple Order API.

- When done, clickSearch.The Search Results table displays all of your transactions that used a Simple Order API key. If your test transaction is in the search results table, your P12 certificate was used in the request and is verified.
Verifying with a Results Column
Follow these steps to verify that your test request used your P12 certificate by
adding a results column.
- Log in to theBusiness Center:
- On the left navigation panel, choose
Transaction Management > Transactions.The Transactions page appears.
- In the Search Results section, clickEdit columns.The Edit Table Layout page appears.
- ClickAdd item.TheAdd Table Columnwindow appears.
- In the Select Table Column drop-down menu, choose Client Application, then clickSave.
 You are returned to the Edit Table Layout page.
 - When done, clickSave.The Transaction page appears. Now when you search for transactions, the search results table displays the Client Application column. When the Client Application column displays theSimple Order APIvalue, the corresponding transaction used a P12 certificate.

Verifying with Transaction Details
Follow these steps to verify that your test request used your P12 certificate in
transaction details.
- Log in to theBusiness Center:
- On the left navigation bar, choose
Transaction Management > Transactions.The Transactions page appears.
- Use the search fields to find a transaction you sent using your P12 certificate, then clickSearch.The Search Results table updates.

- In the Search Results table, click the request ID for the transaction you are verifying.The Transaction Details page appears.

- In the Request Information section, verify that the Client App is set to Simple Order API. You can also verify that the Security Key ID is set to your key ID.
