![[CyberSource logo]](images/cybslogo.gif)
Search documentation:
|
|
Search documentation: |
| Help Advanced | |
| Published 08/06/2002 |
|
Chapter 2
Creating Strategies and Modules
This chapter explains how to use the Administration Server to create strategies and modules.
Note Before you create business strategies, the server administrator must configure the Administration Server. See Chapter 5, "Configuring and Maintaining Risk Manager" for more information about configuring the Administration Server.
Planning Your Strategy
Before you use Risk Manager to create a strategy, complete the following tasks:
- Define the business rules for the strategy
- Identify the fields you will use in your strategy's rules
Defining Business Rules
Your strategy will be easier to implement if you clearly define the business rules that it must follow.
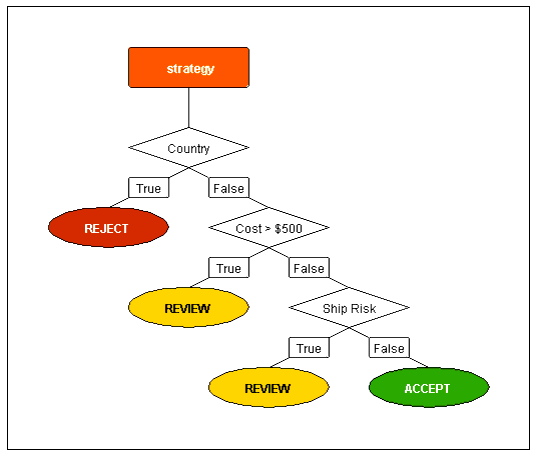
For example, the following business rules can be combined into a strategy:
- If the customer's billing address is not in the United States, reject the order.
- If the customer ordered any items that cost more than $500, review the order.
- If the customer requested same-day shipping, review the order.
- In all other cases, accept the order.
Figure 2 shows how these business rules might look when they are implemented in a Risk Manager strategy.
Figure 2 Sample Strategy
Identifying Fields
After you define your business rules, you can identify the fields to use in your rules.
Risk Manager includes many predefined fields that you can use in your rules. In addition, many plug-ins include a list of fields that are relevant to the plug-in. See Viewing All Fields for information about how to view a list of these fields.
You can also define custom fields for your business. See Adding Business Fields for information about defining custom fields.
For example, to implement the business rules described in Defining Business Rules, you would use the fields described in the following list. All of these fields are system fields.
- The field bill_country contains the country of the customer's billing address. If the billing address is in the United States, the field contains the value
US.- The field amount contains the amount of each item in the order. For example, if an item costs $599.99, this field contains the value
599.99.- The field shipping_method contains the shipping method chosen by the customer. If the customer requested same-day shipping, this field contains the value
sameday.Logging In
Once you have defined your business strategy, you are ready to log into Risk Manager.
- Open a Web browser.
- You can use Microsoft Internet Explorer 5.5 or greater with Risk Manager.
- Type the URL for your company's Administration Server.
- For a regular connection, type
http://<server>:<port>/admin/.- For a secure connection, type
https://<server>:<secureport>/admin/.- Replace
<server>with the name of your application server and<port>(or<secureport>) with the port number where the Administration Server runs.- Press Enter.
- The Log In page appears.
- Type your user name and password, then click Log In.
- Risk Manager displays a list of businesses available on the Administration Server.
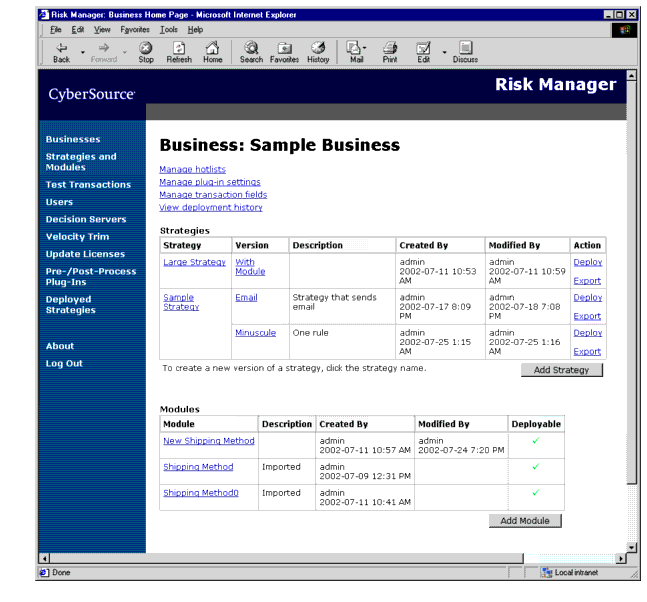
Adding a Business
Risk Manager groups strategies into businesses. If there are no businesses on your Administration Server, you must add a business before you can create a strategy.
- Type a name and description for the business, then click Add Business.
- Risk Manager creates a new business.
Creating a New Strategy
A strategy can include rules, plug-in calls, and other components. Figure 3 shows how each of these components appear in the strategy editor.
Figure 3 Components of a Strategy
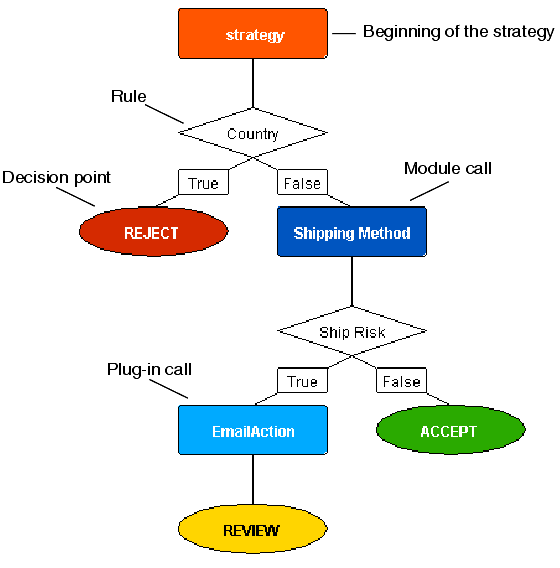
To add components to a strategy, click on the lines that connect each component. To edit a component, click on the component.
Important As you edit a strategy, save your changes frequently by clicking the Save Changes button. If you do not, the Administration Server will not store your changes.
Strategies are grouped into businesses. Before you create a strategy, you must decide which business will contain the strategy. Also, you must decide whether to start the new strategy with a copy of an existing strategy.
A strategy can be deployed to a Decision Server only when all of its modules are complete and when it contains no Unspecified points.
Creating an Empty Strategy
- Click the name of the business that will contain the new strategy.
- The home page for the business opens.
- Type a strategy name.
- For example, you can use the name of a sales channel, such as
WeborPhone.- Type a version name.
- You can use the version name to indicate different versions of a similar strategy. For example, you might have two version names,
NormalandHoliday.Note The Decision Server can run only one version of a strategy at a time.
- Type a brief description of the strategy.
- Click Create Strategy.
- Risk Manager creates the strategy and returns you to the home page for the business.
Creating a Copy of an Existing Strategy
When you create a new version of a strategy, you can start with a copy of an existing version.
- Click the name of the business that will contain the new strategy.
- The home page for the business opens.
- Click the name of the strategy that contains the version to copy.
- The Add Strategy page opens.
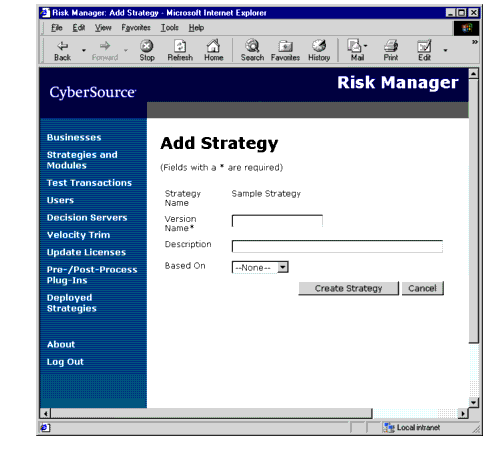
- Type a version name.
Note The Decision Server can run only one version of a strategy at a time.
- Type a brief description of the strategy.
- In the Based On list, choose the version to copy.
- Click Create Strategy.
- Risk Manager creates a copy of the existing version.
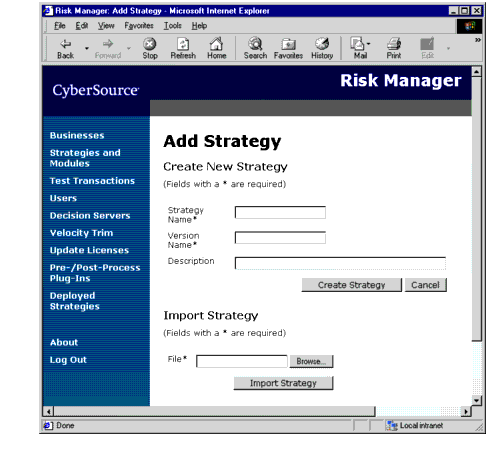
Importing a Strategy
When you create a new strategy, you can choose to import a strategy from a file. Importing a strategy also imports all of the modules and plug-in settings for the strategy.
After you import a strategy, Risk Manager changes its description to "Imported." If necessary, it adds a number to the end of the strategy's version name, module names, and plug-in settings names, to prevent conflicts with existing information.
- On the left navigation bar, click Businesses.
- The Choose a Business page opens.
- Click the name of the business where you want to import the strategy.
- The home page for the business opens.
- Click the Add Strategy button.
- The Add Strategy page opens.
- Under Import Strategy, click the Browse... button.
- The browser prompts you for the location of the strategy file. Choose the strategy file to import, then click Open.
- Click Import Strategy.
- Risk Manager imports the strategy and its modules.
Creating Rules
A strategy uses rules to make your business decisions. Each rule evaluates some of the fields in a transaction. For example, you can check whether the customer's billing address is in the United States, or you can check whether an Advanced Fraud Screen score is higher than a specific number.
When a rule is used, it can have two results:
- True. The transaction meets the conditions of the rule.
- False. The transaction does not meet the conditions of the rule.
After you create a rule, you choose what happens based on the results of the rule. For example, if the rule is true, the strategy could request a credit card authorization, then check another rule; if the rule is false, you could mark the transaction for review.
Note The Administration Server enables you to use all of Risk Manager's features in your rules. When you deploy a strategy, Risk Manager verifies that your license supports all of the features in your strategy.
- On the business home page, click the version name of a strategy you want to edit.
- The strategy editor opens.
- On the strategy diagram, click where you want to add the new rule.
- For example, in a new strategy, click the line under the orange box at the top of the diagram.
- A pop-up window appears.
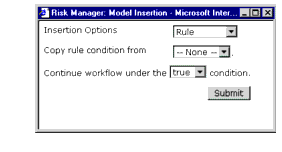
- In the Insertions Options list, choose Rule.
- Choose a rule to copy, or choose None to create a new rule.
- Choose whether to continue the workflow under the true or false condition.
- Click Submit.
- The Rule Editor page opens.
Using the Rule Wizard
The rule wizard helps you create a rule quickly, without writing the rule by hand. You use a simple form to choose which fields to test in the rule.
- Click the Rule Wizard button, located next to the Rule Name box.
- The rule wizard appears in a new window.
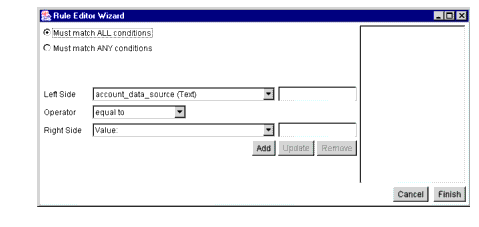
- Choose whether the rule must match all of your conditions to be true, or whether it can match any of the conditions to be true.
- In the Left Side list, choose what you want to test.
- To test an existing field, choose the field name from the list.
- To test an undefined field, choose Field Name and type the name of the field.
- To test a value, choose Value and type the value.
- In the Operator list, choose how to compare both sides of the condition.
- In the Right Side list, choose what you want to compare the left side with.
- To use a value, choose Value and type the value.
- To use an existing field, choose the field name from the list.
- To use an undefined field, choose Field Name and type the name of the field.
- Click Add.
- If the condition is valid, Risk Manager adds it to the list. Otherwise, it displays an error message. Correct the condition as necessary.
- Repeat Step 3-Step 6 as many times as necessary.
- Click Finish.
- Risk Manager creates the rule, closes the rule wizard, and returns you to the Rule Editor page.
- Click Submit.
- Risk Manager saves the rule and returns you to the strategy.
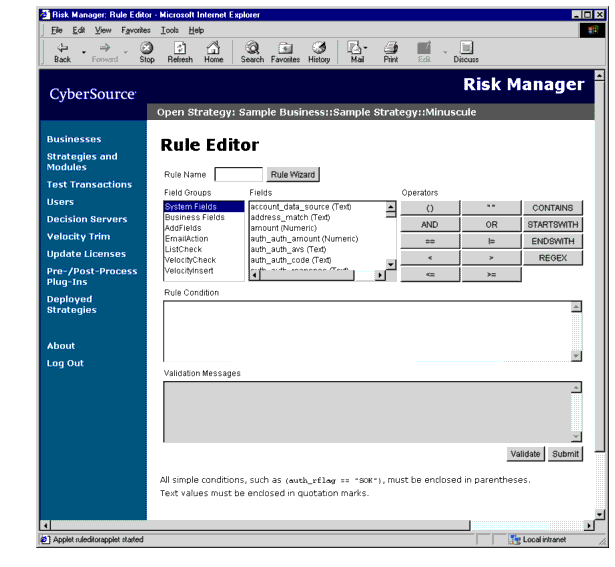
Using the Rule Editor
The rule editor allows you to create and edit rules for your strategy. It also makes sure that your rules use the correct format.
To create a rule, you use operators to compare fields with values. For example, to test whether the field bill_country is equal to the value
US, you would create the following condition:You can also compare fields with other fields. For example, to test whether the field bill_country is equal to the field ship_to_country, you would create the following condition:
bill_country == ship_to_countryRisk Manager provides several types of operators:
- Grouping operators, such as
" "(quotation marks), change how the condition is interpreted.- Comparison operators, such as
==(equal to), compare two items, such as a field and a value.- Joining operators, such as
AND, combine conditions with one another.The following tables describe the operators you can use in a rule.
Table 1 Grouping OperatorsTable 2 Comparison Operators
==cybs_auth_rflag == "SOK"is true if the field cybs_auth_rflag is equal to the valueSOK.!=bill_country != ship_to_countryis true if the field bill_country is not equal to the field ship_to_country.<cybs_score_score_result < 40is true if the field cybs_score_score_result is less than 40.>quantity > 5is true if the field quantity is greater than 5.<=cybs_score_score_result <= 40is true if the field cybs_score_score_result is less than or equal to 40.>=quantity >= 5is true if the field quantity is greater than or equal to 5.CONTAINSbill_address1 CONTAINS "lake"is true if the field bill_address1 contains the valuelake(for example, if the full value of bill_address1 was123 Westlake Drive).STARTSWITHbill_city STARTSWITH "holly"is true if the field bill_city starts with the valueholly(for example, if the full value of bill_city wasHollywood).ENDSWITHbill_address1 ENDSWITH "hamilton"is true if the field bill_address1 ends with the valuehamilton(for example, if the full value of bill_address1 was123 West Hamilton).REGEXbill_zip REGEX "\d{5}(-\d{4})?"is true if the field bill_zip uses the correct format for a United States postal code (for example,94043or94043-1307).See Appendix A, "Regular Expressions" for more information about regular expressions.Table 3 Joining OperatorsCreating a Simple Rule
A simple rule contains only one condition, such as
auth_rflag == "SOK".
- In the Rule Name box, type a name for your rule.
- The strategy diagram will display the first 10-12 characters of the rule name.
- Choose a field group, then double-click the name of the field to add.
- The field name appears in the Rule Condition box.
- Click the button for a comparison operator, such as
==(equal to).
- The operator appears in the Rule Condition box.
- If you want to compare the field you added to a text value, Boolean value, or regular expression, click the button for the
" "(quotation marks) operator.
- The operator appears in the Rule Condition box.
- Type the value to compare with the field, or double-click a field if you want to compare two fields with each other.
- Click Validate to make sure that your rule is formatted correctly. If there are errors, follow the instructions to correct them.
Note Risk Manager automatically validates your rule before it is saved. You are not required to use the Validate button.
- When you are done editing your rule, click Submit.
- Risk Manager returns you to the strategy editor.
Creating an Advanced Rule
An advanced rule contains several conditions joined together, such as
(bill_country == "US") OR (ship_to_country == "US").You can also use parentheses to create more complicated rules. For example, the rule
((bill_country == "US") OR (ship_to_country == "US")) AND (quantity < 5)is true in any of the following cases:
- bill_country equals
US, ship_to_country equalsUS, quantity equals 2- bill_country equals
US, ship_to_country equalsRU, quantity equals 3- bill_country equals
RU, ship_to_country equalsUS, quantity equals 4To create an advanced rule, you can follow the instructions in Creating a Simple Rule. However, you may find it easier to type the rule in the Rule Condition box.
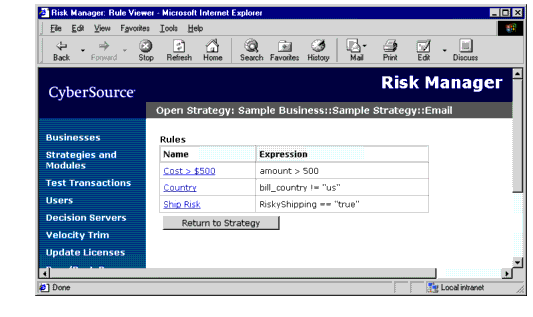
Viewing a List of Rules
You can view a list of all of the rules in a strategy version. The list includes the conditions used in each rule.
- Open the strategy whose rules you want to view.
- Under the strategy diagram, click "View all rules in this strategy version."
- Risk Manager displays all of the rules in the strategy.
Adding Decision Points
Based on the rules you create, your strategy indicates whether you should accept, reject, or review a transaction. You choose whether to accept a transaction by adding decision points to your strategy. Risk Manager stops processing the transaction when the strategy reaches a decision point.
When you create a decision point, you can specify a field name and value to add to the transaction. If the Decision Server reaches the decision point, it will add the field to its reply message.
- On the strategy diagram, click where you want to add a decision point.
- For example, to add a decision point if a rule is true, click the word "True" under the rule.
- A pop-up window appears.
- In the Insertion Options list, choose Decision Point.
- In the Decision Type list, choose the type of decision to insert.
- If you want to add a field to the reply message, type the field name in the Return Field box and the value in the Return Value box.
- Click Submit.
- Risk Manager adds the decision point to the strategy.
Adding Plug-In Calls
Risk Manager includes several plug-ins that you can use as part of your strategy:
- The AddFields plug-in can add or modify fields in the transaction. For example, based on the result of a rule, you could add a field called rule_code that indicates why a transaction was risky.
- The EmailAction plug-in allows you to send an email message to an address that you choose. The email message can include information from the transaction. For example, whenever a transaction is marked for review, the strategy could send a reference number for the transaction to your customer support representatives.
Your license may also include additional plug-ins, including plug-ins that perform hotlist and velocity checks. See Chapter 3, "Using Risk Manager Plug-Ins" for more information about Risk Manager plug-ins.
You can add plug-ins to any part of your strategy. For example, the strategy can call the hotlist plug-in at the beginning of the strategy, or it can call several plug-ins based on the outcome of a rule.
- On the strategy diagram, click where you want to add a plug-in call.
- For example, to add a plug-in call if a rule is false, click the word "False" under the rule.
- A pop-up window appears.
- In the Insertions Options list, choose Plugin Call.
- In the Plugin list, choose the plug-in to use.
- In the Settings list, choose a plug-in settings group to use.
- To create a new settings group, choose New. To use the plug-in without a settings group, choose None.
- Click Submit.
- If you choose an existing group, or None, Risk Manager adds the plug-in to the strategy.
- If you choose New, Risk Manager opens the Create a Plug-In Settings Group page. See Creating Plug-In Settings Groups for information about this page. When you click Save Settings, Risk Manager returns you to the strategy editor.
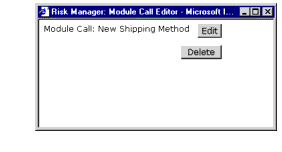
Adding Module Calls
A module contains rules and plug-ins and can be shared by multiple strategies. Once you create modules, you can use them in your strategy. See Creating Modules for information about modules.
You can add modules to any part of your strategy. For example, the strategy can call a module anywhere in the strategy, or it can call a module based on the result of a rule.
- On the strategy diagram, click where you want to add a module.
- For example, to add a module call if a rule is true, click the word "True" under the rule.
- A pop-up window appears.
- In the Insertion Options list, choose Module Call.
- In the Module list, choose the module to call.
- Click Submit.
- Risk Manager adds the module to the strategy.
Creating Modules
In some cases, you may want to use the same business rules in more than one strategy, or you may want to simplify a very complex strategy. You can use modules to perform these tasks. Modules can be used in all of the strategies within a single business.
A module is similar to a strategy; it is a workflow that contains rules and plug-ins. However, you cannot accept, reject, or review a transaction from within a module. Instead, you return information to the strategy, which uses rules to interpret the information.
You can use modules to combine information from different sources, then distill it into one or two fields. For example, you could do any of the following with a module:
- Request a $1 credit card authorization, use rules to interpret the results of the Address Verification Service (AVS), and create a field called risky_avs indicating whether the AVS results appear to be risky.
- Request Delivery Address Verification and geolocation, interpret their results, and create a field called customer_at_billing_location indicating whether the customer appears to be in the same location as the billing address.
- Use rules to examine the shipping method and cost of the order, and create a field called risky_shipping if the customer has requested that an expensive item be shipped very quickly.
- Call several age verification services, interpret their results, and create a field called customer_is_21 indicating whether the customer is at least 21 years old.
A module is complete only when it contains no Unspecified points.
Important If you use a module in several strategies, be very careful when you change the module. Any changes you make will affect all of the strategies that use the module.
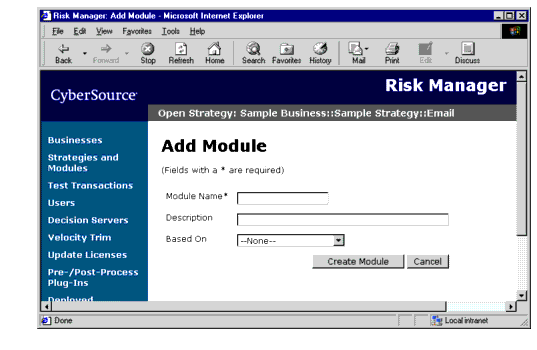
- In the Module Name box, type a name for the module.
- The strategy diagram will display the first 10-12 characters of the module name.
- In the Description box, type a brief description of the module.
- If you want to create a copy of an existing module, select the name of the module from the Based On list. Otherwise, use the default option, None.
- Click the Create Module button.
- Risk Manager creates the module and returns you to the home page for the business.
Adding Rules and Plug-In Calls
You can add rules and plug-in calls to a module just as you would add them to a strategy. See Creating Rules and Adding Plug-In Calls for more information.
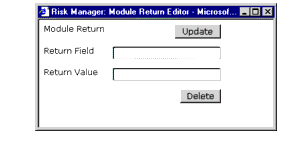
Adding Module Return Points
You use module return points at the end of a module. When Risk Manager reaches a module return point, it stops processing the module and returns to the strategy.
When you create a module return point, you can specify a field name and value to add to the transaction. Your strategies can use this value to determine the results of the module.
- On the strategy diagram, click where you want to add a module return point.
- For example, to add a module return point if a rule is true, click the word "True" under the rule.
- A pop-up window appears.
- In the Insertion Options list, choose Module Return.
- If you want to add a field to the reply message, type the field name in the Return Field box and the value in the Return Value box.
- Click Submit.
- Risk Manager adds the module return point to the strategy.
Editing Strategies and Modules
You can edit or delete any part of your strategy or module after you create it. For example, you can change the conditions in a rule, delete a plug-in call, or change a decision point from "Accept" to "Reject" or "Review."
Note If you change a strategy that has already been deployed, or if you change a module that is used in a deployed strategy, you must redeploy the strategy before your changes are used to process transactions.
If you have already deployed a strategy, consider creating a backup of the strategy before you change it. See Exporting a Strategy for information about exporting strategies to files.
Editing or Deleting a Rule
You can change the conditions in a rule, and you can switch the true and false branches of a rule. You can also delete a rule.
- Click the rule you want to change.
- The Rule Editor page opens.
- To edit the rule, make the necessary changes, then click Submit.
- Risk Manager updates the rule.
- To switch the true and false branches of the rule, click the link under Workflow Exchange.
- Risk Manager switches the true and false branches.
- To delete the rule, choose which branch of the rule to keep. You can keep the true branch, the false branch, or neither branch. Then click Delete Rule.
- Risk Manager deletes the rule.
Editing or Deleting a Decision Point
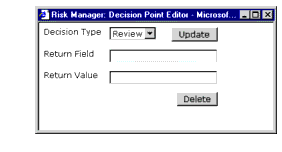
- To change the type of decision point, choose the type of decision to use, then click Update.
- Risk Manager updates the decision point.
- To change the field to add to the transaction, update the Return Field and Return Value boxes, then click Update.
- Risk Manager updates the decision point.
- To delete the decision point, click Delete, then click OK.
- Risk Manager deletes the decision point.
Editing or Deleting a Plug-In Call
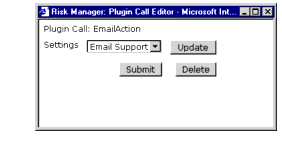
- To change the settings group for the plug-in call, choose a different group from the list, then click Submit.
- If you choose an existing settings group, Risk Manager updates the settings group.
- If you choose New, Risk Manager opens the Create Plug-In Settings Group page. Update the settings, then click Save Settings.
- To edit the settings group for the plug-in call, click Update.
- Risk Manager opens the Modify Plug-In Settings Group page. Update the settings, then click Save Settings.
- To delete the plug-in call, click Delete.
- Risk Manager deletes the plug-in call.
Editing or Deleting a Module Call
Editing or Deleting a Module Return Point
Creating Hotlists
Hotlists enable you to store information about transactions that are known to be fraudulent. You can also use hotlists to store information about your best customers, so you can ensure that you do not accidentally reject their orders.
Each business has its own hotlists, which are stored on a Decision Server. Hotlists are updated in real time; you can update your hotlists without changing your strategies. You cannot share hotlists between businesses.
Hotlists can contain any of the following information:
Each Decision Server includes two hotlists for each business:
- Negative hotlist: Contains information associated with fraudulent transactions
- Positive hotlist: Contains information for customers whose orders you always want to accept
To use your hotlists in a strategy, you add the ListCheck plug-in to the strategy, then create rules that interpret the results of the hotlist checks. See ListCheck Plug-In for more information about the ListCheck plug-in.
Adding Hotlist Entries
- On the left navigation bar, click Businesses.
- The Choose a Business page opens.
- Click the name of the business whose hotlist you want to change.
- The home page for the business opens.
- Click "Manage hotlists."
- The Hotlist Management page opens.
- Click "Add entries to the hotlist."
- The Add Hotlist Entries page opens.
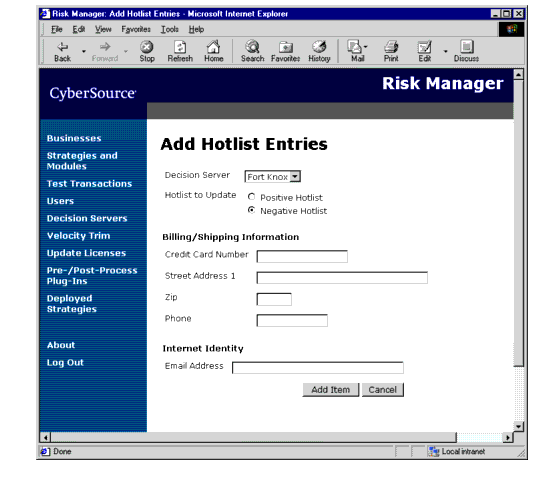
- In the Decision Server list, choose which server will use the hotlist entries.
- Next to Hotlist to Update, choose whether to add the entries to the positive or negative hotlist.
- Type the customer information to add to the hotlist. If you type a customer's street address, you must also type a postal code.
Important The data format you use in hotlists must exactly match the format used in Decision Server transactions. For example, if you add the phone number
(605) 555-3333to the hotlist, and a transaction contains the phone number605-555-3333, the hotlist will not detect a match.- Click Add Item.
- Risk Manager adds the entries to the hotlist.
Removing Hotlist Entries
- On the business home page, click "Manage hotlists."
- The Hotlist Management page opens.
- Click "Remove hotlist entries."
- The Remove Hotlist Entries page opens.
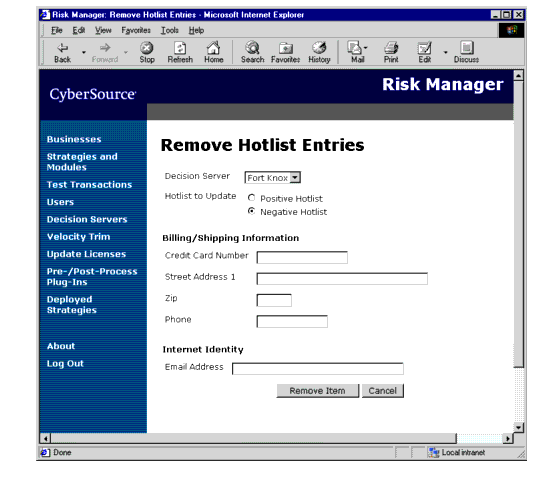
- In the Decision Server list, choose which server contains the hotlist entries.
- Next to Hotlist to Update, choose whether to remove the entries from the positive or negative hotlist.
- Type the customer information to remove from the hotlist. If you type a customer's street address, you must also type a postal code.
- Click Remove Item.
- Risk Manager removes the entries from the hotlist.
Exporting a Hotlist
If you want to use your Risk Manager hotlist for other applications, you can export all of your hotlist entries to a file. Hotlists are stored on your company's Decision Server.
For information about the format of a hotlist file, see Appendix B, "Hotlist File Format".
- On the business home page, click "Manage hotlists."
- The Hotlist Management page opens.
- Click "Export hotlist to a file."
- The Export Hotlist page appears.
- Choose a Decision Server from the list, then click Export Hotlist.
- Your browser prompts you to save the hotlist file. Click OK, then choose a location to save the file.
Importing a Hotlist
If your company already maintains a hotlist, you can import all of your existing hotlist entries into a Decision Server.
Before you import the hotlist, you must create a hotlist file. For information about the format of a hotlist file, see Appendix B, "Hotlist File Format".
- On the business home page, click "Manage hotlists."
- The Hotlist Management page opens.
- Click "Import hotlist from a file."
- The Import Hotlist page appears.
- Choose a Decision Server from the list.
- Click the Browse... button.
- The browser prompts you for the location of the hotlist file. Choose the hotlist file to import, then click Open.
- Click Import Hotlist.
- Risk Manager imports the hotlist.
Adding Business Fields
You may need to use fields in your strategies that do not already exist in Risk Manager. For example, if you want to make decisions based on the department that is selling a product, you would need to create a business field for the department code.
- On the business home page, click "Manage transaction fields."
- The Business Transaction Fields page opens.
- Click Add Field.
- The Add Business Field page opens.
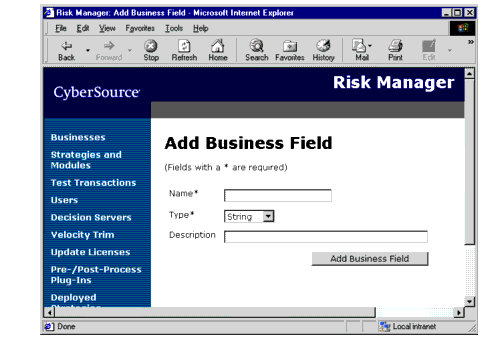
- In the Name box, type the name of the field.
- The field name can contain only letters, numbers, dashes (
-), underscores (_), and periods (.).- In the Type list, choose a data type for the field. You can use one of the following types:
- String: Text or numbers
- Number: Only numbers
- Boolean: Either the word
trueor the wordfalse- Date: Date in the format
MM/DD/YYYY, whereMMis the month,DDis the day, andYYYYis the year- Type a brief description of the field.
- Click Add Business Field.
- Risk Manager adds the field to the business.
Viewing All Fields
You can view a list of all fields available to a business, including system fields, plug-in fields, and business fields.
Note If a field is defined in several places, it appears only once in the list of fields.
- On the business home page, click "Manage transaction fields."
- The Business Transaction Fields page opens.
- Click View All Fields.
- The Transaction Fields page opens. This page displays all of the fields that can be used within the business.
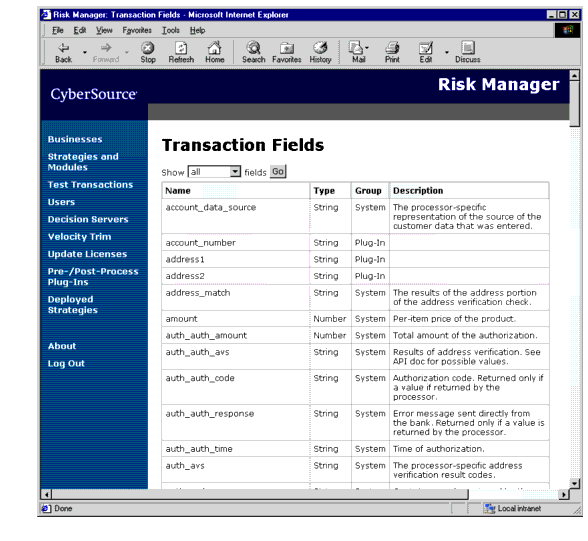
- To view only a specific group of fields, choose the group from the list at the top of the page, then click Go.
- Risk Manager displays only the fields for the group you chose.
When you are done looking at the list of fields, click your browser's Back button to return to the list of fields for your business.
| Copyright © 2002 CyberSource Corporation. |