![[CyberSource logo]](images/cybslogo.gif)
Search documentation:
|
|
Search documentation: |
| Help Advanced | |
| Published 05/15/2002 |
|
Chapter 2
Installing the CCC
This chapter explains how to install the CCC, including procedures for upgrading and activating the CCC. In addition, this section explains how to create a certificate and private key.
System Requirements
The CCC for Intershop 4.0/4.2 Hosting requires the following:
- Intershop 4.0 (build 1257), or Intershop 4.2 (build 1259) with patch 5 (1259_P05_NT) installed
Note Patch 5 is only needed for Intershop 4.2.
- Find the current build number at the bottom of the Intershop Site Admin login page. For a download of patch 5, see the Intershop download page.
- Windows® NT server
- Recommended for Windows NT: Internet Information Server (IIS) or Netscape® Enterprise Server
- Hard drive space: 40 MB for Windows NT
Setup Overview
The following steps outline the procedure to set up the CyberSource Commerce Cartridge:
- Install CyberSource Commerce Cartridge for Intershop 4.0/4.2 Hosting
- Activate CyberSource Commerce Cartridge
- Generate a certificate and private key
- Test CyberSource Commerce Cartridge
- Configure CyberSource Commerce Cartridge
After the setup is completed, you can take your eCommerce Web site live and process transactions through CyberSource.
Upgrading CyberSource Services
Complete the steps in this section if you currently run the CCC 2.0 for Intershop 3.0 and want to upgrade to the CCC for Intershop 4.0/4.2 Hosting. If you do not run the CCC 2.0 for Intershop 3.0, you can skip to Installing the CCC.
Note If you are upgrading the CyberSource Commerce Cartridge for Intershop 4.0/4.2 from v. 3.2.2.0 to v. 3.4.1.0, simply type install.bat. You can update the cartridge without losing any database information.
Upgrading the CyberSource Commerce Cartridge from Intershop 3.0 to Intershop 4.0/4.2
- Complete the export stage of the Intershop upgrade, using the script and documentation at Upgrade to Intershop 4 Web page. This stage exports the Intershop 3.0 database configuration and all other store data. It does not export the CyberSource Commerce Cartridge.
- If you are using two servers, perform the export on the machine that currently runs Intershop 3.0.
- Download the upgrade script for the CyberSource Commerce Cartridge. The upgrade script is bundled with the CyberSource Commerce Cartridge.
- Run the upgrade script for the CyberSource Commerce Cartridge to complete the export stage of the cartridge upgrade.
- Type the following:
c:\intershop\bin\perl.exe upgrade.pl exportNote Change the drive letter if necessary to correspond to the drive where Intershop is installed.
- When prompted, enter the name of the store for which you want to export data.
- This process creates the cybersource.data data file.
- Copy the cybersource.data file from c:\intershop\plugins\cybersource to c:\intershop\cartridges.
- If you are using two servers, copy the file from the machine that currently runs Intershop 3.0 to the machine where you have installed Intershop 4.0/4.2.
- Complete the import stage of the Intershop upgrade.
- This stage builds the required databases in Intershop 4.0/4.2 and imports the old store data to the new databases.
- If you are using two servers, perform the import on the machine that currently runs Intershop 4.0/4.2.
- Follow the steps in Installing the CCC to install CyberSource Commerce Cartridge for Intershop 4.0/4.2 Hosting.
- Follow the steps in Activating CyberSource Services to activate your store in the CyberSource Commerce Cartridge for Intershop 4.0/4.2 Hosting.
- Follow the steps in Configuring the CCC to configure your store in the CyberSource Commerce Cartridge for Intershop 4.0/4.2 Hosting.
- Run the upgrade script for the CyberSource Commerce Cartridge as follows to complete the import stage of the cartridge upgrade.
- Type the following:
c:\intershop\bin\perl.exe upgrade.pl import- When prompted, enter the name of the store for which you want to import data.
- This process reads information from the cybersource.data file, then copies it to the Intershop data tables.
- Follow the steps in Viewing Transactions to view the imported data.
Installing the CCC
Complete the steps in this section to install the CyberSource Commerce Cartridge. You must have Intershop 4.0 (build 1257) or Intershop 4.2 (build 1259) installed and running on your Web server before you install the CyberSource Commerce Cartridge.
Installing the CCC
- Log on with Administrator rights.
- Create a temporary directory on your Web server and select the appropriate compressed file to download cccis4-nt3_4_1_0.exe or cccis42-nt-3_4_1_0.zip.
- Extract the files from the downloaded file.
- When you extract the files, a directory named cccis4-nt3_4_1_0 or cccis42-nt-3_4_1_0 is created, with the files install.bat and uninstall.bat, and a directory named sw1257005r (Intershop 4.0) or sw125901x7 (Intershop 4.2).
Note Do not delete the temporary directory or the executable file you downloaded. You need the executable file if you later decide to uninstall CyberSource Commerce Cartridge. See Uninstalling the CCC for information about uninstalling.
- From the cccis4-nt3_4_1_0 or cccis42-nt-3_4_1_0 directory, run the installation file.
- At the prompt type:
install.bat- then follow the on-screen prompts.
- When installing the cartridge, a rules.txt file is installed. If this file has been updated, copy it twice — before uninstalling the cartridge and after installing it — to avoid losing the changes.
- Create the rules.txt file using the following format:
MerchantId:Currency1,Currency2...:CreditCardType1,CreditCardType2
- For the currency value, use the three-letter ISO standard currency codes.
- For the credit card types, use the same credit card names you enter elsewhere in the Back Office.
- Add rules sequentially with no spaces between parameters or lines.
- During installation, enter the database administrator's password to complete the installation.
Uninstalling the CCC
Activating CyberSource Services
Complete the following steps to activate the CyberSource Commerce Cartridge.
Activating the CyberSource Commerce Cartridge
- Use a Web browser to open:
http://yourservername/isroot/index.html- The Welcome to Intershop 4 page appears.
- Select the Site Administration link at the bottom right of the Web page.
- The Site Administration Log On page appears.
- Enter the case-sensitive log on and password (the default for both is siteadmin).
- If you changed the password, enter the new password.
- Click Log On.
- Select the Cartridge Administration Menu link.
- Select CyberSource Commerce Cartridge for Intershop 4.0/4.2.
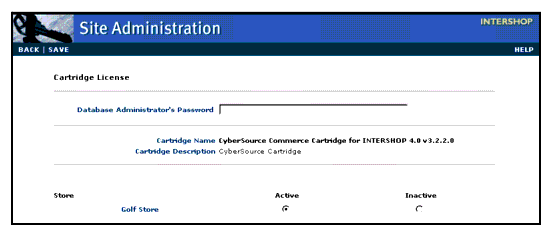
- The Cartridge License page appears, as shown in Figure 1.
Figure 2 Cartridge License Page

- Enter the database administrator's password.
- Click the stores you want to use CyberSource Commerce Cartridge.
Note Activate the Training Store for testing purposes.
- Click Save at the top left of the page.
Creating a Certificate and Private Key
CyberSource uses technology based on public key cryptography to securely exchange messages over the Internet. This technology requires each business partner to have a key pair: a public key, which is delivered in a certificate, and a private key. Before you can securely exchange messages with CyberSource, you must generate your certificate and private key.
You and CyberSource each have your own certificate, which you share, and your own private key, which you keep secret. CyberSource gives you the CyberSource certificate, while keeping the CyberSource private key confidential. Likewise, you share your certificate with CyberSource, but keep your private key secure.
Store your certificate and private key, along with the CyberSource certificate, on your servers where you installed the CyberSource client software. It is your responsibility to closely guard your private key, to ensure that your confidential information is not compromised.
To generate your certificate and private key, use the ECert application included with your installation software. You need your merchant ID to run ECert. If you do not have a merchant ID, register for an evaluation account at the CyberSource Merchant Registration Web page. If you have previously run ECert, contact Customer Support to update your certificate and private key.
You can create your certificate and private key by either:
- Clicking
Generateon the CyberSource System Administration page- Running the ECert application, then copying your certificate, key and password files to the keys directory
If you want the CyberSource System Administration page to generate your certificate and private keys, then do the following procedure.
Creating Your Certificate and Private Key by Using the Generate Button
- Go to the Welcome to Intershop 4 page at the following URL:
http://yourservername/isroot/index.html- In your store, select Back Office.
- The Back Office page appears.
- Enter the case-sensitive log on name and password (the default for both is admin).
- Click Login.
- The Welcome to Intershop 4 Back Office page appears.
- Select the System Admin tab from the menu bar at the bottom of the page.
- A System Administration Main Menu page appears.
- Scroll down to the Cartridge Administration Menu section. Select the CyberSource Configuration link.
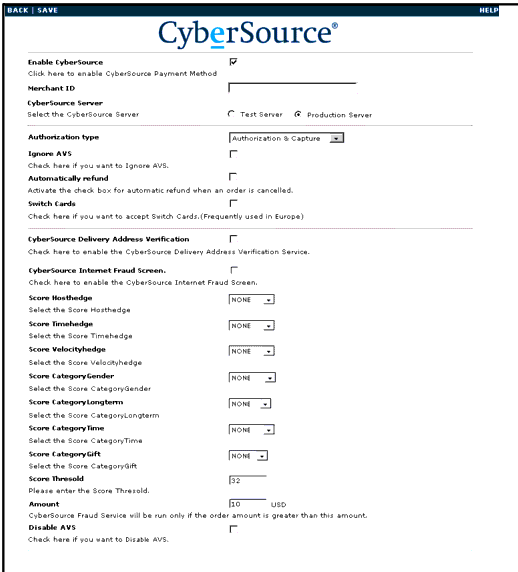
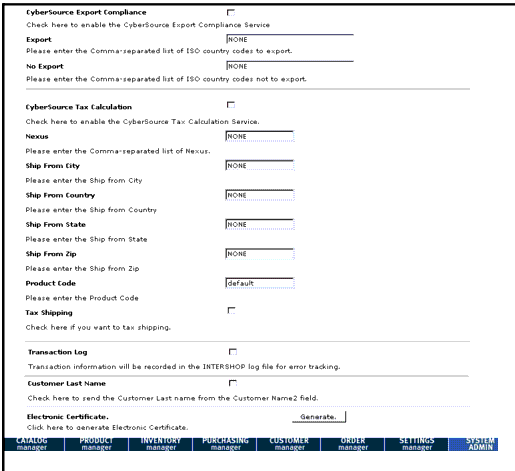
- The CyberSource System Administration page appears, as shown in Figure 3 and Figure 4.
Figure 3 CyberSource System Administration Page (top)

Figure 4 CyberSource System Administration Page (bottom)

- Select the Authorization Type you want to implement. For more information on configuring the CyberSource System Administration page, see Configuring CyberSource Credit Card Processing.
- Click Save.
- Scroll down to the Electronic Certificate section. Click Generate.
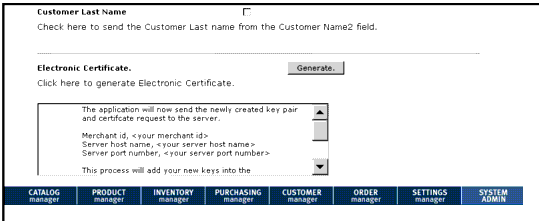
- The page will refresh with a new text box showing you the results of your request, as shown in Figure 5.
Figure 5 CyberSource System Administration page (bottom) After Electronic Certificate Generation

If you want to run the ECert application to generate your certificate and private keys, then do the following procedure.
Creating Your Certificate and Private Key by Running the ECert Application
- Change to the directory where you installed your client software.
- Select Start>Programs>Command Prompt, then change to the path for the directory where ECert is located.
- Run the ECert application.
ecert.exe<merchant_id>- where
<merchant_id>is your merchant ID.- When the ECert application successfully runs, it writes the following files to disk:
- <merchant_id.crt>— certificate file
- <merchant_id.pvt>—private key file
- <merchant_id.pwd>—password file
- CyberSource_SJC_US.crt—CyberSource certificate file
- By default, the files are written to the directory where ECert is run.
Note The ECert application automatically sends a copy of your certificate (.crt) file, but not your private key (.pvt) file, to the CyberSource ICS server. Always keep your private key secret.
- Copy the CyberSource certificate, your certificate, your private key, and your password files to the keys directory of any server where the ICS client libraries are installed. Your certificate (.crt) and private key (.pvt) files are paired and must be used together.
After you generate your certificate and private key, you can securely send transaction requests to the CyberSource test server. When you go live, you can securely send transaction requests to the CyberSource production server
Note You need to update your certificate and private key yearly to reduce the risk of having them compromised. Contact Customer Support about using the update option to update your files.
Additional options are available for the ECert application. However, you will most likely only use these options in rare circumstances, on the recommendation of a Customer Support Representative.
Note Contact Customer Support for instructions for using the ECert options.
The syntax and options for ECert are:
ecert <merchant_id>[ -help ] [ -version ] [ -noprompt ] [ -update ][ -display ][ -debug ] [ -path <keys directory> ][ -proxy <url> [ <username> ] [ <password> ] ][ -server <ics server host> <ics server port> ]Following are descriptions for the options:
- help — Returns the ECert syntax.
- version — Reports the version of ECert you have installed.
- noprompt — Causes ECert to run without additional confirmation.
- update — Updates your certificate and private key and your copy of the CyberSource certificate. You can only use this option if your certificate already exists in the CyberSource server and your site has gone live.
- display — Displays your certificate and private key and CyberSource certificate information.
- debug — Provides debugging information if you experience problems with the ECert application.
- path <path>
— the directory where your keys will be generated.- proxyurl <proxy url> — Causes ECert to use the server at the URL <proxy url> as a proxy server.
- proxyport <proxy port> — Causes ECert to connect to a proxy server on the port <proxy port>. If you use this option, you must also use the proxyurl option.
- proxyusername <proxy username> — Causes ECert to connect to a proxy server with the username <proxy username>. If you use this option, you must also use the proxyurl and proxypassword options.
- proxypassword <proxy password> — Causes ECert to connect to a proxy server with the password <proxy password>. If you use this option, you must also use the proxyurl and proxyusername options.
- serverhost <ics server host> — Causes ECert to use the server <ics server host> to connect to CyberSource. he default host server is setup.ic3.com. The CyberSource test server is ics2test.ic3.com, and the CyberSource production server is ics2.ic3.com.
- serverport <ics server port> — causes ECert to use the port <ics server port> to connect to CyberSource. The default port is 80.
Enabling CyberSource Services and Tracking
Enable CyberSource Services and Tracking through the CyberSource System Administration page. The CyberSource Commerce Cartridge offers Payment Processing. Other services in this integration are not supported for CyberSource Small Business.
Enabling CyberSource Services and Tracking
- Go to the Welcome to Intershop 4 page at the following URL:
http://yourservername/isroot/index.html- In your store, select Back Office.
- The Back Office page appears.
- Enter the case-sensitive log on name and password (the default for both is admin).
- Click Login.
- The Welcome to Intershop 4 Back Office page appears.
- Select the System Admin tab from the menu bar at the bottom of the page.
- The System Administration page appears.
- Scroll down to the Cartridge Administration Menu section. Select the CyberSource Configuration link.
- The CyberSource System Administration page appears.
- Select Enable CyberSource to activate CyberSource as your payment method. Again, you must select this option in order to use any of the CyberSource services.
- Select Transaction Log to track the score and other order data for every transaction in the eCommerce site. The log resides on the computer where the CyberSource Commerce Cartridge is installed, and is usually accessible only by the site administrator.
- Click Save.
| Copyright © 2002 CyberSource Corporation. |