![[CyberSource logo]](images/cybslogo.gif)
Search documentation:
|
|
Search documentation: |
| Help Advanced | |
| Published 05/15/2002 |
|
Chapter 3
Configuring the CCC
This chapter explains how to configure the CCC credit card application.
Configuring CyberSource Credit Card Processing
Use the following steps to configure the CyberSource Commerce Cartridge to authorize and process your eCommerce payments.
Configuring the Authorization Process
- Go to the Welcome to Intershop 4 page at the following URL:
- http://yourservername/isroot/index.html
- In your store, select Back Office.
- The Back Office page appears.
- Enter the case-sensitive log on name and password (the default for both is admin).
- Click Login.
- The Welcome to Intershop 4 Back Office page appears.
- Select the System Admin tab from the menu bar at the bottom of the page.
- The System Administration page appears.
- Scroll down to the Cartridge Administration Menu section. Select the CyberSource Configuration link.
- The CyberSource System Administration page appears.
- If you want to authorize the credit card and capture payment simultaneously, while the customer is at the eCommerce site, select Authorization & Capture as the Authorization Type in the Authorization Type box.
- If you want to authorize the credit card in one step, then capture payment later from the back office, then select Authorization Only. The default is Authorization Only.
- If you want to ignore the results of the address verification check performed by U.S. banks, then select Ignore AVS (address verification system). The AVS check verifies that the customer's information in the order form matches the information on file for the credit card.
- Selecting Ignore AVS enables the authorization transaction to proceed despite an inconsistency in the AVS check. Otherwise, transactions are declined when an AVS inconsistency results, and no authorization code is generated.
- Select Automatically Refund to enable CyberSource to automatically refund payment on cancelled orders. If this box is selected and payment is received, the customer directly receives credit if the order is cancelled. If the amount is authorized but not yet captured, the authorization is voided when the order is cancelled.
- If you want to accept European Switch cards, then select Switch Cards.
- Click Save.
Configuring the Payment Method
- Go to the Welcome to Intershop 4 page at the following URL:
- http://yourservername/isroot/index.html
- In your store, select Back Office.
- The Back Office page appears.
- Enter the case-sensitive log on name and password (the default for both is admin).
- Click Login.
- The Welcome to Intershop 4 Back Office page appears.
- Select the System Admin tab from the menu bar at the bottom of the page.
- The System Administration page appears.
- In the Payment Method Settings section, select the Payment Method Settings link.
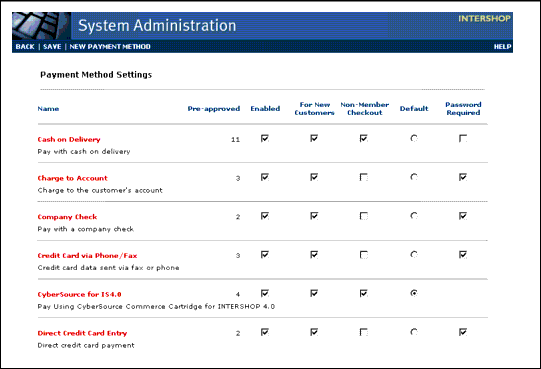
- The Payment Method Settings page appears, as shown in Figure 6.
- In the CyberSource for IS4.0/4.2 area select any or all of the following:
- Enabled - enables CyberSource to process payment transactions.
- For New Customer - enables CyberSource payment processing for new customers.
- Non-Member Checkout - enables CyberSource payment processing for non-members.
- Default - makes CyberSource Commerce Cartridge your default payment method.
- Password Required - requires all customers to enter a password.
Figure 6 Payment Method Settings Page
- Select the CyberSource link.
- An editing page appears.
- Use this page to rename CyberSource to the payment name you want customers to see, for example, "Credit Card" or "Online Credit Card."
- Click Save, then Back.
- You see the renamed method on the Payment Method Settings page.
Configuring the Required Fields for CyberSource Transaction Processing
The following information is required by the CyberSource servers to process credit card authorizations, captures, or refunds:
- First Name
- Last Name
- Address (including street, city, state, postal code, and country)
- Phone Number
Configure your eCommerce site to collect all of this information from customers when they are either registering or using non-member checkout.
Configuring the System to Collect Information from Your Customers
- Go to the Welcome to Intershop 4 page at the following URL:
- http://yourservername/isroot/index.html
- In your store, select Back Office.
- The Back Office page appears.
- Enter the case-sensitive log on name and password (the default for both is admin).
- Click Login.
- The Welcome to Intershop 4 Back Office page appears.
- Select the System Admin tab from the menu bar at the bottom of the page.
- The System Administration page appears.
- In the General Preference section, select the Customer Registration Preferences link.
- The Customer Registration Preferences page appears, as shown in Figure 9.
Figure 7 Customer General Preferences Page
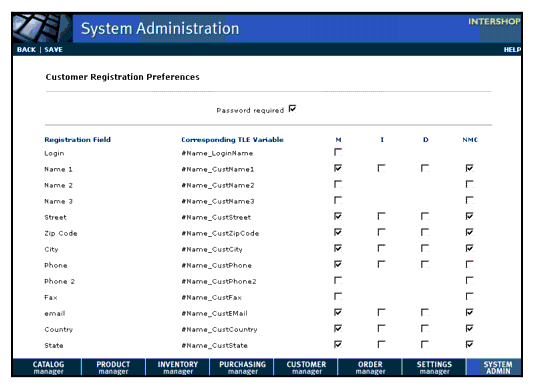
- In the M (Mandatory) and NMC (Non-Member Checkout) columns, verify that the following check boxes are selected:
- Name1
- Street
- ZIP Code
- City
- Phone
- Country
- State
- In the M and NMC columns, verify that the Tax Area check box is disabled.
- Click Save.
Your eCommerce and non-member eCommerce customers need to see which fields are required to process their orders. Therefore, you need to edit the HTML of the storefront or non-member storefront templates to appropriately mark all required fields. If you do not do this, customers might leave required fields blank and then become frustrated when they have to go back to complete the information.
Editing the HTML Code for the Storefront Templates
- Go to the Welcome to Intershop 4 page at the following URL:
- http://yourservername/isroot/index.html
- In your store, select Back Office.
- The Back Office page appears.
- Enter the case-sensitive log on name and password (the default for both is admin).
- Click Login.
- The Welcome to Intershop 4 Back Office page appears.
- Select the System Admin tab from the menu bar at the bottom of the page.
- The System Administration page appears.
- In the Design section, select the Templates link.
- The Templates page appears.
- Select Storefront Templates in the Template Group list box.
- Click Open Template Group, at the top of the page.
- The Storefront Templates configuration options page appears.
- Select the Order - Member Order Information link.
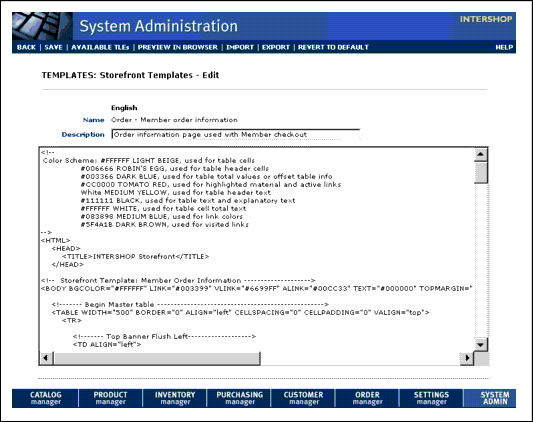
- The Storefront Templates HTML-editing page appears as shown in Figure 10.
Figure 8 Templates: Storefront Templates - Edit page
- Copy the HTML code into your favorite text editor.
- Search for the following text in the HTML code, then ensure that an asterisk (*) appears before each field name to indicate that those fields are required:
Customer name:Street:ZIP Code:City:Phone:email:Country:State:Note If separating the first and last names of the customer name is desired, then insert
firstbeforenamefor CustName 1, and changetitletoLastNamefor CustName 2 in the HTML code.Note If the ZIP Code is not required, which is typical for an international store, then delete the asterisk (*) before the ZIP Code.
- Copy the HTML code, then replace the edited HTML file in the Storefront Templates HTML-editing page.
- Click Save.
- Click Preview in Browser, at the top of the page, to see the results.
Editing the HTML Code for the Non-Member Storefront Templates
- Go to the Welcome to Intershop 4 page at the following URL:
- http://yourservername/isroot/index.html
- In your store, select Back Office.
- The Back Office page appears.
- Enter the case-sensitive log on name and password (the default for both is admin).
- Click Login.
- The Welcome to Intershop 4 Back Office page appears.
- Select the System Admin tab from the menu bar at the bottom of the page.
- The System Administration page appears.
- In the Design section, select the Templates link.
- The Templates page appears.
- Select Storefront Templates in the Template Group list box.
- Click Open Template Group, at the top of the page.
- The Storefront Templates configuration options page appears.
- Select the Order: Non-Member Order Information link.
- The Storefront Templates HTML-editing page appears.
- Copy the HTML code into your favorite text editor
- Search for the following text in the HTML code, then ensure that the character string
*)appears between the<TD>and</TD>tags on the next line after each field name to indicate that the fields are required:
Customer name:Street:ZIP Code:City:Phone:email:Country:State:Note If separating the first and last names of the customer name is desire, then insert
firstbeforenamefor CustName 1, changetitletoLastNamefor CustName 2 in the HTML code, then go back to the CyberSource System Administration page and select Customer Last Name.Note If the ZIP Code is not required, which is typical for an international store, then delete the asterisk (*) before the ZIP Code.
- Copy the HTML code, then replace the edited HTML file in the Storefront Templates HTML-editing Web page.
- Click Save.
- Click Preview in Browser, at the top of the page, to view the results.
Configuring the Store for Multiple Currencies
You can edit the Registration Page to add a drop-down box that allows your customers to choose which currency to use for their transaction. You must edit the HTML of the storefront template to add this drop-down box, otherwise customers will only have the option to pay in U.S. dollars.
Before you process transactions in multiple currencies, you must first do the following:
- Establish a relationship with a payment processor that allows you to process multiple currencies
- Establish a multiple currency account with your banking partner
- Obtain multiple merchant ID's from CyberSource
Note As a best practice, inform your customers that each customer can have only one currency associated with their account.
You can add a drop-down box for currency type by using the following steps.
Editing the HTML to Add Currency to the Registration Page
- Go to the Welcome to Intershop 4 page at the following URL:
- http://yourservername/isroot/index.html
- In your store, select Back Office.
- The Back Office page appears.
- Enter the case-sensitive log on name and password (the default for both is admin).
- Click Login.
- The Welcome to Intershop 4 Back Office page appears.
- Select the System Admin tab from the menu bar at the bottom of the page.
- The System Administration page appears.
- In the Design section, select the Templates link.
- The Templates page appears.
- Select Storefront Templates in the Template Group list box.
- Click Open Template Group, at the top of the page.
- The Storefront Templates configuration options page appears.
- Select the Registration - Registration Member Data Form link.
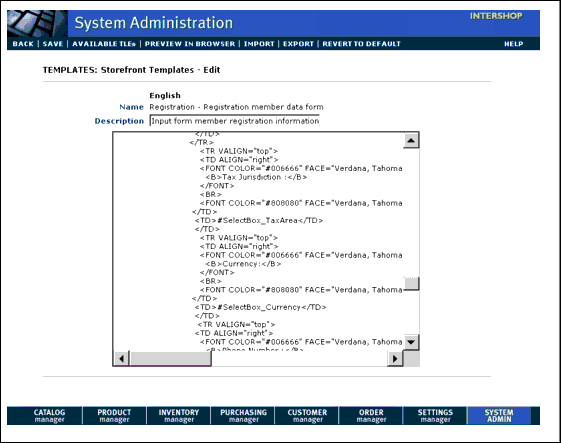
- The Storefront Templates HTML-editing page appears as shown in Figure 9.
Figure 9 Templates: Storefront Templates - Edit page
- Copy the HTML code into your favorite text editor.
- Search for the following text in the HTML code:
</TD><TD>#SelectBox_TaxArea</TD></TD>- Immediately after the code show in step 9, add the following lines of HTML code:
<TR VALIGN="top"><TD ALIGN="right"><FONT COLOR="#006666" FACE="Verdana, Tahoma, Arial, Geneva" SIZE="2"><B>Currency:</B></FONT><BR><FONT COLOR="#808080" FACE="Verdana, Tahoma, Arial, Geneva" SIZE="1">[required] </FONT></TD><TD>#SelectBox_Currency</TD></TD>- Copy the HTML code, then replace the edited HTML file in the Storefront Templates HTML-editing page.
- Click Save.
- Click Preview in Browser, at the top of the page, to see the results.
Configuring the Store Currency
You can configure the store currency to allow transactions using different currencies by using the following steps:
Configuring the Store Currency
- Go to the Welcome to Intershop 4 page at the following URL:
- http://yourservername/isroot/index.html
- In your store, select Back Office.
- The Back Office page appears.
- Enter the case-sensitive log on name and password (the default for both is admin).
- Click Login.
- The Welcome to Intershop 4 Back Office page appears.
- Select the System Admin tab from the menu bar at the bottom of the page.
- The System Administration page appears.
- In the General Preferences section, select the Currency Preferences link.
- The Currency Preferences page appears as shown in Figure 10.
Figure 10 Currency Preferences Page
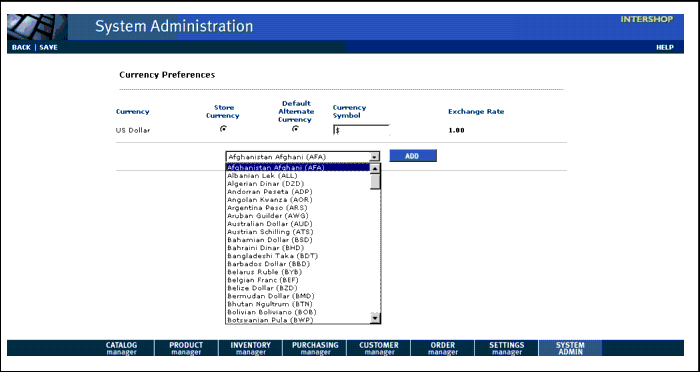
- Using the Store Currency drop-down menu, select the currency you want to use in your store.
- The available currencies match the currencies listed in the Alternate Currency drop-down menu.
- Enter the appropriate Currency Symbol.
- Click Save.
- Click Preview in Browser, at the top of the page, to see the results.
Configuring and Activating Alternate Currencies
You can add specific currency types to the currency drop-down box by using the following steps:
Configuring and Activating Alternate Currencies
- Go to the Welcome to Intershop 4 page at the following URL:
- http://yourservername/isroot/index.html
- In your store, select Back Office.
- The Back Office page appears.
- Enter the case-sensitive log on name and password (the default for both is admin).
- Click Login.
- The Welcome to Intershop 4 Back Office page appears.
- Select the System Admin tab from the menu bar at the bottom of the page.
- The System Administration page appears.
- In the General Preferences section, select the Currency Preferences link.
- The Currency Preferences page appears.
- Using the Alternate Currency drop-down menu, select a currency to add to your store. Only one currency can be added at one time.
- Click Add to add that currency to the Alternate Currency list.
- Be sure all page setting are correct. Click OK.
- Select a Default Alternative Currency.
- Enter the appropriate three-letter Currency Symbol for each currency.
- Enter the Exchange Rate.
Note Update the exchange rate daily so customers see accurate information in the storefront.
- Click Save.
- Click Preview in Browser, at the top of the page, to see the results.
Deactivating Alternate Currencies
- In the Currency Preferences page, click Delete to the right of the currency you want to delete.
- Click Save.
Special Considerations for Using Multiple Currencies
For your planning on the use of multiple currencies, consider the following points.
- As Intershop permits one store for each currency your customers will use, multiple stores must be set up, one per currency.
- You must have a banking relationship that allows for processing of multiple currencies. Contact your banking representative to learn more about this.
- CyberSource Customer Support will set up your currencies and configuration at CyberSource. You cannot do this yourself. A CyberSource Customer Support representative will make modifications to your configuration files at CyberSource for all currencies that will be processed through the CyberSource payment applications.
- The conversion from one currency to the other is your responsibility. Be sure that you have a current Exchange Rate entered.
Editing Error Messages
You can customize the error messages your customers see by using the following steps.
Editing Error Messages
- Go to the Welcome to Intershop 4 page at the following URL:
- http://yourservername/isroot/index.html
- In your store, select Back Office.
- The Back Office page appears.
- Enter the case-sensitive log on name and password (the default for both is admin).
- Click Login.
- The Welcome to Intershop 4 Back Office page appears.
- Select the System Admin tab from the menu bar at the bottom of the page.
- The System Administration page appears.
- In the Design section, select the Templates link.
- The Templates page appears.
- Select Cartridge Templates Group in the Template Group list box.
- Click Open Template Group, at the top of the page.
- The Cartridge Templates configuration options page appears.
- Select the CyberSource Commerce Cartridge for Intershop 4.0/4.2 Hosting link.
- A Cartridge Templates page, listing the various error messages, appears.
- Click the name of the error message you want to customize.
- An Edit Cartridge Template page appears.
- Edit the text of the error message.
- Click Save.
| Copyright © 2002 CyberSource Corporation. |