![[CyberSource logo]](images/cybslogo.gif)
Search documentation:
|
|
Search documentation: |
| Help Advanced | |
| Published 08/06/2002 |
|
Chapter 4
Deploying and Testing a Strategy
This chapter explains how you can deploy a strategy to a Decision Server and verify that it works correctly.
Important Always test your strategies before you use them to process your customers' transactions.
Deploying a Strategy
Before you can use a strategy to process transactions, you must deploy it to a Decision Server.
- On the left navigation bar, click Businesses.
- The Choose a Business page opens.
- Click the name of the business that contains the strategy you want to deploy.
- The home page for the business opens.
- Find the version of the strategy to deploy. In the Action column for that version, click Deploy.
Note If the Deploy link is not available, you must edit your strategy so that it is deployable. A strategy is deployable when it does not contain any Unspecified points or incomplete modules.
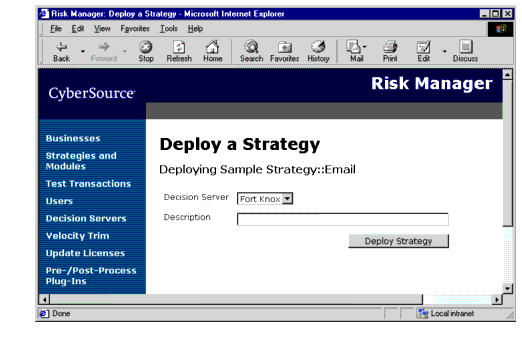
- The Deploy a Strategy page opens.

- Type a brief description of the deployment and choose the Decision Server to deploy to, then click Deploy Strategy.
Viewing a Business' Deployment History
Each business includes a list of attempts to deploy that business' strategies. You can view a list of deployment attempts and see whether each one succeeded or failed.
To view this list, go to the home page for the business, then click "View deployment history for business." The Business Strategy Deployment History page opens and displays information about the business' deployment attempts.
Viewing Strategies Deployed on a Decision Server
You can view a list of strategies that are currently deployed on a Decision Server. If you no longer need to use a strategy, you can remove it from the Decision Server.
- On the left navigation bar, click Deployed Strategies.
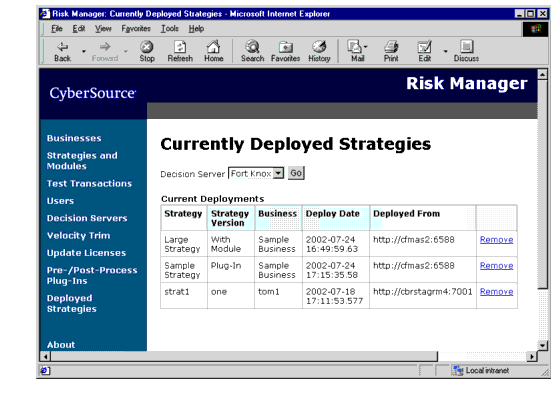
- The Currently Deployed Strategies page opens.
- Choose a Decision Server from the list, then click Go.
- Risk Manager displays a list of strategies that are currently deployed on the Decision Server.

- To remove a strategy from the Decision Server, click Remove next to the appropriate strategy, then click OK.
- Risk Manager removes the strategy from the Decision Server.
Creating a Test Plan
Before you test your strategy, create a test plan, so you can ensure that you have tested the strategy completely.
Your test plan should include all of the following components:
- Manual testing
- Use the Test Transactions page to send single transactions to a Decision Server. See Sending Test Transactions for more information. This type of testing is especially useful during strategy development.
- Automated testing
- Consider using an automated tool to verify that your strategy works well with a large number of test cases. You can also use an automated tool after changing your strategy to make sure that it still works properly.
- You will need to work with your developers to create an automated testing tool that uses Risk Manager's XML interface. See the Risk Manager Developer's Guide for more information.
- "Live" testing
- Once you deploy a strategy to your production Decision Server, run a few test transactions to make sure it was deployed correctly.
Also, you should create a set of test transactions that will test both the true and the false branches of each rule.
Sending Test Transactions
You can make sure that your strategy is working correctly by sending test transactions and looking at their results. To save time, you can also create templates that include a name, address, and other information for the transaction.
Sending a Single Transaction

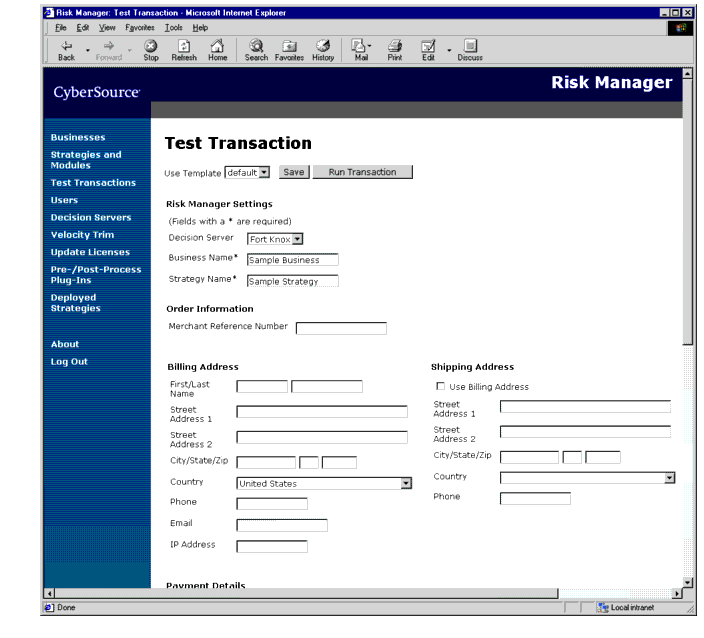
- Under Risk Manager Settings, choose the Decision Server where your strategy is deployed, and type the appropriate business name and strategy name.
Note The business name and strategy name are case-sensitive.
- Under Order Information, type a reference number for the transaction.
- Under Billing Address, Shipping Address, and Payment Details, type the appropriate information.
- Under Products, type the quantity, product name, price, and any custom fields for each product in the order.
- Click the More button if you have more than two products.
- For custom fields, use the format
name1=value1,name2=value2,name3=value3.- Under Custom Request Fields, type the names and values of any custom fields for the entire request.
- Click Run Transaction.
- Risk Manager runs the transaction and displays the request and reply messages in Extensible Markup Language (XML) format.
- To find out whether the transaction was accepted, rejected, or marked for review, look for the value of RmRflag near the beginning of the reply. For example, if the transaction is accepted, the reply will include the following text:
<RmRflag>ACCEPT</RmRflag>Creating a Transaction Template
- Follow the instructions in Sending a Single Transaction to specify information for the template. Do not click the Run Transaction button.
- Next to the Use Template list, click Save.
- A pop-up window appears.
- Type a name for the template.
- If you want to use the template every time you open the Test Transactions page, type the name
default.- Click OK.
- Risk Manager saves the template.
Working with an Existing Template
- On the left navigation bar, click Test Transactions.
- The Test Transactions page opens.
- In the Use Template list, choose the name of the template to open.
- Risk Manager opens the template.
- To modify the template, make changes as necessary, then click Save.
- A pop-up window appears. Click OK to save the template.
- To save the template with a new name, click Save As.
- A pop-up window appears. Type the new name, then click OK to save the template.
- To delete the template, click Delete.
- Risk Manager deletes the template.
| Copyright © 2002 CyberSource Corporation. |