![[CyberSource logo]](images/cybslogo.gif)
Search documentation:
|
|
Search documentation: |
| Help Advanced | |
| Published 08/07/2002 |
|
Chapter 1
Introducing the Payer Authentication Plug-In
This chapter provides an overview of the Payer Authentication Plug-In and describes how it works with CyberSource Risk Manager.
Overview of the Payer Authentication Plug-In
The CyberSource Payer Authentication Plug-In for Risk Manager enables you to quickly and easily add support for the Visa® Payer Authentication Service (VPAS), also known as Verified by Visa, to your Web store.
The Payer Authentication Plug-In integrates with Arcot TransFort, which you run on your own servers. To process a VPAS transaction, you send requests to the Risk Manager Decision Server. The plug-in communicates with Arcot TransFort to check whether the customer participates in VPAS and to validate the results of payer authentication.
You can add the Payer Authentication Plug-In to any part of a Risk Manager business strategy, then create rules based on the outcome of payer authentication. You can also configure the Payer Authentication Plug-In to run at the beginning of every Risk Manager transaction.
Requirements
To use the Payer Authentication Plug-In, you must install and configure the following Arcot products:
You must also install the Arcot TransFort Merchant Software Development Kit (SDK) on your Risk Manager Decision Server.
For more information, see the Arcot TransFort Merchant Software Installation Manual and Arcot TransFort Merchant Software Programmer's Guide.
In addition, your Risk Manager license must include support for the Payer Authentication Plug-In. If you need to upgrade your license to include support for the plug-in, contact a CyberSource sales representative.
After you install the Payer Authentication Plug-In on your Risk Manager servers, you can use the plug-in as part of your business strategies.
How the Payer Authentication Plug-In Works
There are three steps to authenticate a customer with the Payer Authentication Plug-In:
- You send a request to the Risk Manager Decision Server. The ProcessPA plug-in checks whether the customer participates in payer authentication. If the customer participates, the plug-in provides a payer authentication request.
- You redirect the customer to the issuing bank's authentication form. The customer provides a password in a Web form, and you receive a payer authentication response.
Note Risk Manager does not perform this step. You must add this functionality to your Web server.
- You send a second request to the Risk Manager Decision Server. The ValidatePA plug-in validates the payer authentication response.
The following sections explain how the ProcessPA and ValidatePA plug-ins work.
Checking Customer Participation
When a customer attempts to make a purchase, you send a request to the Decision Server containing information about the order. The Decision Server uses the ProcessPA plug-in to determine whether the customer participates in payer authentication.
The following figure shows how the ProcessPA plug-in checks whether a customer participates in payer authentication. In this example, the ProcessPA plug-in runs as a pre-process plug-in; it can also run as part of a business strategy.
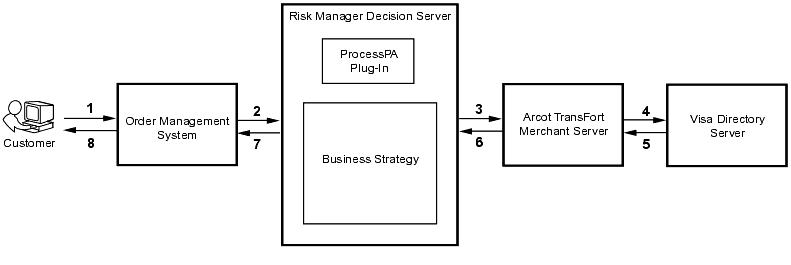
- A customer attempts to make a purchase.
- Your order management system sends a request to the Decision Server to process the order.
- The request includes the customer's credit card number, as well as more detailed information about the order and your company.
- See ProcessPA Fields for a complete list of fields that are used to check participation.
- Risk Manager uses the ProcessPA plug-in to send the transaction to the Arcot TransFort Merchant Server.
- The Merchant Server checks whether the customer's issuing bank participates in VPAS.
- If the bank participates, the Merchant Server sends the transaction to the Visa Directory Server, which determines whether the customer is enrolled in VPAS.
- If the customer is enrolled, the Visa Directory Server sends information about the transaction to the customer's issuing bank, then returns a payer authentication request (PAReq). Otherwise, the Visa Directory Server indicates that the customer is not enrolled.
- The Merchant Server returns the results of enrollment checking to the Decision Server.
- The Decision Server uses your business strategy to evaluate the results of enrollment checking, then sends a reply to the order management system.
- For example, if the customer is enrolled in VPAS, the strategy could return a reply to indicate that you should authenticate the customer. If the customer is not enrolled in VPAS, the Decision Server could continue to use your strategy to process the transaction.
- See Chapter 2, "Adding Payer Authentication To a Strategy" for information about how to use the plug-in as part of a strategy.
- The order management system interprets the reply and stores information as necessary. If the customer is enrolled in VPAS, you redirect your customer to the issuing bank's authentication form.
Validation
After a customer authenticates with the issuing bank, you send a second request to the Decision Server. This request includes the signed payer authentication result (PARes), which you receive from the customer's issuing bank. The Decision Server uses the ValidatePA plug-in to verify the digital signature for the payer authentication result.
The following figure shows how verification occurs during a Decision Server transaction. In this example, the ValidatePA plug-in runs as a pre-process plug-in; it can also run as part of a business strategy.
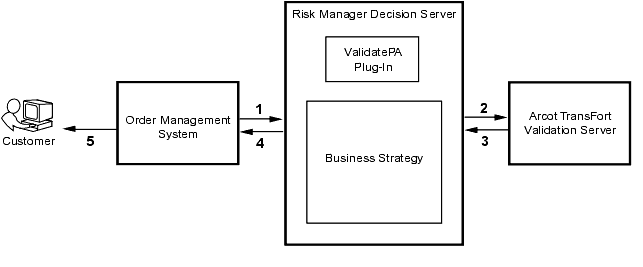
- Your order management system sends a request to the Decision Server to process the order.
- The request includes the signed payer authentication result. See ValidatePA Fields for a complete list of fields that are used for validation.
- Risk Manager uses the ValidatePA plug-in to send the transaction to your company's Arcot TransFort Validation Server.
- The Validation Server checks that the payer authentication result is valid, then returns the results of validation to the Decision Server.
- The Decision Server uses your business strategy to evaluate the results of validation, then sends a reply to the order management system.
- For example, if validation succeeded, you could automatically approve the order. If validation failed, the Decision Server could mark the order for review.
- See Chapter 2, "Adding Payer Authentication To a Strategy" for information about how to use the plug-in as part of a strategy.
- The order management system interprets the reply, stores information as necessary, and displays an appropriate message to the customer.
Installing the Payer Authentication Plug-In
Before you install the Payer Authentication Plug-In, you must install and configure the Arcot TransFort Merchant Server, Validation Server, and Merchant SDK. For instructions, see the Arcot TransFort Merchant Software Installation Manual and the Arcot TransFort Merchant Software Administration Manual, available on the Risk Manager installation CD.
Note You must install the Merchant SDK on the same computer that runs your Risk Manager Decision Server. You can install the Merchant Server and Validation Server on a different computer.
After you install the Arcot software, follow the instructions in this section to install the Payer Authentication Plug-In on your Risk Manager server.
Updating the WebLogic Startup Script
You must change the WebLogic startup script for the computer that runs your Decision Server.
- Using a text editor, open the WebLogic startup script.
- On Windows, this file is called
startWebLogic.cmd.- On Solaris, this file is called
startWebLogic.sh.- Add Arcot's Java API directory to the library path.
- On Windows, if you installed the Merchant SDK in the default location, add the following line near the top of the file:
set PATH=%PATH%;c:\Program Files\Arcot Systems\xfort\SDK\JavaAPI- On Solaris, if you installed the Merchant SDK in the default location, add the following line near the top of the file:
LD_LIBRARY_PATH=$LD_LIBRARY_PATH:/opt/arcot/xfort/SDK/Java- Add Arcot's Java API JAR file,
ArcotMerchantSDK.jar, to WebLogic's classpath.
- On Windows, if you installed the Merchant SDK in the default location, the text will now appear similar to the following:
set CLASSPATH=.;.\lib\weblogic_sp.jar;.\lib\weblogic.jar;.\lib\rm\jakarta—regexp—1.2.jar;.\lib\rm\jdom.jar;.\lib\rm\jimi.zip;.\lib\rm\jregex1.1_02.jar;.\lib\rm\rmplugin.jar;.\lib\rm\xerces.jar;.\lib\rm\xmlrpc—1.1.jar;.\lib\rm\msbase.jar;.\lib\rm\mssqlserver.jar;.\lib\rm\msutil.jar;c:\Program Files\Arcot Systems\xfort\SDK\JavaAPI\ArcotMerchantSDK.jar- On Solaris, if you installed the Merchant SDK in the default location, the text will now appear similar to the following:
CLASSPATH=$WL_HOME:$WL_HOME/lib/weblogic_sp.jar:$WL_HOME/lib/weblogic.jar:$WL_HOME/lib/rm/jakarta—regexp—1.2.jar:$WL_HOME/lib/rm/jdom.jar:$WL_HOME/lib/rm/jimi.zip:$WL_HOME/lib/rm/jregex1.1_02.jar:$WL_HOME/lib/rm/rmplugin.jar:$WL_HOME/lib/rm/xerces.jar:$WL_HOME/lib/rm/xmlrpc-1.1.jar:/opt/arcot/xfort/SDK/Java/ArcotMerchantSDK.jar- Save and close the WebLogic startup script.
Deploying the Plug-In
After you update the WebLogic startup script, deploy the
payauth.jarfile on your Administration Server and Decision Server. Thepayauth.jarfile is in therm/directory on your installation CD.For information about deploying a JAR file on WebLogic, see the Risk Manager Installation Guide.
| Copyright © 2002 CyberSource Corporation. |