![[CyberSource logo]](images/cybslogo.gif)
Search documentation:
|
|
Search documentation: |
| Help Advanced | |
| Published 08/08/2002 |
|
Chapter 5
Deploying and Testing Risk Manager
This chapter explains how to deploy Risk Manager using the WebLogic console. It also describes how to verify that the deployment succeeded.
Deploying Risk Manager EAR Files
You must deploy the following Enterprise Archive (EAR) files through the WebLogic console:
Note If you are running the Administration Server and Decision Server on separate systems, you do not need to deploy both EAR files on each system.
- Using a Web browser, go to
http://<servername>:<port>/console, where<servername>is the computer where BEA WebLogic is installed.- Type the BEA WebLogic administrator's user name and password, then click OK.
- The WebLogic Server Console opens.
- In the left navigation bar, click Deployments > Applications.
- The Applications page opens.
- Click "Install a new Application..."
- The Install or Update an Application page opens.
- Click the Browse... button.
- The browser prompts you for the location of the EAR file. Choose
adminserver.earfrom therm/directory on the installation CD, then click Open.- Click Upload.
- WebLogic installs the Administration Server.
- Repeat Step 5-Step 6 for
decisionserver.ear.
- WebLogic installs the Decision Server.
Deploying Risk Manager JAR Files
You must deploy the following Java Archive (JAR) files through the WebLogic console:
Also, if your Risk Manager license supports additional Custom API plug-ins, you must deploy the JAR file for each plug-in:
Other plug-ins, such as the ICS/CPM Plug-In and the Payer Authentication Plug-In, require additional JAR files. For more information, see the documentation for your plug-in.
- In the WebLogic console's left navigation bar, click Deployments > EJB.
- The EJB Deployments page opens.
- Click "Install a new EJB..."
- The Install or Update an Application page opens.
- Click the Browse... button.
- The browser prompts you for the location of the JAR file. Choose
addfields.jarfrom therm/directory on the installation CD, then click Open.- Click Upload.
- WebLogic installs
addfields.jar.- Repeat Step 3-Step 4 for each additional JAR file.
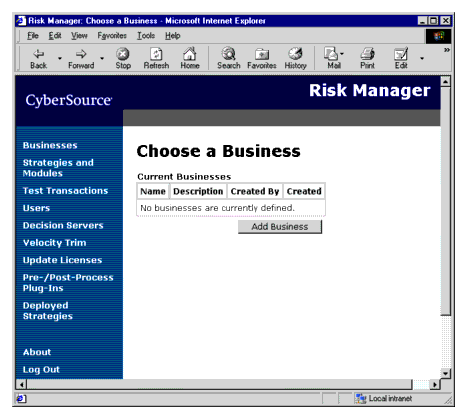
Testing the Administration Server
If WebLogic deploys
adminserver.earwith no errors, go tohttp://<servername>:<port>/adminand log in as the useradmin. The default password isadmin.If your deployment is successful, the Choose a Business page opens.
Changing the Default Password
As soon as the Administration Server is running, change the password for the user
admin.Important If you do not change the password, unauthorized users may be able to access your server.
- On the left navigation bar, click Users.
- The User Administration page opens.
- Click the user name
admin.
- The Edit User page appears.
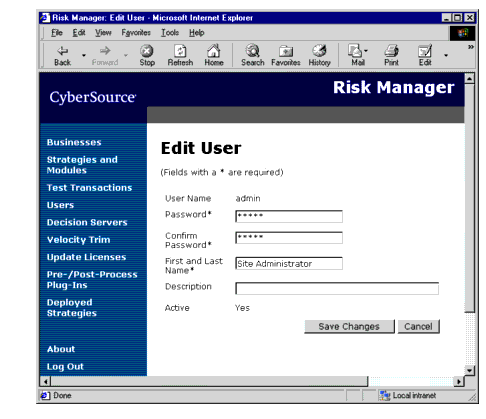
- Type a new password in the Password and Confirm Password boxes, then click Save Changes.
- Risk Manager saves your changes and returns you to the User Administration page.
Testing the Decision Server
To test that the Decision Server is working correctly, add an alias for the Decision Server to the Administration Server. For instructions, see the Risk Manager User's Guide.
| Copyright © 2002 CyberSource Corporation. |