![[CyberSource logo]](images/cybslogo.gif)
Search documentation:
|
|
Search documentation: |
| Help Advanced | |
| Published 05/15/2002 |
|
Chapter 3
Using the CCC for Microsoft Site Server
This chapter provides details on how to implement ICS services in the CCC for Microsoft Site Server. It explains how to use ICS services and describes the data required to use them. For the most current information on the services supported, please see the ICS2 Developer's Guide, available on the CyberSource Small Business Support Center Web site.
This chapter explains the individual services that comprise the CyberSource applications described in Chapter 1, "Overview of the CCC". Each CyberSource service category consists of one or more services. For example, Payment Services consists of Authorize Card, Bill Card, and Refund Card.
This chapter contains the following sections:
- Available CCC Services
- Other services in this integration are not supported for CyberSource Small Business.
- Configuring Your Store
Note A variety of useful data is returned from the ICS services. It is up to you to see that this data is stored in your internal databases. For example, you must ensure that all data on successful orders is stored in your customer service and sales databases. You must also interpret the reply fields for your customer. For information on customizing and localizing these messages, see Appendix A, "The CyberSource Message Manager".
Available CCC Services
Before editing your store's database and Active Server Pages (ASP), you need to determine which CCC services you would like to use. Table 1 lists the available services, associated CyberSource products, and their functionality.
Table 1 Available ServicesOther services in this integration are not supported for CyberSource Small Business.
Adding Services and Passing Data
To select services, you must use the Site Server Pipeline Editor. To open the Pipeline Editor, select Start > Programs > Microsoft Site Server > Commerce > Pipeline Editor.
Data is sent between your Web server and the CyberSource ICS server in the form of fields. A field consists of a
name=valuepair that can be passed to the CCC asmscsorderform.[name]=value, wherenameis the name of a required or optional field used by the ICS service. Use the CCC interface to set the values for[name]. Each service supports a variety of required and optional fields, which are explained in this chapter.Adding the CCC to the Commerce Server Pipeline
The CCC does not support any HTML editor. You select and configure all services using the Win32 Pipeline Editor, as outlined in the following steps:
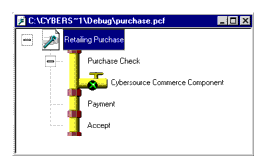
- Add the CyberSource Commerce Component to your pipeline as shown below.
- Double-click the CyberSource Commerce Component.
- The Component Properties window opens.
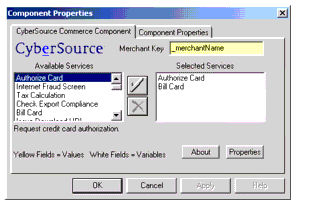
- On the CyberSource Commerce Component tab, select a service from the Available Services list.
- Click the check mark button to move your selected service to the Selected Services list.
- Double-click the service to view or edit its properties.
All available services within a newly added CCC have preset property settings. You must change some of these settings before using the CCC in a production environment (this does not apply to preexisting components). For example, if you accessed the General tab, you would see that the Server Configuration is preset to the Test Server. To use the component in a production environment, you must change this default setting.
Also, you must get a unique merchant ID from CyberSource before you use the CCC in a production environment. You should also verify that the default values for fields such as "currency" are correct before you use the CCC in a production environment.
Configuring Your Store
This section explains how to configure your store. and contains the following elements:
- General Information
- Advanced Options
- Logging Information
- Product Information
- Shopper Information
- Shipping Information
Note The screens described in this section are used by all CyberSource services.
General Information
Each request sent to CyberSource must contain information specified in the General tab of the Properties dialog box, which is shown below. Table 2 describes the fields in the General tab.
Note Pipeline fields contain variables, and not the values that the variables represent, with some exceptions. Variables must be set in the component, then the values for those variables are set in the mscsorderform object on the ASP pages. There are some pipeline fields that are exceptions to this rule, and these have been given a yellow background to their edit boxes to distinguish between value versus variable fields. The value fields are Merchant Key (_merchantName is a variable, anything else specified is a value), Logging MB, Log File Directory, Production Server, Port, and Timeout in Secs.
Figure 2 General Tab
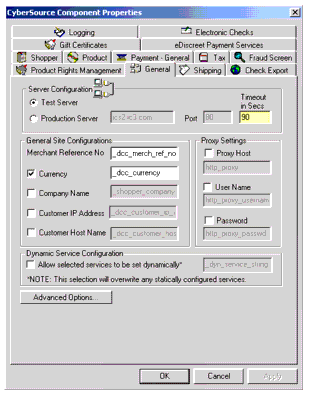 Table 2 Fields on the General Tab
Click the Advanced Options button to open the Advanced Options dialog box, which is described in the following section.
Advanced Options
Since CyberSource frequently adds new ICS services, the CCC allows you to send additional fields to the CyberSource server. Click the Advanced Options button in the General tab to access this feature. The Advanced Options window, shown in the following figure, displays instructions for the available options.
Note Use Advanced Options at the direction of CyberSource Customer Support or to extend CyberSource services with new configurations of ICS services.
Figure 3 Advanced Options Dialog Box
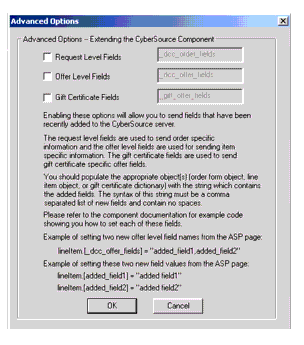 Table 3 Advanced Options Fields
Advanced Options Dialog Box
CyberSource uses name/value pairs to communicate information to its servers. You may find it necessary to extend the CCC to support recently added name/value pairs which have not yet been built into the component.
Note For the most up-to-date list of the name/value pairs supported by the CyberSource server, please refer to the ICS2 Developer's Guide, available on the CyberSource Small Business Support Center.
Example Adding New name/value Pair Fields For Request-level Fields
mscsOrderForm.[_dcc_order_fields] = "FieldName1"
mscsOrderForm.[FieldName1] = "FieldValue1"
Note If you are referencing the order form object as some other variable name within your ASP page, then use that name instead of the mscsOrderForm name above. In most cases, mscsOrderForm will be the correct name to use.
Example Adding New name/value Pair Fields For Offer-level Fields
Set orderFormItems = mscsOrderForm.Items
set lineItem = orderFormItems(iLineItem)
lineItem.[_dcc_offer_fields] = "FieldName1"
lineItem.[FieldName1] = "FieldValue1"
Note If you are referencing the Order Form object as some other variable name than mscsOrderForm, use that name instead. Also, the variable iLineItem represents the lineitem number of the offer you are extending.
Logging Information
The Logging tab, displayed below, allows you to specify a directory in which to log response codes. Table 4 describes fields for the Logging tab.
For more information see the ICS2 Developer's Guide, available on the CyberSource Small Business Support Center, for a list of possible values.
Note You are not charged for errors, but are charged for declines.
Figure 4 Logging Tab
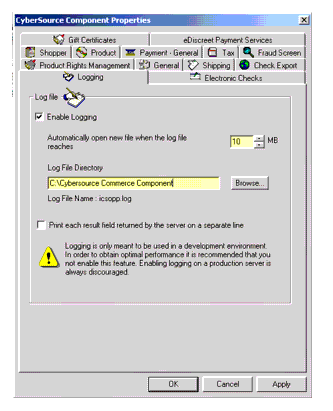
Note In a production environment, turn off logging for optimal system performance.
Table 4 Fields on the Logging TabThe list box enables you to click the up or down arrow to choose when to automatically open a new file when the file log reaches the size you specify.
The Print Each Result Field Returned By The Server On A Separate Line check box will cause each result field that is returned by the server to be printed on a separate line basis and not formatted in a paragraph.
Product Information
Each request that you send to CyberSource must contain at least some of the information specified in the Product tab, shown below. Table 5 describes the fields required in the Product tab for the CCC.
Figure 5 Product Tab
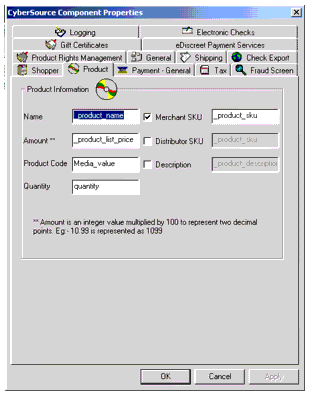 Table 5 Fields on the Product Tab
1099.
- You sell your own products directly, and you have registered an SKU with Digital Product Rights Management to represent an electronic product.
- You buy a product from a manufacturer, such as a software publisher, and you have registered an SKU with Digital Product Rights Management and mapped the SKU to the manufacturer's part number.
Shopper Information
Click the Shopper tab to display or configure shopper information. The Shopper tab appears as shown below. Use the Shopper tab to configure the appropriate data input source for your Web store. Table 6 describes the fields on the Shopper tab.
Figure 6 Shopper Tab
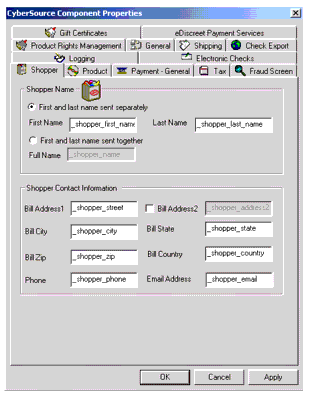
Testing ASP Pages with a Combined Shopper Name
Microsoft Site Server includes sample Web sites that use a single field for the shopper name. If you are using the test server, you can select the First and last name sent together option button to send the shopper name in a single field (the combined shopper name field). This option enables you the test the sample Web sites that are included with Site Server.
In a production environment, however, you need to send the first name and last name in separate fields. If you are using the production server, the option First and last name sent together will be disabled.
Note When you write ASP pages and create databases, store the first and last names in separate fields.
The combined shopper name field can store the shopper name in either of the following formats:
- <last name>, <first name>
- <first name> <last name>
If the string contains a comma, the text that proceeds the comma is the last name; the text that follows the comma is the first name. If the string does not contain a comma, the text that precedes the first space in the string is the first name; the text that follows the first space is the last name.
Table 6 Fields on the Shopper TabShipping Information
Click the Shipping tab to display or configure shipping information. The Shipping tab appears as shown below. All of these fields are optional. Use them when the shipping information is different from the information in the Shopper tab. Table 7 describes the fields on the Shipping tab.
Figure 7 Shipping Tab
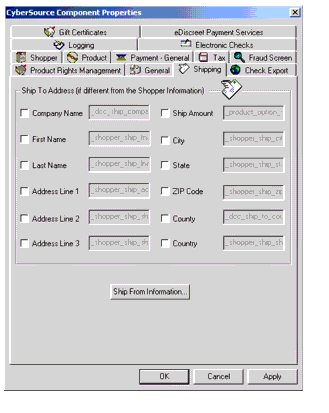 Table 7 Fields on the Shipping Tab
Click the Ship From Information button to open the Ship From dialog box, which is described in the following section.
Ship From Information
Use the Ship From dialog box, shown below, to specify information about the company that ships the product. The Ship From information, described in Table 8, is used to Calculate Sales Tax. To display this dialog box, click the Ship From Information button in the Shipping tab.
Figure 8 Ship From Information
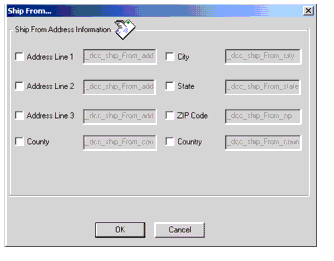 Table 8 Fields on the Ship From Dialog Box
| Copyright © 2002 CyberSource Corporation. |